 A Rapid Direct batch is required to enter receipts in this screen.
The Rapid Donation Receipt Entry form (show below) allows associations to quickly enter large amounts of donations. You can enter several donations at once (mouse-free) and then process all of them at a later time. Credit cards are processed at the end of data entry to increase performance, and are not stored to comply with PA-DSS.
A Rapid Direct batch is required to enter receipts in this screen.
After you have entered rapid donation receipts, you can review and edit them on the Rapid Donation Receipt Review screen.
To enter rapid donation receipts:
1. From the Personify360 main toolbar, select Donate > Rapid Donation Receipt Entry.
The Rapid Donation Receipt Entry screen displays, as shown below.
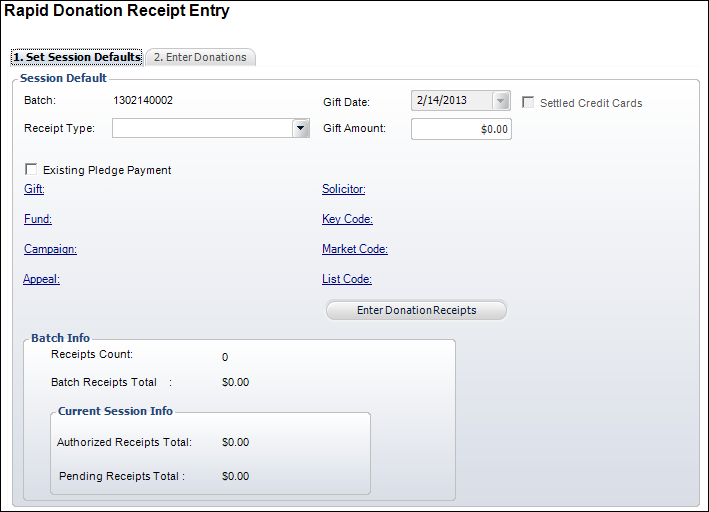
2. Select the Receipt Type from the drop-down menu.
3. Enter the Gift Amount.
If the selected gift is a FND "CASH" product with an agency discount, the Amount field is read-only and will be updated when payment is applied.
4. Select the Existing Pledge Payment checkbox, if necessary. When checked, the Gift link is disabled.
5. Click the Gift link and search for the appropriate gift.
6. Click the Fund/Campaign/Appeal links and search for which the gift was made, if necessary.
7. Click the Solicitor link and search for the solicitor assigned to the donor, if necessary.
8. Click the Key Code, Market Code, or List Code links and search for the codes related to the gift, if necessary.
If you select a Key Code, the Market Code and List Code are automatically populated and cannot be changed.
9. Click Enter Donation Receipts.
The Enter Donations tab displays, as shown on the next page.
10. From the Enter Donations tab (shown to the right), click the Donor ID link and search for the appropriate donor.
Begin typing in the constituent’s name and the search results will automatically be displayed as you type.
11. Select the Existing Pledge Payment checkbox, if necessary.
If selected, the system will automatically apply the payment to the existing payment schedule. When checked, all fields in the Gift or Pledge Info section are disabled.
12. Modify the Description, if necessary.
13. If the donation is a pledge, perform the following:
a. Enter the Total Pledge Amount.
b. Enter the number of Periods for the payment schedule.
c. Select the Pledge Frequency from the drop-down list.
14. Modify the gift Amount, if necessary.
15. Change the Receipt type, if necessary.
16. Modify the donor’s Name and Address, if necessary.
17. For cash and check receipts, enter the Check Number.
18. For credit receipts, enter the CC Number, Expiration Date, and CW2 number.
19. Modify the Solicitor, Fund, Campaign, Appeal, Key Code, Market Code, and List Code previously defined on the Set Session Defaults tab, if necessary.
20. Select the Anonymous checkbox is the donor wishes to remain anonymous. Otherwise, verify that name is the List As field.
21. To enter another donation by the same donor, click Same Donor, search for the appropriate gift, and update the necessary information.
22. To enter another donation by a different donor, click Next Donor, and repeat steps 10-20.
23. When all donations have been entered, click Authorize Receipts.
The Status of each donation is updated to “APPROVED”, as shown to the right.
24. Run the FND640 process and then the FND645 process.