OR
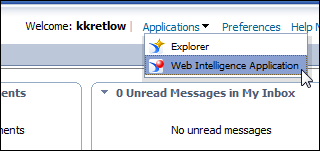
Select Applications > Web Intelligence Application, as shown below.
Data Analyzer gives you the option to create your own reports based on a specific query you create in the application. The reports can then be saved to one of your personal folders, known as My Folders, or to one of the Public Folders.
Data Analyzer allows you to use a saved Data Analyzer query to create a marketing list. To create a marketing list, it must be saved in either the public marketing lists folder or in your personal marketing lists folder. For public marketing lists (available to all users), save your Data Analyzer query in the All > Public Folders > Personify[version] > [Org_OrgUnit] > Marketing Lists folder. For example, All > Public Folders > Personify750 > NASE_NASE > Marketing Lists. For personal marketing lists, save your Data Analyzer query the All > My Favorites folder.
To create a Webi report using a query:
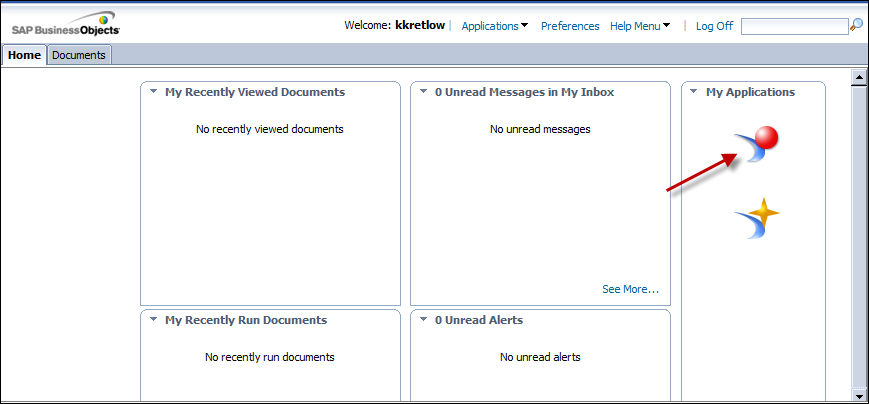
1. Click the Web Intelligence icon on the right navigation pane, as highlighted below.
OR
Select Applications > Web Intelligence Application, as shown below.
2. Click the new icon, as highlighted below.

The Create a new Web Intelligence Document window displays, as shown below.
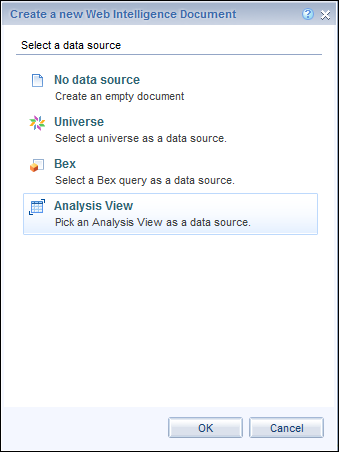
3. Select Universe and click OK.
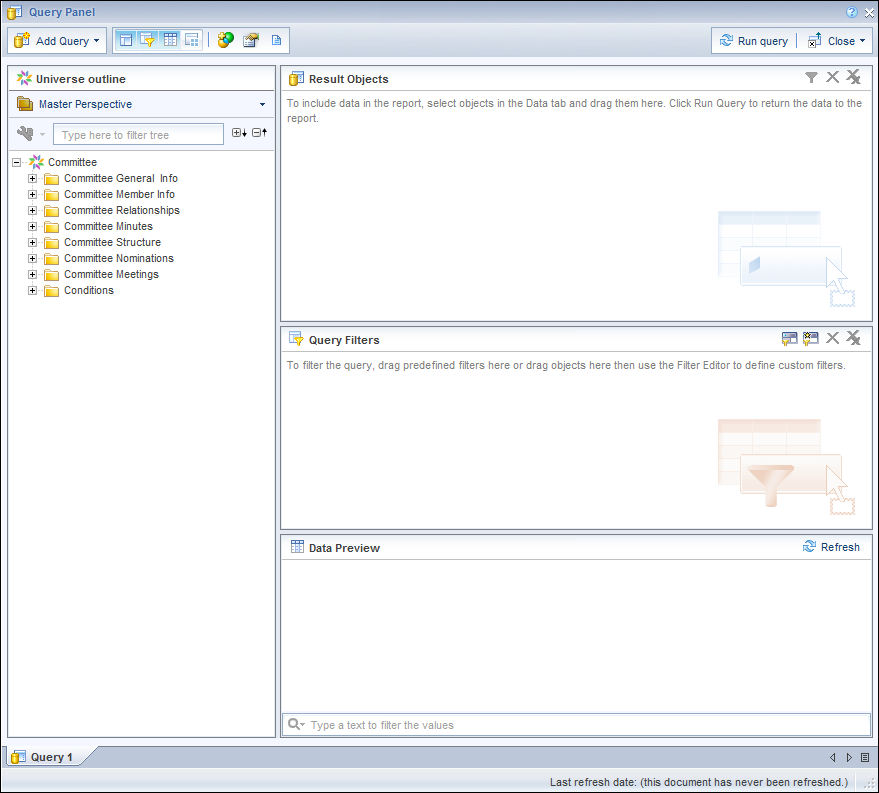
The Universe window displays, as shown below.

4. You can either navigate through the list of universes, or type the universe name in the search field, then click Enter.
5. Click and drag objects into the Result Objects section to specify what data you want to appear in your report.
For more detailed information on the objects available in each universe, please refer to Searching for Universe Objects in Data Analyzer.
 The Master Customer ID and the Sub Customer ID are required fields for the report if you want to use it to create a marketing list.
It is not necessary to have any other information appear in the report; however, having other fields such as name and email will not harm the creation of the report.
You can alter the order you want the result objects to appear by clicking and dragging them within the Result Objects box.
6. Click and drag objects into the Query Filters section to specify a filter based on each object you add.
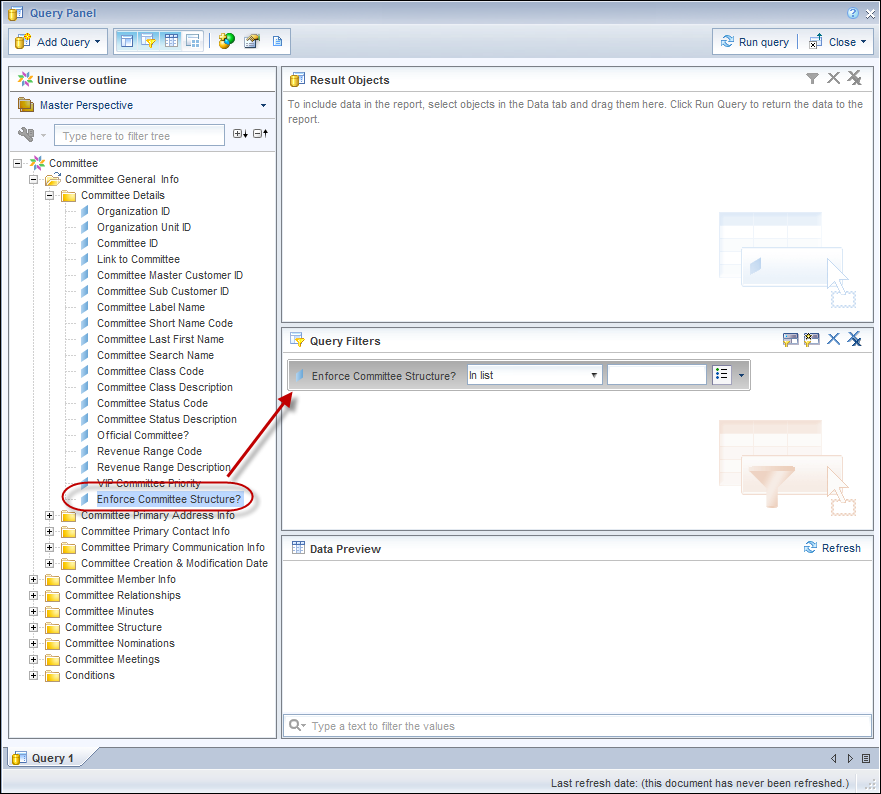
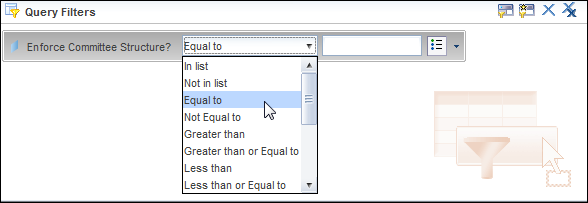
7. After adding each Query Filter, determine how you want the query to filter the results by selecting the values you will either accept or reject.
a. Select an option from the In List drop-down.
b. Enter the values into the provided entry field next to the In List field that correspond with your In List selection.
You can also choose the values from a list by clicking the list icon to the far right of the filter and selecting Value(s) from list from the drop-down.
c. Click the value from the list on the left, then click the arrow pointing to the Value(s) Selected box.
d. When you finish, click OK.
8. You can also add more queries, subqueries, or combined queries to your original query by using the options on the New Web Intelligence Document menu.
Select the option you want to add, and enter the details for the query/subquery/combined query just as you did for the first query.
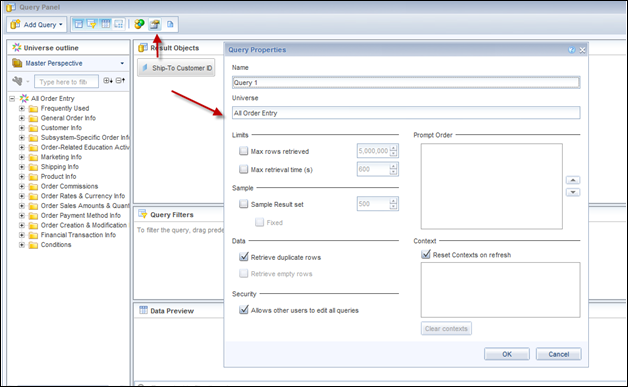
9. Click the Properties tab to edit your query’s properties such as its name and limits, as highlighted below.
10. When you finish editing your query, click Run Query.
The report appears on the workspace.
If after viewing the report, you want to edit the query, click Data Access > Edit and it will bring you back to the query screen for you to edit the settings. Make sure to click Run Query again after you have finished editing it.
11. To edit the report title, click the title’s text box (circled in red below) and enter a new title.

12. Click the green check mark or hit Enter to confirm the title.
13. To further edit the appearance and page layout including background color, background image, and margins, click the Format tab and alter the settings as desired.
14. When you complete your report, click Save As under the disk icon drop-down.
The Save Document window displays, as shown below.
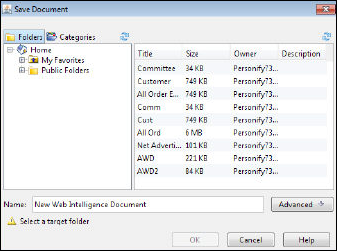
15. Enter the Name of the report.
16. If necessary, click Advanced Settings to define other settings to apply to the report.
17. Click on the folder you want to store your report in from the Location box.
To create a Marketing List with the report you just created, you must save it in one of three folders:
· Marketing List - located under Public Folders > [Environment Folder] (e.g., PPRO) > [OrgID_OrgUnit] (e.g., NSSWP_NSSWP).
· Marketing List - located under My Folders > Favorites.
· Favorites- located under My Folders.
If the Marketing List folder exists in the Favorites folder, the system will list the queries from this folder and not from the Favorites folder.
18. Click OK to finish creating and saving your report.
See Also:
· Adding a Personal Report to Data Analyzer