Maintaining Committee Meeting Minutes
Using this screen, you can store committee meeting minutes with a committee
record for future reference.
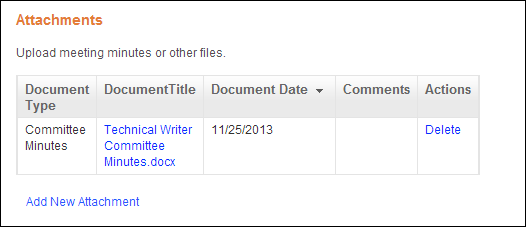
In addition, as of 7.5.1, you can view meeting minutes on the web for
a committee using the Attachments
control, as shown below.
 Prior
to 7.5.2, you were unable to change the document type on the Resume/Related
Documents screen and if an individual added a document other than minutes
to a committee on the web using the Attachments control, you were unable
to view these attachments on the this screen; the only document type that
was stored in the back office for committees was committee minutes. As
of 7.5.2, you can define additional document types in the non-fixed system
type CUS
"RELATED_DOC" and these documents are stored on the Resume/Related
Documents screen. COM
“RELATED_DOC” is being used in conjunction with an upgrade script,
so that existing minutes files that were saved in the past are accessible
after upgrading to 7.5.2. In future releases, COM
“RELATED_DOC” and CUS
"CUSTOMER_DOCUMENT" will be depreciated.
Prior
to 7.5.2, you were unable to change the document type on the Resume/Related
Documents screen and if an individual added a document other than minutes
to a committee on the web using the Attachments control, you were unable
to view these attachments on the this screen; the only document type that
was stored in the back office for committees was committee minutes. As
of 7.5.2, you can define additional document types in the non-fixed system
type CUS
"RELATED_DOC" and these documents are stored on the Resume/Related
Documents screen. COM
“RELATED_DOC” is being used in conjunction with an upgrade script,
so that existing minutes files that were saved in the past are accessible
after upgrading to 7.5.2. In future releases, COM
“RELATED_DOC” and CUS
"CUSTOMER_DOCUMENT" will be depreciated.
To maintain meeting minutes:
1. From the
Personify360 main toolbar, select Customers
and Committees > Committee Central.
The Committee Central search screen displays.
2. Create
a new committee or search for and select an existing committee.
3. From the
Common Tasks task category, click Maintain
Minutes and Other Files.
The Resume/Related Documents screen displays on the Demographics tab, as
shown below.
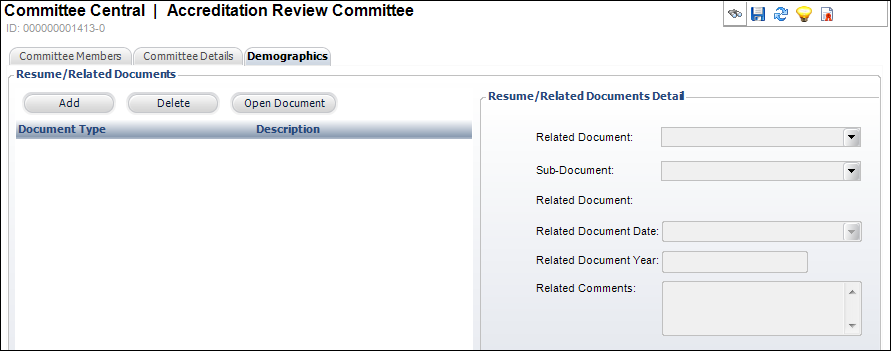
4. Click
Add.
The Open window displays.
5. Search
for and select the appropriate document.
6. Select
the Related Document type from
the drop-down.
Values in the drop-down are populated based on the non-fixed codes defined
for the COM "RELATED_DOCS"
system type.
7. If necessary,
select the Sub-Document type from
the drop-down.
Values in the drop-down are populated based on the subcodes defined for
the non-fixed codes defined for the COM "RELATED_DOCS"
system type.
8. The Related Document Date defaults to
today. If necessary, change this date.
9. The Related Document Year defaults to
this year. If necessary, change the year.
10. If necessary,
enter any Related Comments.
11. If necessary,
highlight a document and click Open Document.
The document opens. The system copies the document to a local TEMP folder
and opens it using Windows standard file relationships.
12. Click
Save.
See Also:
· For the
different actions you can perform after setting up a committee, refer
to Working
with Committees in Committee Central.
· For the
list of reports you can run for a committee, see Committee
Reports.
· For more
information on how to create a new committee, refer to Creating
a New Committee.
· For the
system types and codes you must set up for committees, refer to Committees
System Types and Codes.