 Components
are always $0.
Components
are always $0.You can choose to add a components to the subscription using the Define Components screen. For example, you can choose to add membership dues if only members are allowed to order the subscription.
If revenue needs to be recognized from a bundle of products, the combination of products should be created as a package. Unlike components, each detail included in a package is priced at the product level. A rate structure and rate code can be associated with a component product in the Membership and Subscription subsystems.
Components
are always $0.
To add components to the subscription:
1. From the
Personify360 main toolbar, select Products > Product
Central.
The Product Maintenance search screen displays.
2. Click Search to find a product or click Create New Product.
3. From the
Define the Product task category, click Define Components.
The Components screen displays, as shown below.
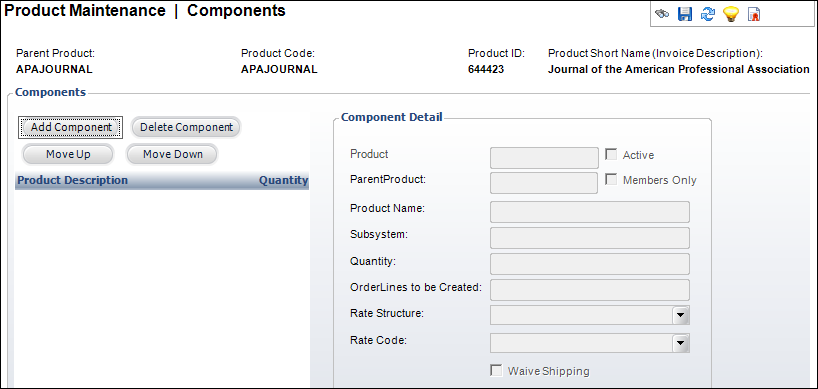
4. Click
Add Component.
The Product Chooser window displays.
5. Select the appropriate product to add as a component.
6. Enter the Quantity of the product you want to add.
7. If necessary, enter the Order Lines to be Created number.
8. If necessary, select a Rate Structure and Rate Code.
9. Check the appropriate checkboxes:
· Active
· Waive Shipping
10. If necessary, use the Move Up and Move Down button to arrange the components in the correct order.
11. Click Save.
Screen Element |
Description |
|---|---|
Components |
|
Add Component |
Button. When clicked, the Choose Product screen displays. Search for a component and double-click it to add it to the table. The fields in the Component Detail section are populated. |
Delete Component |
Button. When clicked, the highlighted product is deleted as a component. |
Move Up |
Button. When clicked, the highlighted product is moved one row up in the grid. |
Move Down |
Button. When clicked, the highlighted product is moved one row down in the grid. |
Component Detail |
|
Product |
Link. The component product fills in this field automatically. Click the link to open the Choose Product screen and search for a new product. |
Parent Product |
Read-only. Brought in from the product search for new records or from the PRODUCT COMPONENT table for existing components. |
Active |
Checkbox. When checked, it signifies the component is active. |
Members Only |
Read-only. Disabled unless the product is members-only. |
Product Name |
Read-only. The name of the product selected from the Product field. |
Subsystem |
Read-only. Subsystem associated with the product. |
Quantity |
Text box. The quantity of the component that should be included. |
Order Lines to be Created |
Text box. How many order lines you want created based on the quantity given. |
Rate Structure |
Drop-down. Validated against the rate structure table. When set, this specific rate structure will be used on the order detail record created when the product is ordered. |
Rate Code |
Drop-down. The rate or price associated with the rate structure selected. |
Waive Shipping |
Checkbox. When checked, this component will not be included in any calculation of shipping charges. |