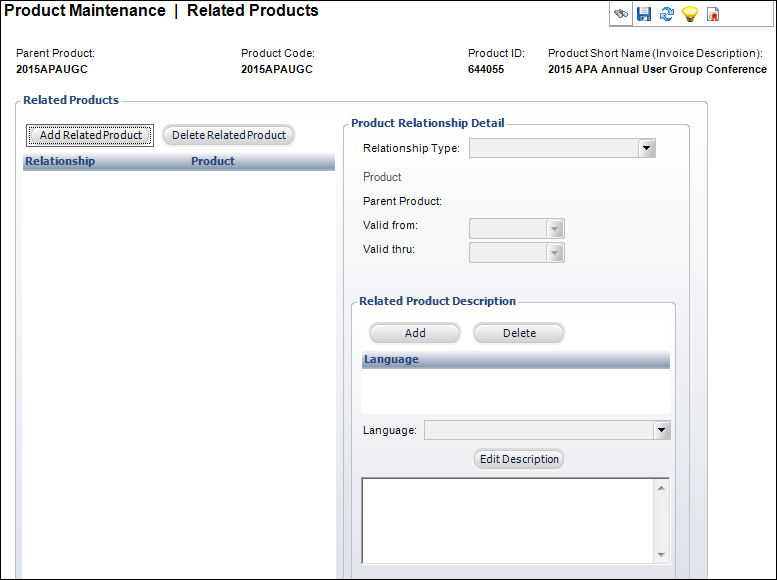
The Related Product screen displays, as shown below.

Here you can associate an active meeting product with other products. An example would be defining inventory products that could be substituted for a back-ordered item.
To setup related products:
1. From the
Personify360 main toolbar, select Products > Product
Central.
The Product Maintenance search screen displays.
2. Click Search to find a product or click Create New Product.
3. From the
Relationships task category, click Related Products.
The Related Product screen displays, as shown below.

4. Click
Add Related Product.
The Product Chooser screen displays. Enter information and search for a
product. Double-click a product to add it to the table.
5. Select the Relationship Type from the drop-down.
6. Select the Valid from date from the drop-down.
7. If necessary, select the Valid thru date from the drop-down.
8. Optionally, if you would like to add a sales script for the customer service representative to read to the customer during order entry, add a description of the related product
a. From the Related Product Description, click Add.
b. Select the Language from the drop-down.
c. Click
Edit Description.
The HTML Editor Dialog window displays.
d. Enter the related product description.
e. Click OK.
9. Click Save.
Screen Element |
Description |
|---|---|
Related Products |
|
Add Related Product |
Button. When clicked, a row is added to the Related Products table and the corresponding fields are enabled to add a product for the selected relationship type. |
Delete Related Product |
Button. When clicked, the highlighted row from the table and the information entered in the Product Relationship Detail fields are deleted. |
Product Relationship Detail |
|
Relationship Type |
Drop-down. Defines the relationship between the product and the selected related product. Values in the drop-down populated based on the fixed codes defined for the ORD "RELATION_TYPE" system type.
|
Product |
Link. This provides the list of valid options and populates product, sub-product, and description fields for the selected product. |
Parent Product |
Read-only. Populated from the product search. |
Valid from |
Drop-down. Start date of the relationship. |
Valid thru |
Drop-down. Optional end date for the relationship. |
Related Product Description |
|
Add |
Button. When clicked, a row is added to the Related Product Description table and the fields in the Related Product Description section are enabled. |
Delete |
Button. When clicked, the highlighted row from the Related Product Description table and the information entered are deleted. |
Language |
Drop-down. Identifies the language of the text. This allows descriptive text to be shown on the website based on the language of the customer. Values are populated based on the options defined on the Language Maintenance (APP004) screen. |
Edit Description |
Button. When clicked, opens the HTML Editor Dialog window to enter a description of the related product. |