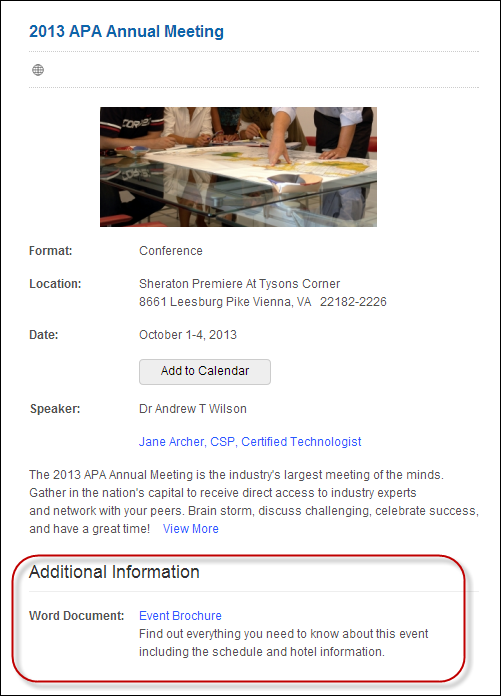
You can associate an active meeting product with documents, images, or abstracts. Meeting products can be linked to user guides, product rebates, or other product instructions. These files will appear on the Meeting Details control for web-enabled meeting products, as displayed below.
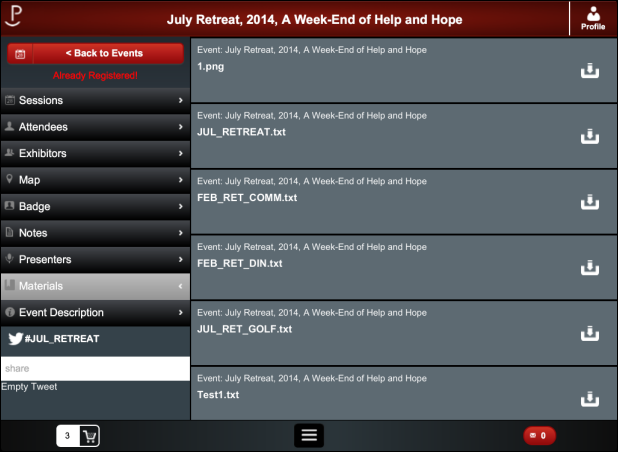
In the mobile application, users can access and download related files right to their mobile device using the Materials menu option. Selecting a material item presents the user with the option to save and open multiple file types, as displayed below.
 The materials are displayed in the order that they are returned from the "MobileGetMeetingListing" data service. That order is alphanumeric within PRODUCT_ID. At the meeting level, what you are seeing below is the materials for the conference and its sessions in ascending PRODUCT_ID order. Within a particular PRODUCT_ID, the sort is alphanumeric. See Service Operation:MobileGetMeetingListing for more information.
To set up related files:
1. From the Personify360 main toolbar, select Products > Product Central.
The Product Maintenance search screen displays.
2. Click Search to find a product or click Create New Product.
3. From the Relationships task category, click Related Files.
The Related Files screen displays, as shown below.
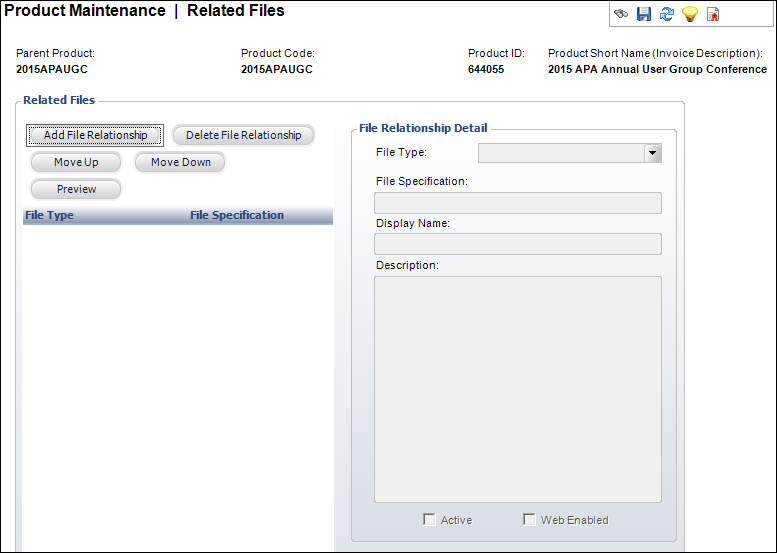
4. Click Add File Relationship.
The Open window displays.
5. Search for and select the file to relate to the product.
 When uploading files, it is very important that your file name does NOT contain spaces, because mobile users will be unable to download the materials. If you need to separate words in the file name, use an underscore instead of a space.
6. Select the File Type from the drop-down.
Values in the drop-down are populated based on the non-fixed codes defined for the ORD "FILE_TYPE_CODE" system type.
7. The File Specification and Display Name default based on the selected file. Edit these if necessary.
As of 7.5.0, the Display Name field indicates what will be displayed in the Additional Information section on the web.
The file name in Personify360 must match the file name on your computer and be less than 40 characters in order for the file to upload correctly into the mobile app.
8. Enter a Description about the file.
9. As of 7.5.0, by default, the Active checkbox is checked. Uncheck this, if necessary.
10. As of 7.5.0, check the Web Enabled checkbox if you want the related file to display in the Additional Information section on the product detail page on the web.
11. Click Save.
12. Repeat the steps above to add any additional related files. As of 7.5.0, use the Move Up and Move Down buttons to arrange the order in which you want the related files to display on the web.