This report displays the same type of data on the web to chapter managers that staff users monitor in Personify360's Subgroup Central screen. However, on the web, it displays the visual version of the statistics that are displayed in Personify360's Subgroup Central screen.
· Pie Chart
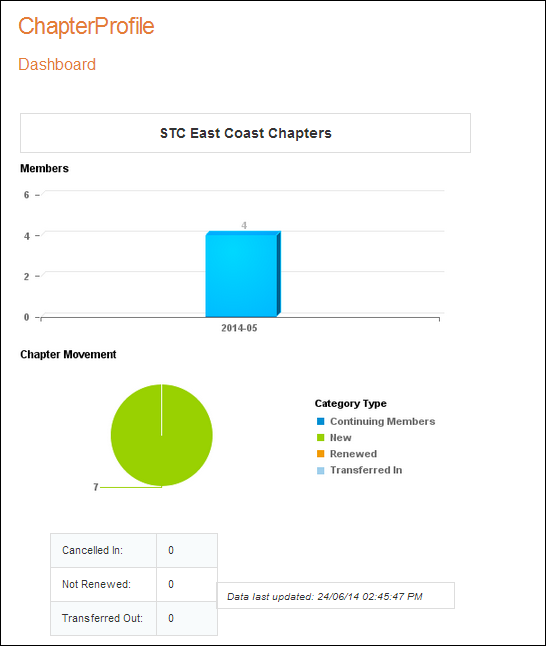
Displays new, transferred in, continuing, and renewed members.
o New members refers to chapter members that are new to the chapter this month.
o Transferred in members refers to chapter members that are new this month due to a transfer from another chapter.
o Continuing members refers to chapter members in their second or later month of chapter membership for this year.
o Renewed members refers to chapter members that renewed their chapter membership this month.
· Table
Shows chapter members that have transferred out, cancelled, or have not
renewed.
o Transferred out indicates how many chapter members have transferred out of the chapter this month and into another chapter.
o Cancelled indicates how many chapter members have cancelled their chapter membership this month.
o Not renewed indicates how many proforma orders remain for this chapter for this month (i.e., renewals that were generated, but were not activated/paid).
· Chart
Indicates how many members were active during each period when MBR700 was
run and indicates which month and year each count is for.
After configuring the Report control to run the Analysis of Chapter
Health - MBR1016 report on the web, a chapter manager will see the report
display similar to what is shown here. For more information about
this report, refer to Analysis of Chapter Health - MBR1016.
The section below details how to set up the Report control to display the Analysis of Chapter Health - MBR1016 report on your website, which is a webi report. The instructions are intended for a user with web admin/host privileges.
This report must be deployed in the BusinessObjects server before group managers are able to run this report on the web. See BusinessObjects Installation for more information. In addition, this control uses the service operation "GetOnlineReportGenerateURL" from data services. The control uses this URL, which connects to the BusinessObjects server, to open or render the report in the current page in the form of PDF. Through the service operation "GetOnlineReportGenerateURL", data services generate the URL. See Personify Data Services for more information.
This report differs from the other report types since it is HTML based, it opens directly on the page. Information is not automatically updated on these dashboards on this report. In order for your chapter manager to view the most up-to-date and meaningful information, you should schedule the following reports to run monthly:
· MBR900 to update the fulfill status of membership orders and to populate a reporting table called Cus_Current_Membership_Info
· CUS603 to maintain the segment based on who is currently in the subgroup
· MBR700 to pull in new members and remove expired members.
It is expected that a monthly view is standard, and because the report spans 13th months back, group managers can compare this time to last year. If your organization runs these reports on a different cadence, then you will need to evaluate the dashboard trend graph, which displays on the Report control when configured for the Analysis of Chapter Health - MBR1016, to determine if it is showing meaningful data to your chapter manager. If not, you may wish to swap the base graph out for a custom graphic that is more meaningful to your business.
You should not drop this report on high-usage pages. Personify to provide recommended numbers after load testing. Alternative is to provide the report as a webi PDF (less demand)
 You
MUST have a proper named user license in order to be able to view the
report(s) online.
You
MUST have a proper named user license in order to be able to view the
report(s) online.
To configure the web settings for the Report control:
1. Add the
"PersonifyBoReport" to the desired page. For more information,
please see Adding a Page on
Your Site Using DNN.
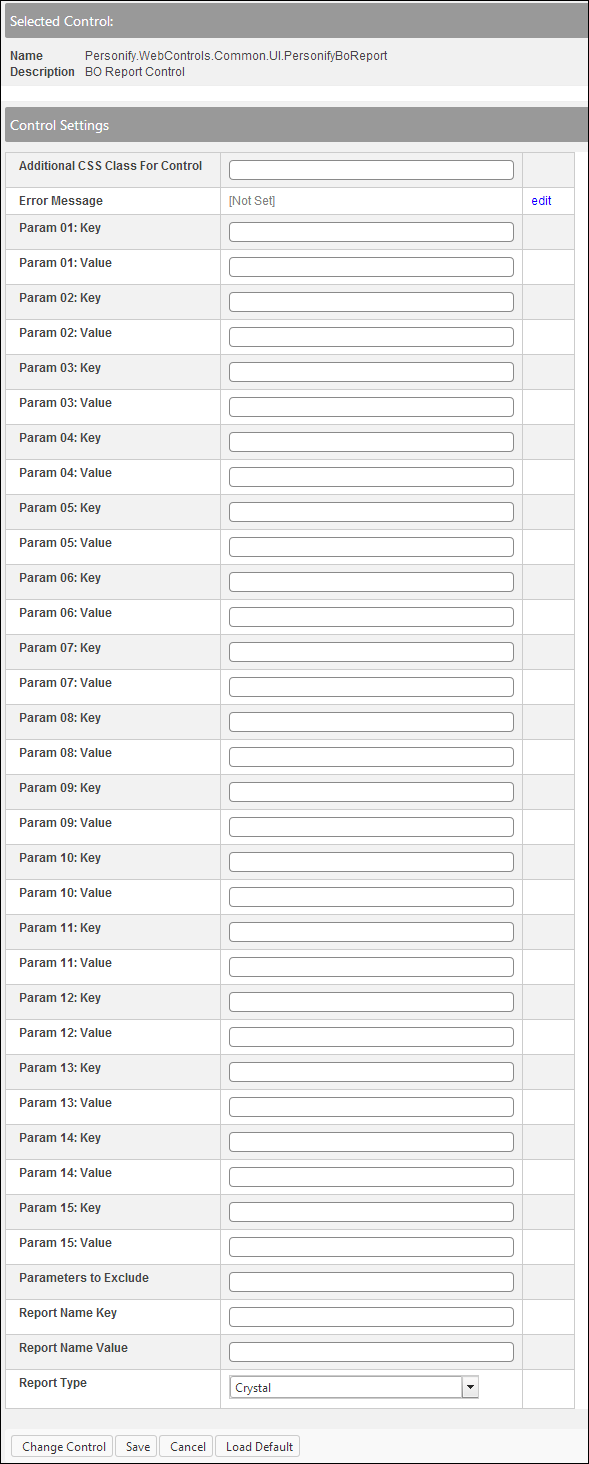
The Control Settings for this control display, as shown below.
 Text fields
have a 250 character limit.
Text fields
have a 250 character limit.
2. If
necessary, in the Additional CSS Class for Control
field, enter the CSS class.
This option allows you to add additional layout to the skin by developing
a new DOTNETNUKE style, which requires an advanced understanding of HTML
and CSS. See Applying
a Default Site Container for information.
3. If
necessary, select or create a new Error Message.
The error message will display on the control for the action that was being
performed at the time of the error.
a. If left blank, the default error message, "An error occurred while performing [Insert Action]. If the problem persists, please contact the site administrator", will display. [Insert Action] will be substituted with the action the control was performing at the time of the error.
b. If you wish to change the default error message, customize it with a PWF Parameter. See Setting up PWF Parameters to learn more about these parameters and why your website's redirect URLs are managed there.
Although
there are more fields listed on the Report control, the settings listed
are the only values necessary in order to run this report on the web.
4. In the Param 01: Key field,
enter "SubgroupMasterCustomerID".
This is the report parameter key. This is the group master customer ID
for which the report is being run.
5. In the Param 01: Value field,
enter "pb_AFMRosterBag%$%GroupMCID".
This is the report parameter value. See Logic
Behind the Report Control for more information.
6. In the Param 02: Key field,
enter "SubgroupSubCustomerID".
This is the report parameter key. This is the group sub customer ID for
which the report is being run.
7. In the Param 02: Value field,
enter "pb_AFMRosterBag%$%GroupSCID".
This is the report parameter value. See Logic
Behind the Report Control for more information.
8. Leave the Param 3-15 Value and Key fields empty.
9. Leave the Parameters to Exclude and Report Name Key fields empty.
Although
there are more fields listed on the Report control, the settings listed
are the only values necessary in order to run this report on the web.
10. In the Report Name Value
field, enter "Analysis of Chapter Health-MBR1016".
The "Report Name Value" field tells BusinessObjects the type
of report you want to render. It needs to be an EXACT match, since BusinessObjects
is searched based on the report's name in order to render the report on
the web. If you do NOT know this value, the report will not run and no
results will be rendered. See BusinessObjects
for more information.
11. From the Report Type drop-down, select "Web-HTML".
12. Click Save.