The following page displays:
The Reporting web module allows you display BusinessObjects reports on your websites. There are two parts to configuring this web module:
1. Editing the Master Report List.
2. Editing the Reporting Settings.
To edit the master report list:
1. Log into your site as Host.
2. Navigate to the appropriate page on your site where you want to add the Reporting web module.
3. Add the Personify – One Click Donation module to where you want it to be located on your page. See Adding a Web Module to the Webpage for more information.
4. From the pencil icon,
select Edit Master Report List.
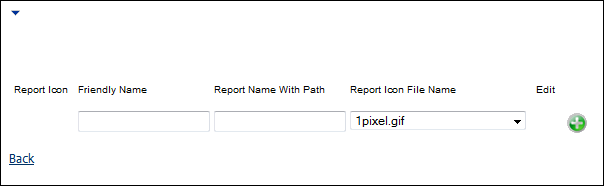
The following page displays:
5. Configure the appropriate module settings as described below:
· Report Icon - Read only table column. If an icon has been selected from the Report Icon File Name drop-down, it will appear in this column.
· Friendly Name - Text field. Enter the display name for the report.
· Report Name with Path - Text box. The file path on your database where the report can be found.
 This needs
to be entered manually. There are plans to have e-Business obtain this
file path programmatically in a future release.
This needs
to be entered manually. There are plans to have e-Business obtain this
file path programmatically in a future release.
· Report Icon File Name - Drop-down. Allows you to select an icon from database that you want to visually represent your report.
· Add - Button. After entering the Friendly Report Name and Report Name with Path the Add button enters the information into the table.
6. Click Add.
7. Click Back.
Your report
information is saved when you click Add. It is for this reason that there
is no Update link as in the other web modules.
To edit the report settings:
1. Click
Edit Reporting Setting from the drop-down or
the link below the web module.
The Edit Reporting Settings screen displays with the following options:
· Display Report In Page - Radio button. When this option is selected, the BO report displays within the page. You may only display one report per web part when this option is selected.
· Display List of Reports As Hyperlink - Radio button. When this option is selected, the BO report displays in a new window. This option allows you to provide multiple reports within the web part.
2. If you selected the
Display Report in Page radio button, the following
page will display:
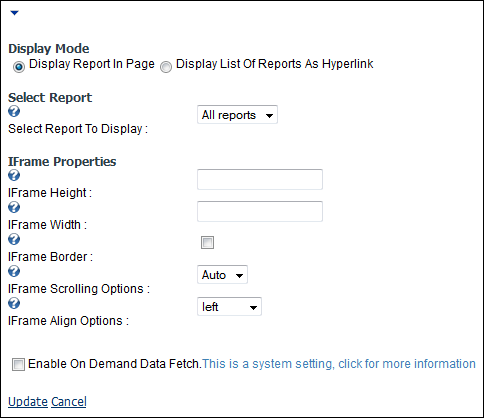
a. Configure the appropriate module settings as described below:
· Select Report To Display - Drop-down. When the “Display Report In Page” option is selected, you may only display one of the reports you set up in the Edit Master Report List section. The reports display in this drop-down.
If Display
Report In Page is selected you can only display one report.
· IFrame Height - Text box. This is the height (in pixels) the report will display in. This defaults to 200.
· IFrame Width - Text box. This is the width (in pixels) the report will display in. This defaults to 200.
· IFrame Border - Checkbox. Allows you to select whether or not you want a border to display around the report.
· IFrame Scrolling Options - Drop-down. Allows you to select whether or not you want the customer to be able to scroll through the report or whether you want the system to automatically determine when scrolling is necessary.
· IFrame Align Options - Drop-down. Allows you to select where to align the report on the page.
3. If you
select Display List Of Reports As Hyperlink: the
following page displays:
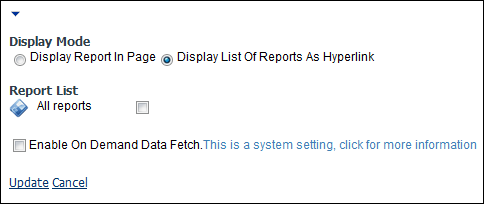
a. The list of all the Master Reports you created in the previous section displays, check the checkbox of the report(s) you want your customers to have access to.
4. Click Update.
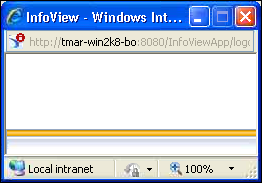
After setting up the Reporting web module, it may appear, as below, to your customers:

In this example, the report is titled "All Reports."
When
the customer clicks on the report and then closes the report window, a
pop-up displays in the bottom, left hand corner of the screen, as shown
below.
This pop-up releases the BO license from the BO server when the customer
closes the report in order to reduce the number of licenses used. This
pop-up is required, but will not stop the customers from proceeding.