
The following page displays:
The Product Directory web module lists for a product class, categories, or subcategories in e-Business. This web module is also used for listing product classes for a given subsystem. You can even use this web module to set up an icon image and sort order for a group of products.
Once you have set up the Product Directory web module for use within your website, you need to configure it.
To configure the Product Directory web module:
1. Log into your site as Host.
2. Navigate to the appropriate page on your site where you want to add the Product Directory web module.
3. Add the Personify – Product Listing module to where you want it to be located on your page. See Adding a Web Module to the Webpage for more information.
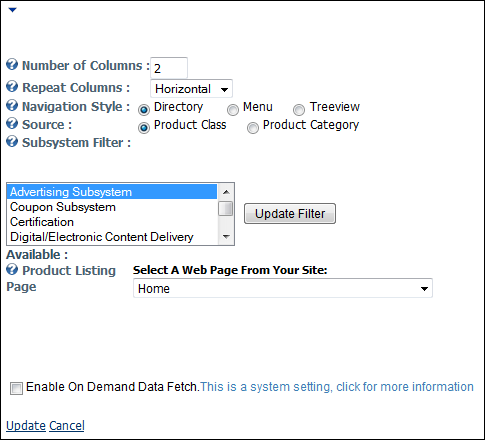
4. From the
pencil icon, select Edit, as highlighted below.
The following page displays:
5. Configure the appropriate module settings as described below:
· Number of Columns - Text box. The number entered here determines the number of column your data displays in when using the Product Directory module.
· Repeat Columns - Drop-down. This setting determines if columns with identical information are displayed horizontally or vertically.
· Navigation Style - Radio button. This setting determines if your data is displayed as a directory, menu, or a tree view.
· Source - Radio button. This setting determines if you wish to display product classes or product categories when using the Product Directory.
· Subsystem Filter - Drop-down and Button. This filter lets you select which subsystem or category to display. If you select Product Class for the Source setting, you can select one or more subsystems. If you select Product Category, you can select one or more product categories.
· Available - This setting displays a table with an item code, item description (which you can modify), a checkbox that allows you to include a particular item code for display, select sort order, and the option of adding a URL for an icon image.
· Product Details Page - Drop-down. This setting determines the webpage to which the customer is directed upon clicking the Product Details link.
6. Click Update.
Depending on the selected navigation style, the links will display differently.
The following image is an example of how your customers will see the Product
Directory Web module with the Menu navigation style.
