The following page displays:

The My Subscription Info web module is used to display the active subscriptions for the member or customer logged into e-Business. This module also can be setup to allow users to renew their subscriptions from the web.
To configure the My Subscription Info web module:
1. Log into your site as Host.
2. Navigate to the appropriate page on your site where you want to add the My Subscription Info web module.
3. Add the Personify – My Subscription Info module to where you want it to be located on your page. See Adding a Web Module to the Webpage for more information.
4. From
the pencil icon, select Edit, as highlighted
below.

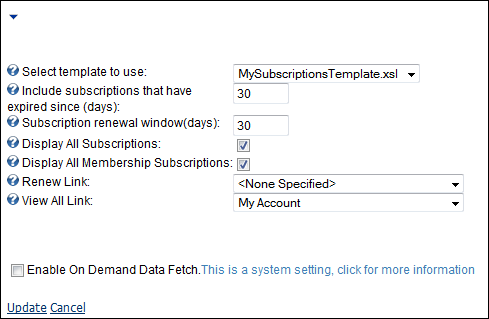
The following page displays:

5. Configure the appropriate module settings as described below:
· Select template to use - Drop-down. This setting allows you to determine which template to apply to the web module.
· Include subscriptions that have expired since (days) - Text box. This setting allows you to include as “active” any subscriptions that have expired within a given number of days. The default amount is “30”.
· Subscription renewal window (days) - Text box. This setting allows you to determine how many days before a subscription expires that a renewal option appears.
· Display All Subscriptions - Checkbox. When checked, all of the customer’s subscriptions display, regardless of status.
· Display All Membership Subscriptions - Checkbox. When checked, a second section will display showing "My Member-Benefit Subscriptions."
· Renew Link - Drop-down. This setting allows you to chose the page users are redirected to when they click the “Renew” link. For example, you can link the “Renew” link to a page with the Pay Orders module, if the Pay Orders module is configured for Pay Renewals.
 The renewal
order must already exist for users to be able to renew their subscription.
· View All Link - Drop-down. This setting allows you to choose the webpage the customer is directed to upon clicking the View All button.
6. Click Update.
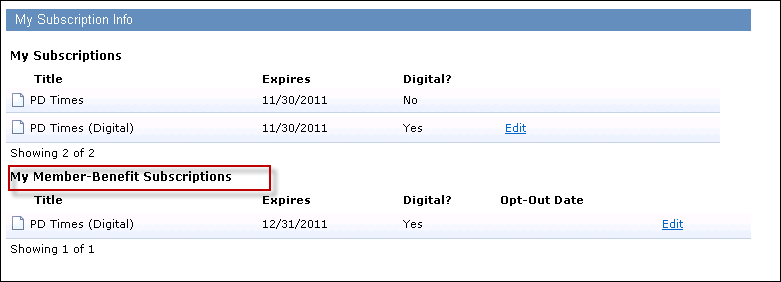
After setting up the My Subscription Info module, it may appear, as
below, to your customer.

This module displays to the customer their current subscription and expiration
date. It can also be configured to show expired subscriptions, as well
as allow the customer to renew the subscription.
 Beginning
in release 7.4.0, the membership benefit subscriptions will display in
this module.
If the"Display All Membership Subscriptions" is select in
the module setup, the "My Member-Benefit Subscriptions" section
will display all subscriptions through the current membership product.

A publication can have a print and digital version available to subscribers. At the subscription product setup level, the product setup provides a way to link the print publication product to a digital publication product.If the subscription product has been defined with a related print subscription product, the subscriber will be given the option to transfer their digital subscription to a print subscription.
· The cycle end date of the digital publication is set to the batch date minus one day, if a batch is open, or to the current date minus one day, and the fulfill status is set to "X" (Transferred).
· Initial Begin Date, Original Order Number, Original Order Line Number in the new print publication order line are set to the same values in the digital publication order line.
· Transferred From Order Number, Transferred From Order Line Number, Transferred To Order Number and Transferred To Order Line Number are set
· Receipts, transfers, refunds are prorated and transferred.
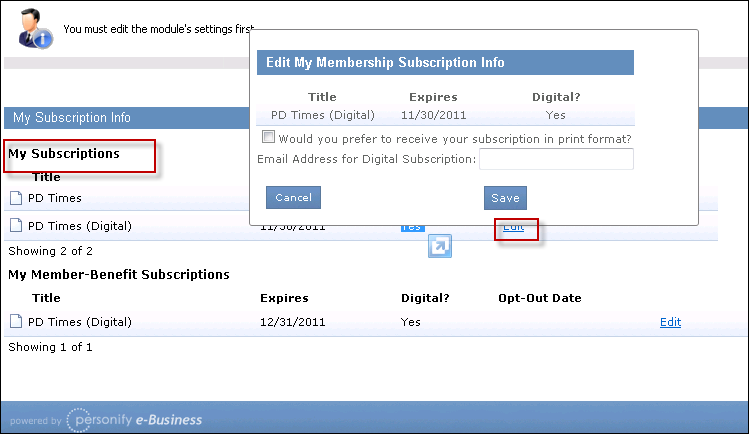
1. From the
My Subscriptions list select Edit at the end
of a title.
The Edit My Subscription Info pop-up displays.
2. Select the checkbox to change from Digital to Print.
3. Enter the email address where Digital subscriptions will be delivered.
4. Select Save
to complete the order change.

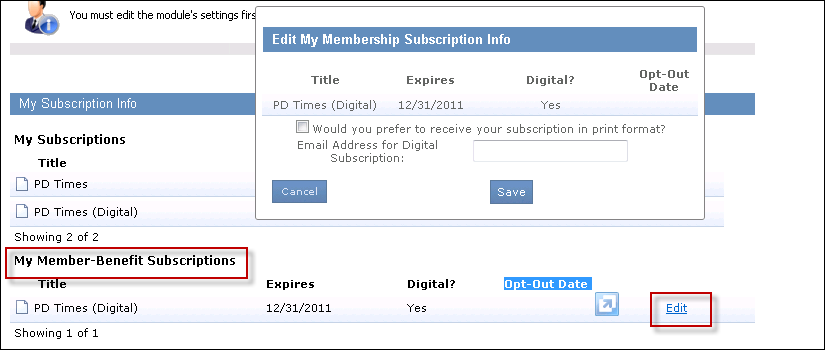
1. From the
My Member-Benefit Subscriptions list select Edit
at the end of a title.
The Edit My Subscription Info pop-up displays.
2. Select the checkbox to change from Digital to Print.
3. Enter the email address where Digital subscriptions will be delivered.
4. Select
Save to complete the order change.
