
The following page displays:
The My Orders web module acts as a search panel that allows you to look up any existing or processed orders for a customer.
To configure the My Orders web module:
1. Log into your site as Host.
2. Navigate to the appropriate page on your site where you want to add the My Orders web module.
3. Add the Personify – My Orders module to where you want it to be located on your page. See Adding a Web Module to the Webpage for more information.
4. From the
pencil icon, select Edit, as highlighted below.
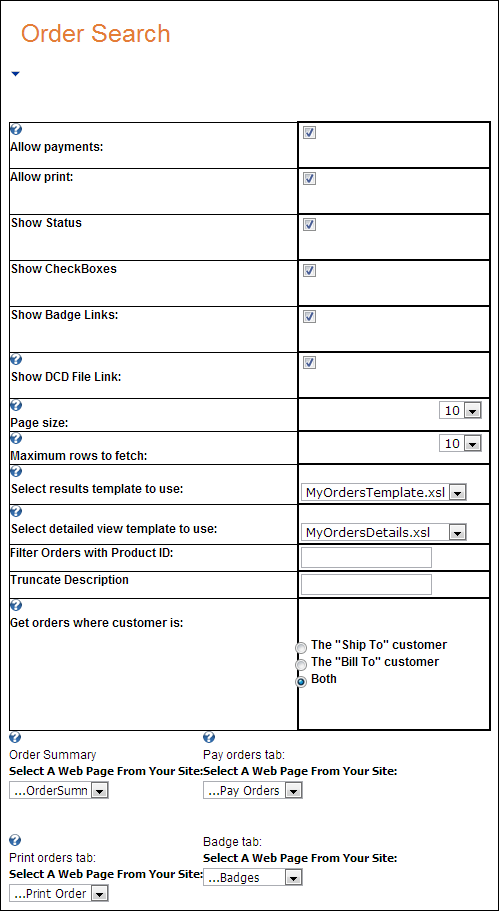
The following page displays:
5. Configure the appropriate module settings as described below:
· Allow payments - Checkbox. When checked, customers are allowed to make payments from the My Orders web module page.
· Allow print - Checkbox. When checked, customers are allowed to print copies of their order.
· Show Status - Checkbox. When checked, the status of the customer’s order displays.
· Show Checkboxes - Checkbox.
· Show Badge Links - Checkbox. When checked, customers can access badges for meeting orders via a link.
· Page size - Drop-down. This setting allows you to control the number of orders that display on the page.
· Select results template to use - Drop-down. This setting allows you to choose the template to apply when displaying results.
· Select detailed view template to use - Drop-down. This setting allows you to choose the template to apply when displaying the detailed view of an order.
· Filter Orders with Product ID - Text box. Allows you to enter a specific product ID by which to filter orders.
· Truncate Description - Text box. This setting allows you to define a maximum character length of the product’s description. By default, the entire (long) description is shown.
· Get orders where customer is - Radio button. This setting determines whether to display order information where the customer is the ship-to customer, bill-to customer, or both.
· Order Summary - Drop-down. This setting determines the page to which the customer is directed to upon clicking the Order Summary button.
· Pay orders tab - Drop-down. This setting determines the page to which the customer is directed to upon clicking the Pay Orders button.
· Print orders tab - Drop-down. This setting determines the page to which the customer is directed to upon clicking the Print Orders button.
· Badge tab - Drop-down. This setting determines the page to which the customer is directed to upon clicking the Badges button.
· Show first 30 orders- Checkbox. As of 7.4.2, when checked, by default it will only show the first thirty orders. If this checkbox is unchecked, the results will override the default order settings. As a best practice, keep make sure that Show first 30 Orders is checked so that the most current orders are displayed.
6. Click Update.
After setting up the My Orders module, it may appear, as below, to your
customer.
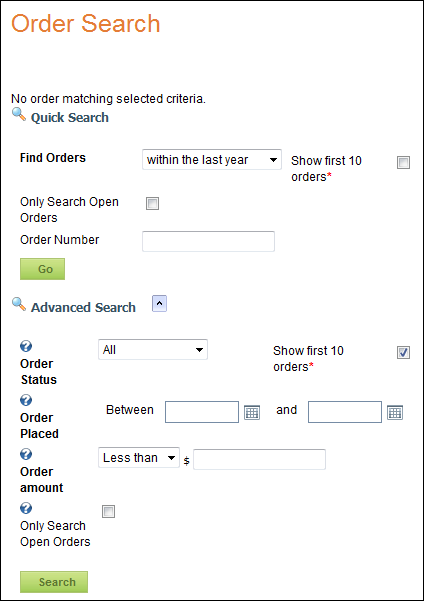
A search control is presented allowing the customer to search for any products, including those not purchased via the web. As of 7.4.2, when the user checks the Show first 30 orders checkbox, and searches for orders, the maximum of thirty orders will display. When the user selects "Show all orders" even if the Show first 30 orders checkbox is checked, the system will override this checkbox.
Clicking the “+” sign allows the customer to see a more detailed view of the product. Clicking the Order Number allows the customer to view the Order Summary page for the order.
For meeting products, the customer also has the option to view all the badges that were awarded for the meeting product.