
The following page displays:
The Customer Demographics web module gives associations the ability to gather personal demographic information from members over the association's website. This web module directly updates member demographic information stored in all customer record types:
· Individual (I)
· Company (C)
· Committees (T)
Any updates made to the website are directly carried over to Demographics Information for customer record types (individual, company, and committees). In addition, for individual customers (I), direct updates can be made to the member's education, special interests, and special needs information.
Once you add the web module on the desired page, you must configure it using the web module’s setting menu. This only needs to be done the first time that you configure the web module and is done using a wizard-like menu.
To configure the Demographic web module:
1. Log into your site as Host.
2. Navigate to the appropriate page on your site where you want to add the Customer Demographic web module.
3. Add the Personify – Customer Demographic module to where you want it to be located on your page. See Adding a Web Module to the Webpage for more information.
4. From the
pencil icon, select Edit, as highlighted below.
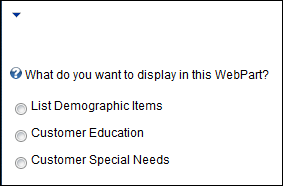
The following page displays:
5. Configure
the appropriate module settings as described below:
What do you want to display in this web part:
· List Demographic Items - Radio button. Select this option to display information about an individual's special interests including, for example, professional areas of practice, other association affiliations, etc
· Customer Education - Radio button. Select this option to display specified education related information on a customer's profile.
· Customer Special Needs - Radio button. Select this option to display information such as meeting information, which may specify that the member is vegetarian. Additionally, this information may record that the member is disabled and requires a wheelchair.
 Although
you can customize the system and add additional demographics tables and
information, the previously listed customer demographics features are
available out of the box.
Although
you can customize the system and add additional demographics tables and
information, the previously listed customer demographics features are
available out of the box.
Depending on the radio button selected, different options appear. However, they all appear in the same table with the same columns. All of the columns are described in the list below:
· Field - Table column/read-only. This column contains the property names of the user’s demographic items. These are API Property Names and not database table fields.
· Display Title - Table column/text box. This columns lets you customize the captions on the generated forms.
· Display - Table column/checkbox. This column lets you indicate whether or not that specific demographic data is displayed in the form.
· Enable Add - Table column/checkbox. If Enable is checked, the field is available for data input, otherwise it is hidden from users. If ReadOnly is checked, it is visible to users, but it is not available for input.
· Enable Edit - Table column/checkbox. If Enable is checked, the field is available for input, otherwise it is hidden from users. If ReadOnly is checked, it is visible to users, but it is not available for input.
· Required - Table column/checkbox. This controls the validation of the input on both the Add and Edit forms. If checked, the user is required to provide input for the field.
· Sort - Table column/checkbox. This column controls the order in which fields appear on the Data View, Add Data Form, and Edit Data Form.
a. If you
select the List Demographic Items radio button, the following fields appear:
· Once completed, this module pulls information from the Customer Interests module. Configure the appropriate module settings as described below:
o DemographicCode - This row allows you to change options for displaying the interest code.
o DemographicSubcode - This row allows you to change options for displaying the interest subcode.
o UserD1 - This field allows you to change the options for displaying the interest start date.
o UserD2 - This field allows you to change the options for displaying the interest end date.
o UserN1 - This field allows you the change the options for displaying the user number.
o Comments - This field allows you to change the options for displaying any comments associated with the interest entry.
b. If you
select the Customer Education radio button, the following fields appear:
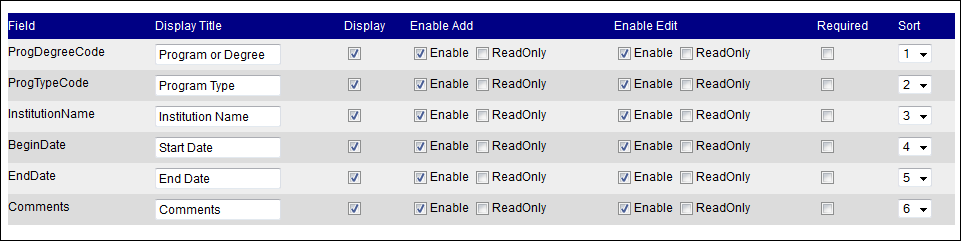
· Configure the appropriate module settings as described below:
o PrgDegreeCode - This field allows you to change the options for displaying the Program or Degree column.
o ProgTypeCode - This field allows you to change the option for displaying the Program Type column.
o InstitutionName - This field allows you to change the option for displaying the name of the institution.
o BeginDate - This field allows you to change the option for displaying the Begin Date column.
o EndDate - This field allows you to change the option for displaying the End Date column.
o Comments - This field allows you to change the option for displaying any comments associated with the education entry.
c. If you
select the Customer Special Needs radio button, the following fields appear:

· Configure the appropriate module settings as described below:
o NeedTypeCode - This field allows you to change the option for displaying the special need code.
o NeedCode - This field allows you to change the option for displaying the special need type.
o Description - This field allows you to change the option for displaying a description of the special need.
o Comments - This field allows you to change the option for displaying any comments associated with the special need entry.
6. Click Update.
After configuring the Customer Demographics web module, your customers will see the module similar to the one below if you have selected the List Demographics option.
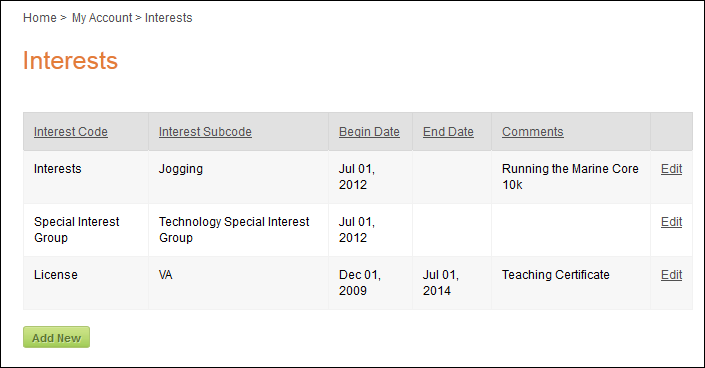
Clicking Edit or Add New allows the customer to add new demographic information or edit previously entered information

Field
names and their behavior are dependent upon how you set up your Demographic
web module.