
The following page displays:
The Customer Address web module allows customers to add or modify their address(es), as well as designate shipping preferences for purchases made through your website. The Customer Address web module contains a number of options and configurations that you can easily set from the web module window.
To configure the Customer Address web module:
1. Log into your site as Host.
2. Navigate to the appropriate page on your site where you want to add the Customer Address web module.
3. Add the Personify – Customer Address module to where you want it to be located on your page. See Adding a Web Module to the Webpage for more information.
4. From the
pencil icon, select Edit, as highlighted below.
The following page displays:
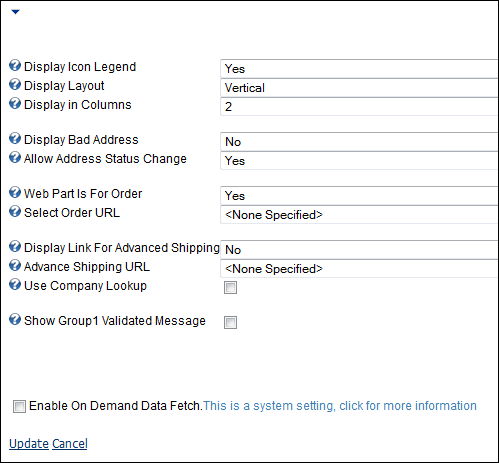
5. Configure the appropriate module settings as described below:
· Display Icon Legend - Drop-down. This options lets you decide whether or not to display an icon legend table below the address.
· Display Layout - Drop-down. This option lets you determine if the data should be displayed horizontally or vertically.
· Display in Columns - Drop-down. This option lets you set the number of columns that you want in your tabular result (minimum=1, maximum= 10).
· Display Bad Address - Drop-down. This option lets you determine whether or not to display disabled addresses in the address listing.
· Allow Address Status Change - Drop-down. This option lets you determine whether to enable or disable the address. This field causes an additional link to be displayed. The address status is changed when the link is clicked.
· Web Part is for Order - Drop-down. This option lets you determine whether or not to use the web module during check out. The user can select an address for Shipping Information or Billing Information. If this option is set to Yes, the Display Bad Address setting is set to No.
· Select Order URL - Drop-down. This option is also used during check out. Once the customer selects a Bill or a Ship address, this URL takes them to the next page.
· Display Link for Advanced Shipping - Drop-down. This option lets you navigate to the advanced shipping page from this page. The web module must be used in the check out process, as set in Web Part Is For Order.
· Advanced Shipping URL - Drop-down. This option takes the customer to the Advanced Shipping page that was enabled via link using the Display Link For Advanced Shipping option above.
· Use Company Lookup - Checkbox. This setting determines whether or not to look up the customer’s company in your database.
· Show Group1 Validated Message - Checkbox. This setting determines whether or not to display a validation message when the address is validated using Group1.
6. Click Update.
After configuring the Customer Address web module, it may appear to
your customers as seen below.

Each of the customer’s addresses displays. The customer can add or edit any of their addresses by clicking the corresponding links.