 The
back office controls all permissions and setups for which customers are
included in the segment(s) and what customer(s) have control over the
segment(s).
The
back office controls all permissions and setups for which customers are
included in the segment(s) and what customer(s) have control over the
segment(s).Affiliate Management in e-Business is an extension of Segmentation in the back office. You have the ability to segment customers based on a number of options:
· Committee
· Employer
· Membership
· Geographic location
· Products purchased
The
back office controls all permissions and setups for which customers are
included in the segment(s) and what customer(s) have control over the
segment(s).
The Affiliate Management List module displays all the affiliate groups for which the logged in user is assigned as the group manager. Similar to the other Affiliate Management web module, the List web module has a variety of options.
The
available options depend on your initial selection.
To configure the Affiliate Management – List web module:
1. Log into your site as Host.
2. Navigate to the appropriate page on your site where you want to add the Affiliate Management web module.
3. Add the Personify – Advanced Affiliate Management module to where you want it to be located on your page. See Adding a Web Module to the Webpage for more information.
4. From the pencil icon,
select Edit, as highlighted below.

The My Account screen displays, as shown below.
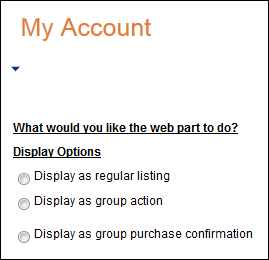
5. Configure the appropriate module settings as described below:
· Display as regular listing – Radio button. This option displays a list of affiliates as a regular listing.
· Display as group action – Radio button. This option confirms the group action being performed on a list of affiliates.
· Display as group purchase confirmation – Radio button. This option displays next actions on completion of a group order.
· If Display as regular listing" radio button is selected:
o Show Search – Checkbox. This setting enables the search panel.
o Page Size – Text box. This setting controls the number of affiliates displayed on a page.
· Show Group Action Panel – Radio button. This setting enables the panel that contains group action options.
· Show Group Purchase Panel – Radio button. This setting enables the panel that contains group purchase options.
· Purchase Action URL – Drop-down. This setting enables the panel that contains group action options.
· Allow Delete – Checkbox. This setting enables the “Remove" option on the context menu.
· Print Roster – Drop-down. This setting refers to the tab to which users are redirected when the Print Roster button is clicked.
· Send Email – Drop-down. This setting refers to the tab to which users are redirected when the Send Email button is clicked.
· Order History – Drop-down. This setting refers to the tab to which users are redirected when the View Order History button is clicked.
· View Profile – Drop-down. This setting refers to the tab to which users are redirected when the View Profile button is clicked.
· Renew – Drop-down. This setting refers to the tab to which users are redirected when the Renew button is clicked.
· Add Employee – Drop-down. This setting refers to the tab to which users are redirected when the Add Employee button from the Group Action panel is clicked.
This setting
only applies to the Employee segment.
· Add Committee Member – Drop-down. This setting refers to the tab to which users are redirected when the Add Employee button from the Group Action panel is clicked.
This setting
applies to only to the Committee segment.
· If the “Display as group action" radio button is selected:
o Print Roster – Drop-down. This setting refers to the tab to which users are redirected when the Print Roster button is clicked.
o Send Email – Drop-down. This setting refers to the tab to which users are redirected when the Send Email button is clicked.
o Buy Product – Drop-down. This setting refers to the tab to which users are redirected when the Buy Product button is clicked.
· If the “Display as group purchase confirmation" radio button is selected:
o Buy another product for the same group – Drop-down. This setting refers to the tab to which users are redirected when purchasing another product for their same group.
o Buy another product for different group – Drop-down. This setting refers to the tab to which users are redirected when purchasing another product for another group.
o Proceed to cart – Drop-down. This setting refers to the tab to which users are redirected when the Proceed to Cart button is clicked.
o Affiliate List in Group Purchase confirm mode – Drop-down. This setting refers to the Committee Affiliate list tab (set in “Group Purchase mode) user will be redirected in the “Buy Product" workflow.
6. Click Update.