 Personify
recommends that you place the Advanced Meeting web modules on a blank
page on your site.
Personify
recommends that you place the Advanced Meeting web modules on a blank
page on your site.The Advanced Meeting and Advanced Meeting Menu web modules work together to provide your organization the means to easily display large meetings and meeting sessions to your customers. Prior to the release of the Advanced Meeting modules, if a meeting had hundreds of sessions, these sessions were all listed on the Product Detail page and could not be easily sorted. There was no easy way for a customers to organize their time at the meeting/conference when selecting sessions to register for.
The Advanced Meeting modules provide your customers with the following pieces of functionality:
· A view of all sessions in the meeting sorted by date and time, track, or speaker.
· A “My Agenda Builder” area allowing customers to add sessions to his/her “My Agenda” calendar regardless of any business rules and eligibility requirements to register/purchase the sessions.
· A “My Agenda” calendar displaying all sessions the customer added as well as any personal appointments the customer added, which can then be downloaded to his/her Microsoft Outlook.
· Ability to add a meeting or meeting session to their Facebook and/or LinkedIn pages.
· One-click registration for customers logged into the system to register for any sessions they add to their agenda AND qualify for according to your organization’s business rules.
The Advanced Meeting Web Module only displays meeting products that have not passed their registration date when the customer logs into the website. Also, the Advanced Meeting Web Module only displays sessions created with a value of “Y” for the “Available to Agenda” flag in the database.
Personify
recommends that you place the Advanced Meeting web modules on a blank
page on your site.
To create a blank page for your Advanced Meeting web module:
1. Log into your site as Host.
2. From the toolbar select,
Pages > Add New Page, as highlighted below.
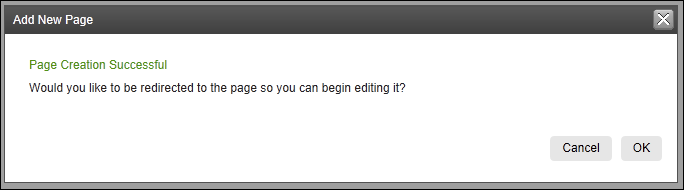
The Page Settings screen displays, as shown below.
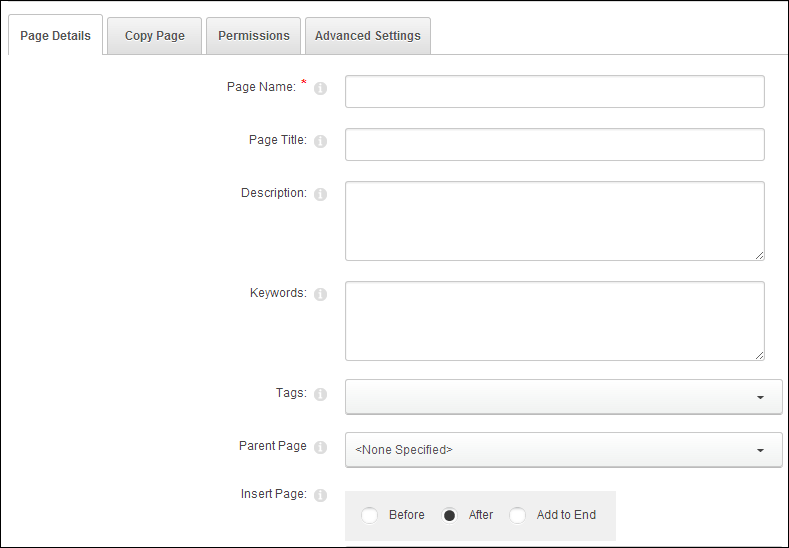
3. Configure the appropriate basic settings on the Page Settings screen. See Adding a Page Using DNN for more information about page configuration settings.
When uploading
your small and large images, ensure that the small image is 197x290 pixels
and the large image is 569x206 pixels. This will ensure that your images
are not stretched or compressed.
4. Click
Add Page.
The system generates a blank page with your specifications.
5. Observe
the new page’s URL and record the Tab ID value that displays next to “tabid”
in the URL.
For example, the Tab ID value for the page below is 165, as highlighted
below.

6. From the
toolbar, select Edit Page > Page Settings.
The Page Settings screen displays.
7. Select
the Advanced Settings tab, as highlighted below.
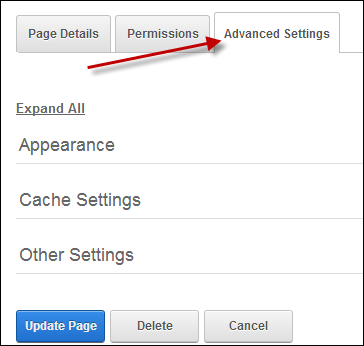
8. Expand the Other Sections setting.
9. In the
Link URL section, select the URL (A Link To An
External Resource) radio button, as highlighted below.
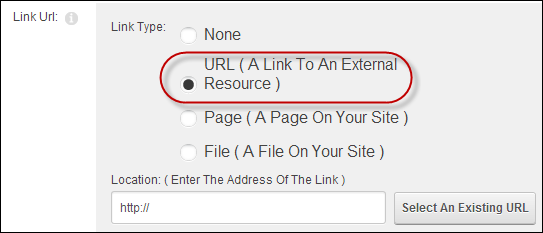
The Location field is now enabled.
10. In the
text box, enter the following URL:
http://[Your Website]/[PageName]/tabid/[Tab ID Number]/Default.aspx?mpid=[Meeting
Product ID]
The specified
Meeting Product ID will affect the items displayed in the AdvanceMeeting
Menu option.
11. You can configure the appropriate basic settings on the Page Management screen. See Adding a Page Using DNN for more information about page configuration settings.
12. Select the Update
Page button.
You are returned to your newly created blank page.
To configure the Advance Meeting web module:
1. Log into your site as Host.
2. Navigate to the blank page you created.
3. Add the Personify - Advanced Meeting module to where you want it to be located on your page. See Adding a Page Using DNN for more information.
4. From the
pencil icon, select Edit, as highlighted below.

The following page displays:
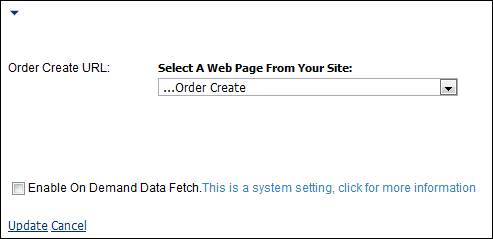
5. Configure the appropriate module settings as described below:
· Order Create URL - Drop-down. Select the web page where your order create web module is located. This option specifies the location a user is directed on your site after clicking the Register Now button (or the Update Your Registration button if they already registered for one or more of the meetings on their agenda).
6. Click
Update.
The My Agenda and Agenda Builder screens Appear similar to the image below
based on how you set:
This section
does not cover creating a
Meeting product.
Depending on the setups you made during the meeting product’s creation, the Advanced Meeting’s home page may look like this to your customers.
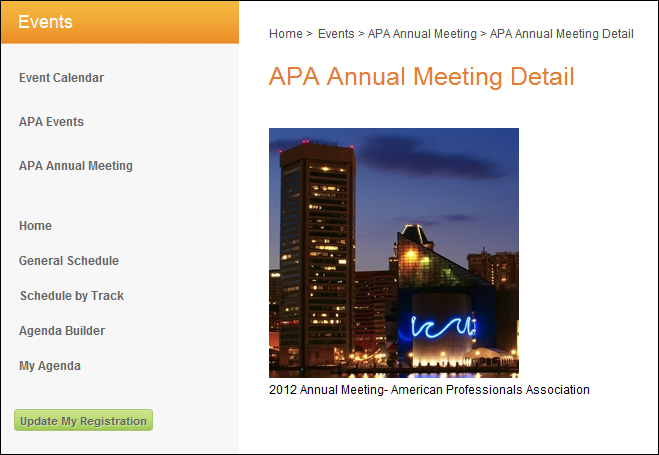
· Small Image may display in the upper left corner, if it was defined in the Meeting product’s setup (not shown).
· Large Image may display, if it was defined in the Meeting product’s setup.
· Long Description may display, if it was defined in the Meeting product’s setup.
· Menu bar which allows the customer to navigate through the meeting description, view the meeting’s sessions, add the sessions to her/her agenda, or view his/her agenda.
· One-click registration button that allows the logged-in customer to register for this meeting. If the customer visit’s this page after he or she has registered, the Register Now button is replaced with the Update My Registration button.
When a customer
registers for the meeting, the meeting product and all of the meetings
the customer has added to the My Agenda screen are placed in the Order
Checkout. Any meeting sessions added to My Agenda after the initial registration
can not be added to the shopping cart using this button; the user will
have to manually add the sessions to his or her shopping cart.
· The number of days between the present date and the final registration date which calculates automatically upon log-in (not displayed).
· These links allow the customer to add the meeting to his or her Facebook or LinkedIn profile (not displayed).
The customer
can add the meeting and an agenda of desired sessions to his or her Facebook
or LinkedIn profile without having to register for the meeting.
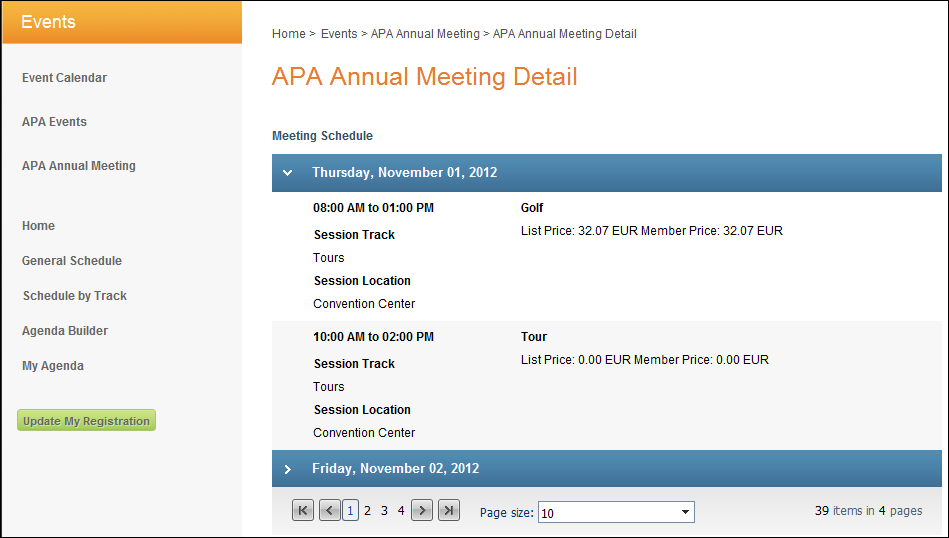
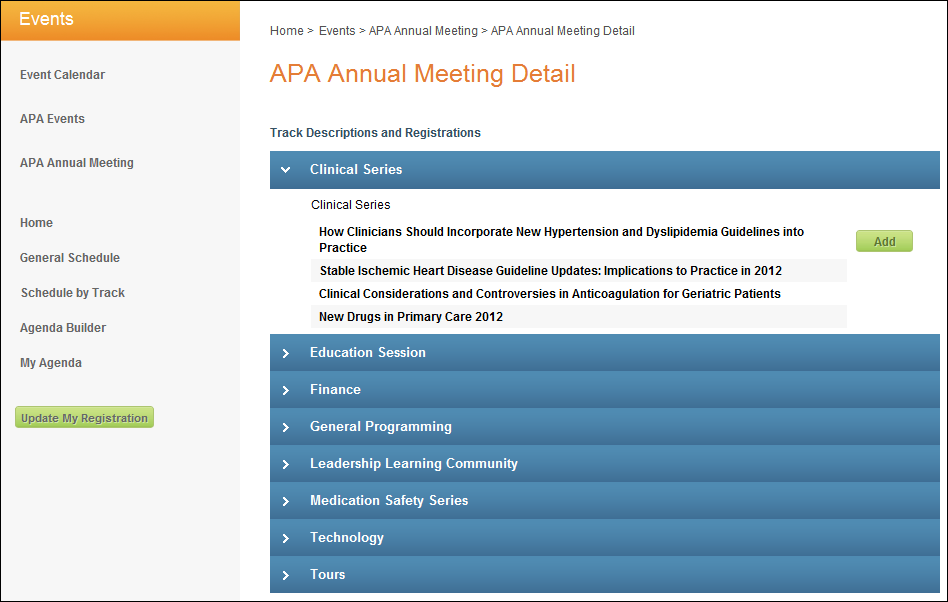
The Advanced Meeting’s General Schedule page allows the user to view all of the sessions within the meeting sorted by date.
The Advanced Meeting’s Schedule by Track page allows the user to view all the sessions sorted by Track.
Customers
only see this option on the left-side menu if the meeting they are viewing
has sessions assigned to different tracks.
A
customer can not view this page without first logging on to the site.
The Agenda Builder page appears similar to the General Schedule page with the exception that the customer has the option to add (or remove) any of the sessions to his or her My Agenda.
The Agenda Builder page also allows the customer to filter the list of sessions by date or event type by selecting the associated radio button.
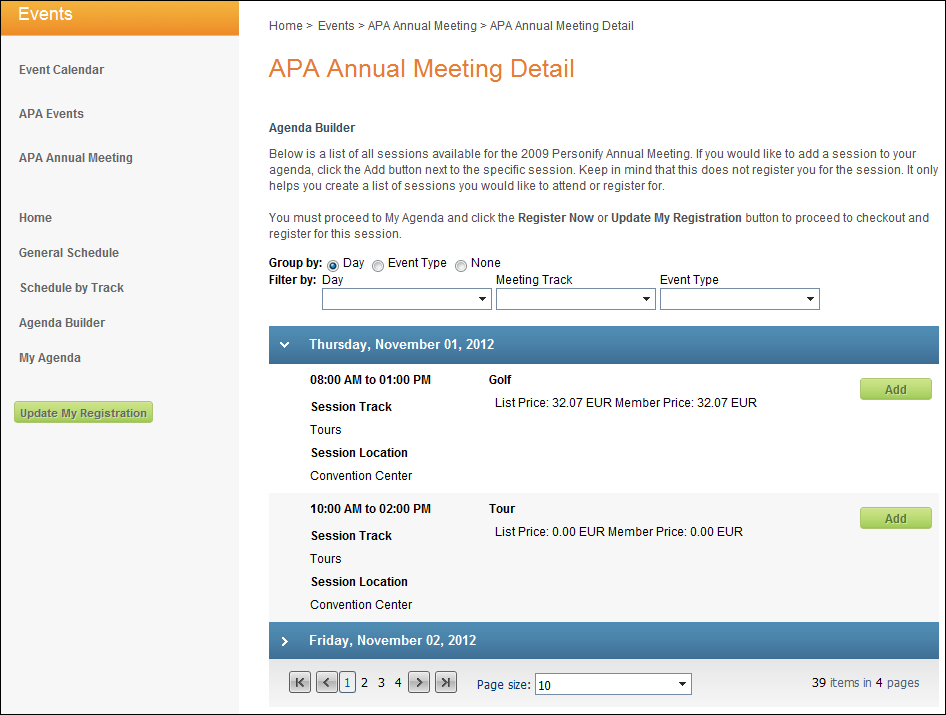
When
a user adds a session to his/her agenda, it does NOT create an order or
register him/her for the session. It only adds it to his/her agenda for
viewing/organization purposes.
Customers
can not view this page without first logging on to the site.
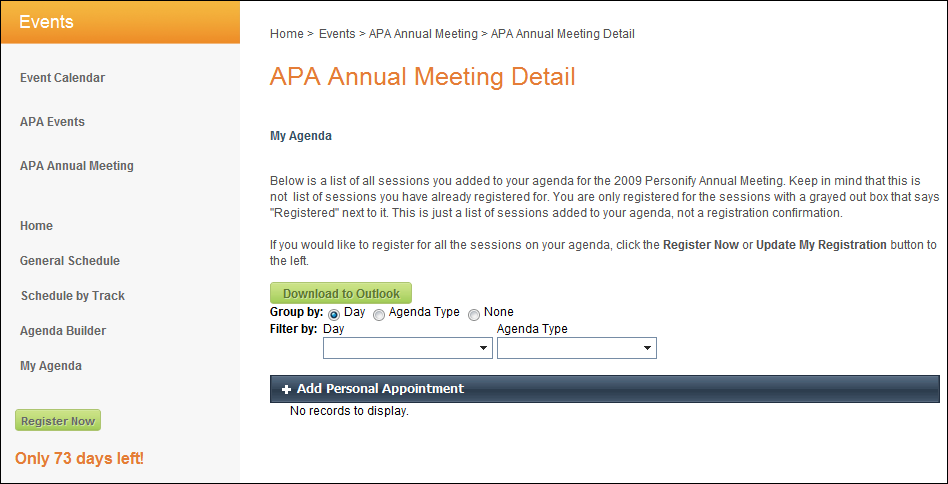
Once your customers have added sessions to their agenda using the Agenda Builder page, they can navigate to the My Agenda page to view all of the sessions they added sorted by date and time. If a customer has added many sessions, filters are provided allowing the customer to view their selected sessions by a certain day or type.
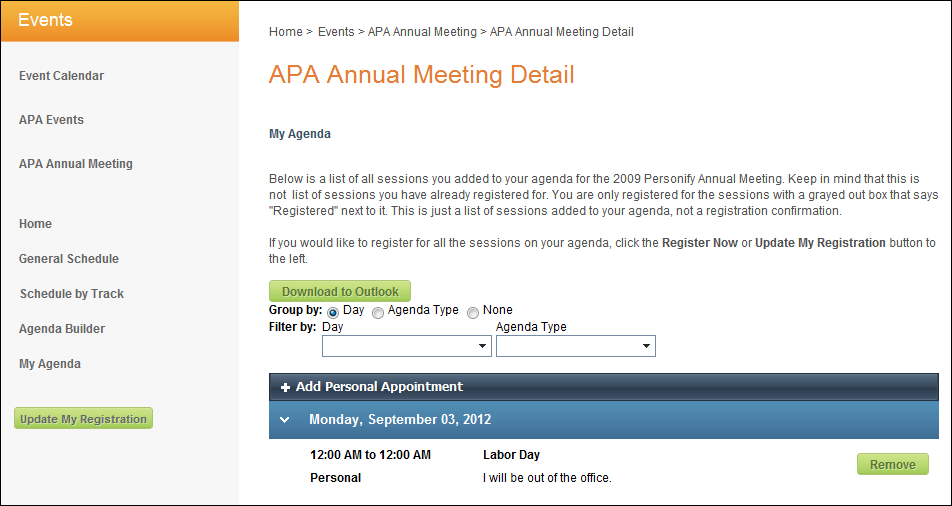
Functionality has also been provided to allow customers to add personal appointments to their agenda. For example, if a customer has arranged to meet with a colleague for dinner, he or she can add that meeting as an appointment on their agenda.
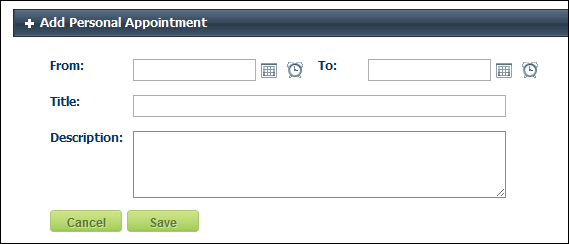
To add a personal appointment, click the Add Personal Appointment button
available on the My Agenda page .
The following fields appear:
Once the customer is satisfied with his/her agenda, he or she can click the “Download to Outlook” button. This downloads an .ics file, which then displays all of the selected sessions and personal appointments on the customer’s Outlook calendar.
Downloading
My Agenda to Outlook does not register the customer to the meeting or
sessions.
Similar to downloading to Outlook, once the customer is satisfied with
his/her agenda, he or she can click the “Add event to my Facebook” or
“Add event to my LinkedIn” button. These buttons sends the list of sessions
added to his/her agenda and uploads the list to either his/her Facebook
or LinkedIn profile pages.
A new window displays for the social networking site, and users are prompted
to enter their account information. A confirmation screen displays for
them to confirm the upload. Facebook uploads the agenda as a post, and
LinkedIn uploads it as an article.
After the customer has finished adding all of their sessions to My Agenda, he or she can click Register Now and the meeting and any sessions that have a price of more than zero dollars are added to the order checkout where the customer can pay and be registered for the meetings and sessions.
Not
until the customer clicks Register Now will
he or she be registered for any meetings or sessions.