Upgrading e-Business with Web Controls
When you are ready to begin your e-Business project using the new web
controls, you will need to follow a few steps before you can get started
with using the .NET Web Controls.
1. Configure
the Image Service.
2. Upgrade
Data Services.
3. Configure
Data Service Web.config.
4. Copy the
Web Controls DLLs.
5. Copy the
Themes.
6. Configure
and Install Registry Key.
7. Configure
the DNN e-Business Web.config.
8. Make the
Website Responsive.
 As
of 7.5.1 FP1, Telerik.WEB.UI.dll was upgraded from 2012.3.1322.40 to 2013.2.717.40.
If you are installing this version of the web controls, you will need
to update your web.config file on your e-Business website per the screenshot
below. Modifications are highlighted in yellow.
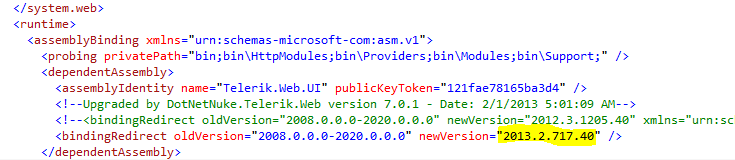
As
of 7.5.1 FP1, Telerik.WEB.UI.dll was upgraded from 2012.3.1322.40 to 2013.2.717.40.
If you are installing this version of the web controls, you will need
to update your web.config file on your e-Business website per the screenshot
below. Modifications are highlighted in yellow.
1. Configure the Image Service
If your organization allows mobile users to upload customer profile
images or you include product images on your product listing page, you
should consider installing the Windows Service. This service creates a
Customer Images folder and helps you to standardize the size of all uploaded
images ensuring that all customer profile images displayed in the same
size as well as all product images. This way, your mobile users can upload
an image of any size and the application will not distort the image when
it displays in the image space. Additionally, if the back office Application
Parameter is set in step 12 below, pictures will display in the Donor360®
screen.
For more information on how the image service works with constituent
images in CRM360®, please see Adding/Changing
a Constituent's Image in CRM360.
To install the Windows Service:
1. Navigate
to the following package folder:
...\Package\Services\ImageServer.
2. Update
the “ImageServer” folder path in the Install.cmd
and Uninstall.cmd files.
3. Open the
TEMPLATE_Config.xml file in the \Package\Services\ImageServer\Config folder and update the following from
the values in the \BackofficeClient\Config\config.xml. Rename it to Config.xml after finishing.
· Seat
Information
· App Service
URL
4. The following
values appear in the TEMPLATE_PersonifyImageService.exe.config.xml.
You can modify them as required in the <appSettings> group. Save
the file as PersonifyImageService.exe.config.xml.
Key |
Value |
Comments |
CustomerImagePath |
(enter the URL) |
Web service will point to this directory
for Customer Image URL |
ProductImagePath |
(enter the URL) |
Web service will point to this directory
for Product image URL |
EnableEventLogs |
False |
For Production. |
ProfileThumbnailWidth* |
40 |
Customer Image |
ProfileThumbnailHeight* |
60 |
Customer Image |
ProfilePictureWidth* |
100 |
Customer Image |
ProfilePictureHeight* |
100 |
Customer Image |
RefreshImageInterval |
3600000 |
In milliseconds. Recommended 1- 24 hrs. |
WindowsService.Name |
(enter Personify360 Image Service Name) |
Enter the service name. This will be useful
when you want to install multiple versions on the same machine. |
WindowsService.Description |
(enter Personify360 image service description) |
Description of the service name. |
These are
the recommended values for the image sizes. The Profile Height and width
can go to 200 X 200 max. The image size should be < 100 K for the best
performance.
5. Save and close the
TEMPLATE_PersonifyImageService.exe.config file.
6. Rename
the TEMPLATE_PersonifyImageService.exe.config
to PersonifyImageService.exe.config.
7. Run the
Install.cmd file from Command prompt.
8. Go to
services and click on Start to start the service.
9. If the
service fails to start, check the application event log and/or your email
for an error report.
10. Go to
your Web Server. Add a new Default Website for example “CustomerImages”.
Set the virtual directory path to CustomerImagePath from step 4.
For clients
using mobile this would be more secure Webserver with Public IP. For others,
this can be any secure Intranet server.
11. Login
to the Personify360 back office. Go to the menu bar option System
Admin > System Setup > Application Parameters.
12. Search
for the "APPLICATION_IMAGES_URL" parameter.
13. Enter
the CustomerImagePath from step 4.
14. If staff
want to view pictures in the CRM360 and Donor360 screen, then go to Applications
parameters and select customer sub system and update the “USE_CONSTITUENT_IMAGES”
value to ‘Y’.
2. Upgrade Data Services
In order to upgrade Personify360 Data Services to support Web Controls,
you must first install the latest version of the Personify360 Data Services
version
.
Please
note that if DataServices is hosted on a SSL enabled website (sites with
a HTTPS protocol) uncomment the security following to the code as highlighted
below.
Before you upgrade:
· Check-in
all pending elements (Entities, Associations, and Service Operations)
from all users
· It is
recommended that you backup PDS_*tables
· It is
recommended that you backup the bin folder of your Data Services site
If
Data Services is hosted on a SSL enabled website (sites with a HTTPs protocol)
uncomment the security node in Bindings section as shown in the following
to the code, as shown below.
<!--<security mode="Transport"/>-->
Upgrading Personify360 Data Services to support Web Controls:
· Run the
upgrade SQL script PersonifyDataServiceUpgrade.sql
against the database
.
· Deploy
the assemblies located to the bin folder on your Data Services
site
.
· Deploy
the assemblies located to the back office client folder on
your Application server
.
After you upgrade:
1. Launch
the Personify360 Web Services Designer.
If the system identifies any conflict, the Conflict Resolution Center will
open. If there are no conflicts, the Personify360 Web Services Designer
will open.
2. Resolve any conflicts
and click Done.
The Personify360 Web Services Designer opens.
3. Build and test locally.
4. Check in all changes
(some elements will be automatically checked out while the conflicts are
resolved).
5. Build and publish your
latest services definition.
3. Configure Data Service Web.config
There
are no changes in the web.config file for the 7.5.1 FP1 package.
1. Add the
following to your <appSettings> section, if not already part of
the web.config file:
<add key="DefaultLanguage"
value="EN-US" />
<add key="DefaultCurrency" value="USD" />
<add key="ListRateStructure" value="LIST" />
<add key="MemberRateStructure" value="MEMBER" />
2. Configure
the default language, currency, and rate structures for your organization.
In
order to maintain rate structures for membership on the web, "ListRateStructure"
and "MemberRateStructure" should be correctly mapped with the
Rate Structure Maintenance screen (ORD000) in the back office. For more
information, please see Defining
Rate Structures.
4. Copy the Web Controls DLLs
Copy the web control DLLs to your DNN site’s bin folder.
5. Copy the Themes
Copy the themes to your e-Business site root folder (i.e., C:\inetpub\wwwroot\<Your
DNN Site>\)
6. Configure and Install Registry Key
1. Copy the
UniversalWebServiceCredentials.reg file
from the release package to your web server on a temp
folder location (e.g., C:\Temp).
2. Right-click
the registry file and click Edit.
3. Update
the credentials of the Personify360 Data Service and Personify360 Shopping
Cart Services.
These credentials are the same username and password that you set up in
your Data Services’ config.xml (SeatInformation section).
4. Save the
.reg file.
5. Double-click
the .reg file to run it.
6. Deploy
the e-Business skin changes for the web controls:
a. Make a
backup of your website
b. Navigate
to the Skins folder.
c. Copy the
PersonifySkin.zip to the ebusiness root
folder > Install > Module directory.
d. Open your
Personify e-Business site and navigate to: www.[YourDomain]]/
[DNNWebSiteURL]/install/install.aspx?mode=installresources.
e. After
the new Personify skin is installed, update the alternate preview page
path changes in the web server.
i. Navigate
to your server where the site is hosted. Explore to site folder and in
the following path: Portal\_default\Skins\PersonifySkin\js\
ii. Open the
personify-skin.js file in a text
editor, such as Notepad.
iii. Search
for “AlternatePreview.aspx” text and replace “/Personify760/DNN/” with
your sites virtual directory name
iv. Click
Save.
Refer
to the Responsive Design section
for additional instructions on changes to Personify skins in order to
make them responsive. You will need to update the user control files in
the Personify Skin in order to enable those files for the mobile view.
7. Configure the DNN e-Business Web.config
1. Add the
following entry in your <configSections> section and outside of
the <sectionGroup>
<section name castle
type Castle.Windsor.Configuration.AppDomain.CastleSectionHandler, Castle.Windsor
For example:
<configSections>
<sectionGroup name="dotnetnuke"
>
--- Other entries
</sectionGroup>
<section name="castle"type="Castle.Windsor.Configuration.AppDomain.CastleSectionHandler,
Castle.Windsor" />
</configSections>
2. Add the
following two sections inside your <configuration > section:
<configuration>
<castle>
<components>
<component service="Personify.WebControls.Store.Providers.IShoppingProvider,
Personify.WebControls.Store" type="Personify.eBusiness.ShoppingCart.ShoppingCartProvider,
Personify.eBusiness.ShoppingCart">
</component>
</components>
</castle>
</configuration>
3. If you
already have a <system.serviceModel> section, add the following
section inside. If not, add the following <system.serviceModel>
section as a part of your <configuration> section:
<system.serviceModel>
<serviceHostingEnvironment
multipleSiteBindingsEnabled="true" />
<services>
<service behaviorConfiguration="Personify.ShoppingCart.Behavior"
name="Personify.ShoppingCart.Lib.PersonifyShoppingCartService">
<endpoint address=""
binding="webHttpBinding" behaviorConfiguration="EPrestBehavior"
name="EPrest" contract="Personify.ShoppingCart.Lib.IPersonifyShoppingCartService"/>
<endpoint address="mex"
binding="mexHttpBinding" name="EPmex" contract="IMetadataExchange"/>
</service>
</services>
<behaviors>
<endpointBehaviors>
<behavior name="EPrestBehavior">
<webHttp />
</behavior>
</endpointBehaviors>
<serviceBehaviors>
<behavior name="Personify.ShoppingCart.Behavior">
<serviceMetadata httpGetEnabled="true"
/>
<serviceDebug includeExceptionDetailInFaults="true"/>
</behavior>
</serviceBehaviors>
</behaviors>
</system.serviceModel>
4. Add the
following to the <appSettings> section:
<appSettings>
<add key="svcUri_Base"
value="[YOUR PERSONIFY DATA SERVICE URL]" />
<add key="RESTShoppingCart_BaseUri"
value="[YOUR PERSONIFY SHOPPING CART SERVICE URL]" />
<add key="EnableBasicAuthentication_Base"
value="true" />
<add key="ShowPerformanceInfo_Base"
value="false"/>
<add key="RegistrySetting"
value="HKEY_LOCAL_MACHINE\SOFTWARE\TMA Resources\UniversalWebService"/>
<add key ="PersonifyCssPath"
value="Themes/" />
<add key ="PersonifySkin"
value="PersonifyDefault" />
<add key ="CombineCSS"
value="true" />
</appSettings>
5. Configure
the values of the svcUri_Base and RESTShoppingCart_BaseUri
in step 4 above with your Data Service URL and Shopping Cart Service URL
respectively.
Example: Highlighted values below in yellow should be replaced with your
environment information and the highlighted value in green below should
be replaced with the Data Service URL:
<add key="svcUri_Base"
value="http://releasefulltest/PersonifyDataServices/PersonifyData.svc/"/>
<add key="RESTShoppingCart_BaseUri"
value="http://<your site>/<Your DNN Site>/PersonifyShoppingCartSVCService/PersonifyShoppingCartService.svc/"/>
6. Add the
following to the <handlers> section of the <system.webServer>
section:
<handlers>
<add name="HttpCombiner_axd"
path="HttpCombiner.axd" type="Personify.WebControls.Base.HttpCombiner"
verb="*"/>
</handlers>
7. Add the
following to the <httpHandlers> section of the <system.web>
section:
<httpHandlers>
<add path="HttpCombiner.axd"
type="Personify.WebControls.Base.HttpCombiner" verb="*"/>
</httpHandlers>
8. Add only
the following highlighted section into the <membership> section
of the <system.web > section:
<system.web>
<membership defaultProvider="AspNetSqlMembershipProvider"
userIsOnlineTimeWindow="15">
<providers>
<clear />
<add name="AspNetSqlMembershipProvider"
type="System.Web.Security.SqlMembershipProvider" connectionStringName="SiteSqlServer"
enablePasswordRetrieval="true" enablePasswordReset="true"
requiresQuestionAndAnswer="false" minRequiredPasswordLength="7"
minRequiredNonalphanumericCharacters="0" requiresUniqueEmail="false"
passwordFormat="Encrypted" applicationName="DotNetNuke"
description="Stores and retrieves membership data from the local
Microsoft SQL Server database" />
<add name="PersonifyAuthProvider"
type="Personify.RESTServices.Framework.PersonifyMembershipProvider"/>
</providers>
</membership>
</system.web>
9. (Optional)
If diagnostics logging in DNN site for Web Controls is needed, add the
following section your <configuration> section:
<system.diagnostics>
<sources>
<source name="Personify.WebControls"
switchValue="All">
<listeners>
<remove name="Default"/>
<add name="textfileListener"/>
</listeners>
</source>
</sources>
<sharedListeners>
<add name="textfileListener"
type="Personify.WebControls.Base.Utilities.PersonifyFileTraceListener,
Personify.WebControls.Base" initializeData="[YOUR LOG FILE FOLDER
PATH\personifyWebControls.log" />
</sharedListeners>
<trace autoflush="true"/>
</system.diagnostics>
10. Configure
the YOUR LOG FILE FOLDER PATH value in the step
9 above with the location of the log file you want to save.
Step 10 needs
to be configured in order to have step 11 working. You may experience
a significant performance hit if step 11 along with step 10 are configured. It
is needed only to diagnose/troubleshoot the issues.
11. (Optional)
If you need to diagnose the communication between Web Controls (DNN Website)
and Data Services, you need to add the following setting to <appSettings>:
<add key="LogAllPDSRequests" value="true"/>
12. (Optional) If your
Data Services is hosted on a SSL enabled website (sites with a HTTPS protocol),
add the following highlighted section to your <bindings>
section:
<bindings>
<webHttpBinding>
<binding name="higherMessageSize"
maxBufferSize="4194304" maxBufferPoolSize="4194304"
maxReceivedMessageSize="4194304" transferMode="Streamed">
<readerQuotas maxDepth="32"
maxStringContentLength="4194304" maxArrayLength="4194304"
maxBytesPerRead="4096" maxNameTableCharCount="16384"
/>
<security
mode="Transport"/>
</webHttpBinding>
</binding>
8. Make the Website Responsive
Personify has developed its own responsive CSS in order to accommodate
mobile web users accessing your website. Please refer to Configuring
the Responsive CSS for more information on how to make pages in your
website responsive.