 The
"Assign A Room" task in Product Maintenance is only available
if the Predefine Conference
Room Inventory checkbox on the General
Setup screen is unchecked.
The
"Assign A Room" task in Product Maintenance is only available
if the Predefine Conference
Room Inventory checkbox on the General
Setup screen is unchecked.For meetings without any breakout sessions, you can assign a room. For breakout sessions, you can assign one or more rooms. For example, if a keynote general session requires a significant amount of space, you can assign multiple, individual rooms to the one breakout session, because frequently convention centers can expand multiple rooms into one large room.
The
"Assign A Room" task in Product Maintenance is only available
if the Predefine Conference
Room Inventory checkbox on the General
Setup screen is unchecked.
 As
of 7.4.1SP1, if the Start Date and End Date of a room assignment is the
same as the Begin Date & Time and End Date & Time of the meeting
product (defined on the General
Setup screen), if you update the Start Date and/or End Date of a room
assignment, the system will ask if you want to also update the Begin Date
& Time and End Date & Time of the meeting product.
As
of 7.4.1SP1, if the Start Date and End Date of a room assignment is the
same as the Begin Date & Time and End Date & Time of the meeting
product (defined on the General
Setup screen), if you update the Start Date and/or End Date of a room
assignment, the system will ask if you want to also update the Begin Date
& Time and End Date & Time of the meeting product.
To assign a room:
1. From the
Personify360 main toolbar, select Products > Product
Central.
The Product Maintenance search screen displays.
2. Click Search to find a product or click Create New Product.
3. From the
Define the Product task category, click Assign A Room.
The Assigned Rooms screen displays, as shown below.
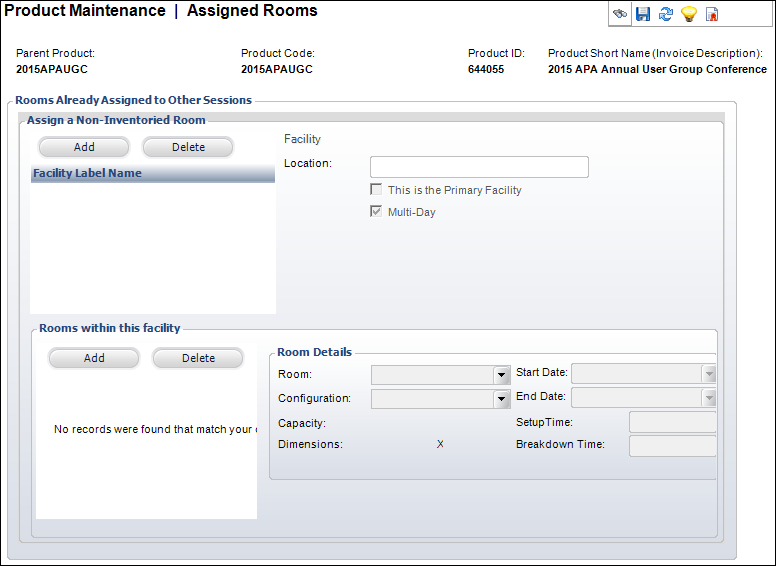
4. From the Assign a Non-Inventoried Room section, if a facility was defined on the General Setup screen, that facility will display as the primary facility. If necessary, you can assign multiple facilities. For more information, please see Assigning Multiple Facilities to a Meeting.
5. From the Rooms within this facility section, click Add.
6. Select
the Room from the drop-down.
Rooms available for selection are defined on the Conference Room Information
screen in Meetings Facility Maintenance.
7. If necessary, select the Configuration from the drop-down.
8. Select the Start Date and End Date from the drop-downs.
9. Enter the Setup Time.
10. Enter the Breakdown Time.
11. Click Save.
Screen Element |
Description |
|---|---|
Assign a Non-Inventoried Room |
|
Add |
Button. When clicked, a row is added to the Rooms Already Assigned to Other Sessions table and the corresponding fields are enabled to assign a room. |
Delete |
Button. When clicked, the highlighted row from the table and the information entered in the Assign a Non-Inventoried Room fields are deleted. |
Facility |
Link. Opens the Facility Chooser screen to search for a facility. |
This is the Primary Facility |
Checkbox. When checked, indicates the facility is a primary facility for the meeting since you can have multiple facilities for one meeting. If you selected a facility on the General Setup screen, then that facility is considered the primary facility and this field is read-only. |
Multi-Day |
Read-only. The value displayed here depends on if you checked the Multi-Day checkbox on the General Setup screen. |
Rooms within this facility |
|
Add |
Button. When clicked, a row is added to the Facility Room ID table and the corresponding fields are enabled to associate a room with the facility. |
Delete |
Button. When clicked, the highlighted row from the table and the information entered are deleted. |
Room |
Drop-down. Select a defined meeting room, e.g., Banquet Hall, Conference Room, Ballroom, Classroom. The options available depend on the room types selected on the Facility Setup screen.
|
Configuration |
Drop-down. A code used to describe the configuration of the meeting room selected, e.g., square, round, rectangular, triangular, oblong. This can also reference the seating arrangement, such as classroom, lecture, theater, etc. The options available depend on the room types selected on the Facility Setup screen. |
Capacity |
Read-only. In accordance with fire safety standards and the configuration, this field represents the maximum number of people permitted in this room for the meeting. This automatically populates based on the information entered on the Facility Setup screen. |
Dimensions |
Read-only. The dimensions of the room as defined on the Facility Setup screen. |
Start Date |
Drop-down. The begin date the room will be used. |
End Date |
Drop-down. The date the room is no longer needed. |
Setup Time |
Text box. The time in minutes it takes to set up the room for different setups/configurations. Used for scheduling purposes by the meeting planner. |
Breakdown Time |
Text box. The time in minutes it takes to dismantle the setup/configuration for the room. Used for scheduling purposes by the meeting planner. |
See Also:
· Maintaining Meeting/Session Tracks