Assigning Multiple Facilities to a Meeting
From the General Setup screen in Product Maintenance, you can define the primary facility for a meeting. However, if you want to assign multiple facilities to a meeting, you must do so via the Assigned Rooms screen.
To assign multiple facilities to a meeting:
1. From the Personify360 main toolbar, select Products > Product Central.
The Product Maintenance search screen displays.
2. Click Search to find a product or click Create New Product.
3. From the Location tab in the Meeting Products section on the General Setup screen, click the Facility link to select the primary facility for the meeting.
The Facility Chooser displays.
4. Search for and select the appropriate facility.
The facilities available for selection are defined on the Meetings Facility Maintenance screen. For more information, please see Setting Up Facilities for Meetings.
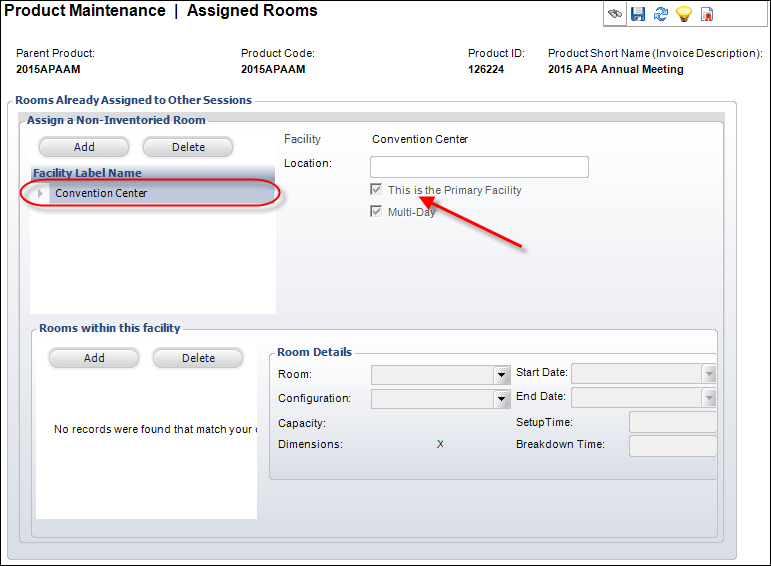
Please note that the selected facility is added as the primary facility on the Assigned Rooms screen, as highlighted below.

5. To assign additional facilities, perform the following:
a. From the Subsystem Specific task category, click Assign A Room.
The Assigned Rooms screen displays.
b. From the Assign a Non-Inventoried Room section, click Add.
The Facility Chooser displays.
c. Search for and select the appropriate facility.
The facilities available for selection are defined on the Meetings Facility Maintenance screen. For more information, please see Setting Up Facilities for Meetings.
d. Click Save.
6. If necessary, select the rooms within the facility. For more information, please see Assigning a Room to a Meeting/Session.
The rooms available for selection are defined on the Conference Room Information screen in Meetings Facility Maintenance for the selected facility. For more information, please see Setting Up Facilities for Meetings.
See Also:
· Defining General Product Information
· Uploading Session for a Meeting Parent Product
· Defining Room Assignments for a Multi-Day Meeting
