 Details
associated with this task, such as providing the account numbers, should
not be defined without input from the Accounting/Finance department.
Details
associated with this task, such as providing the account numbers, should
not be defined without input from the Accounting/Finance department.Before you define the revenue accounts for this product, revenue account pairs must be defined for the org/org unit. For more information, please see Defining Revenue Account Pairs.
This task defines the income and deferred revenue accounts used in sales and receipt transactions. Revenue can be distributed across multiple accounts or companies by percentage of the sales amount. Typically, this is not used in receipt transactions except under unusual circumstances within the fund raising system. Where multi-company transactions exist, the system will create inter-company transactions for the revenue distribution.
Details
associated with this task, such as providing the account numbers, should
not be defined without input from the Accounting/Finance department.
To define Revenue accounts:
1. From the
Personify360 main toolbar, select Products > Product
Central.
The Product Maintenance search screen displays.
2. Click Search to find a product or click Create New Product.
3. From the
Product Definition task category, click Define Revenue
Accounts.
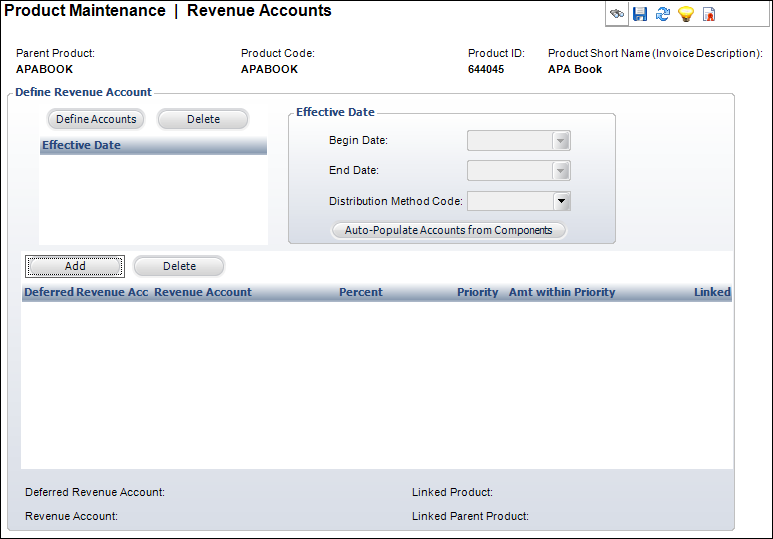
The Revenue Accounts screen displays, as shown below.
4. Click
Define Accounts.
As of 7.4.2, the Account Chooser screen automatically displays because
a revenue account detail record is required in order to save the revenue
account master record.
5. Select the appropriate revenue account.
Please
see Defining
Revenue Account Pairs for more information on revenue accounts and
their functionality.
6. The Begin Date defaults to today's date. Change this date if necessary.
7. If necessary, select the End Date from the drop-down.
8. Select the Distribution Method Code from the drop-down.
9. From the table below, enter the following in the appropriate table cell:
· Percent of the revenue that should go into this account
· Priority number of the revenue account
· Amt within Priority
10. Click Save.
Screen Element |
Description |
|---|---|
Define Revenue Account |
|
Define Accounts |
Button. When clicked, an Effective Date row is added to the table and another Revenue account is added to the product. |
Delete |
Button. When clicked, the highlighted Effective Date row and revenue accounts are deleted from the table. |
Add |
Button. When clicked, a row is added to the Deferred Revenue Account table. The Account Chooser opens to search for a deferred Revenue account. |
Delete |
Button. When clicked, the highlighted row from the table and the information entered in the row are deleted. |
Deferred Revenue Account |
Read-only table column. This field is the account that is used for sales transactions. If no deferred revenue is to be recorded, this should be a standard revenue account. It is validated against the FGL_Account_Master table and must be valid for the your organization. A warning message displays if an account is selected that is not for the organization unit of the product. It may be a liability or revenue account. |
Revenue Account |
Read-only table column. This field is the offsetting income account. This is the account that will be used by a revenue recognition process. It is validated against the FGL_Account_Master table. However, a warning message will display if an account is selected that is not for the organization unit of the product. It must be a revenue account. |
Percent |
Table column. This field is the percentage of the revenue that should go to this account. The total percentages of all line items must equal 100 for the record to be saved (format 000.0000). |
Priority |
Table column. This field is only enabled when the Distribution Method is “Priority.” When discounts or other pricing situations result in a line item not receiving its full amount, the first priority item will receive its full amount and then the next priority item in sequence. |
Amt within Priority |
Table column. This field is only enabled when the Distribution Method is “Priority.” When populated and when the amount to be distributed (because of discounts or other pricing) falls lower that the amount specified with this line item, the amounts will be filled based on this priority. |
Linked |
Read-only table column. Indicates that the line is associated with a specific component product’s accounts after you click the Auto-Populate Accounts from Components button. |
Effective Date |
|
Begin Date |
Drop-down. This field indicates the date on which this distribution will begin to be used as compared to the order date. The Begin Date of the first set of revenue accounts defined defaults to the Available from date from the General Product Setup screen. The Begin Date of each additional set added after the first defaults to today’s date.
Each time a change is made to the distribution accounts, a new start date must be defined for this distribution so that a history and an audit trail can be maintained.
|
End Date |
Read-only. The end date is automatically populated to one day before the next Begin Date of the next set of revenue accounts. |
Distribution Method Code |
Drop-down. The value selected in this field automatically updates all detail records for this effective date. Valid values include: · Percentage – Will distribute by percentage of the price only. The Priority and Amount within Priority columns are disabled. The total amount of the percentage must equal 100. · Priority – Enables the Priority and Amount within Priority columns. When discounts or other pricing situations result in a line item not receiving its full amount, the first priority item will receive its full amount and then the next priority item in sequence. If no amount is specified, the system will distribute the remaining amount by percentage. The total amount of the percentage must equal 100.
Values in the drop-down are populated based on the fixed codes defined for the ORD "DISTRIBUTION_METHOD" system type. |
Auto-Populate Accounts from Components |
Button. When clicked, the revenue account pairs set for the component products are automatically added to the product’s revenue accounts. For this button to work, components must be defined for the product. |