 If an order is placed for this constituent for a membership product with a subscription benefit that has audit qualification information defined for the product, that audit information will be automatically added to this screen.
Here, you can add subscription audit, publication, and qualification information. You can enter information from the qualification car or other device and identify each individual item being reported.
If an order is placed for this constituent for a membership product with a subscription benefit that has audit qualification information defined for the product, that audit information will be automatically added to this screen.
 You should have a regular batch open when changing subscription qualification data in order for the system to update the Sub_Qual_Master record with the batch ID and batch date of the batch that is open.
To add subscription audit information:
1. From the Background Information task category in CRM360, click Subscription-Specific Audit Info.
The Subscription Audit Information screen displays, as shown below.
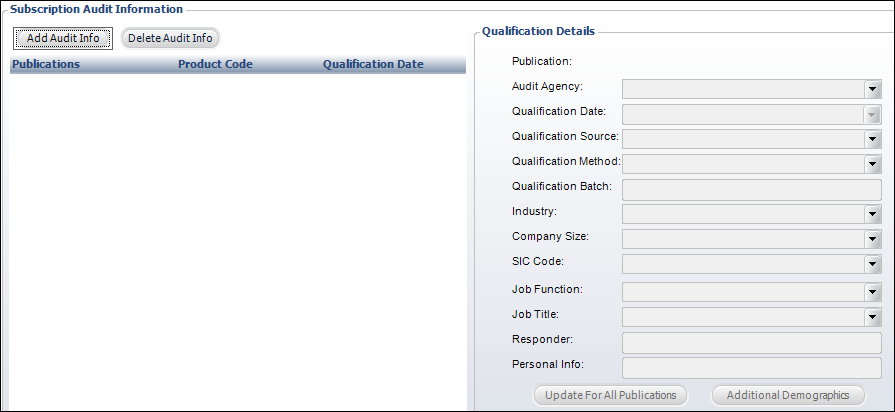
2. Click Add Audit Info.
The Subscription Product Chooser displays.
3. Search for and select the appropriate subscription product.
The Audit Agency is automatically populated.
4. By default, the Qualification Date is set to today. Change this if necessary.
5. Select the Qualification Source from the drop-down.
Values are populated based on the fixed SUB "QUALIFICATION_SOURCE" system type.
6. Select the Qualification Method from the drop-down.
Values are populated based on the fixed SUB "QUALIFICATION_METHOD" system type.
7. Enter the Qualification Batch number.
8. If necessary, select the Industry from the drop-down.
Values are populated based on the non-fixed SUB "INDUSTRY" system type.
9. Select the SIC Code from the drop-down, if necessary.
Values are populated based on the non-fixed SUB "SIC" system type.
10. Select the Company Size from the drop-down, if necessary.
Values are populated based on the non-fixed SUB "COMPANY_SIZE" system type.
11. Select the Job Function from the drop-down, if necessary.
Values are populated based on the non-fixed SUB "JOB_FUNCTION" system type.
12. Select the Job Title from the drop-down, if necessary.
Values are populated based on the non-fixed SUB "JOB_TITLE" system type.
13. Enter the Responder, if necessary.
14. Enter any Personal Info, if necessary.
15. Click Save.
Click the Main Page link to return to the overview page.
16. To update all listed publications (i.e., records available in the grid) with the qualification details of the selected record, click Update for All Publications. Doing so will update those corresponding records in SUB_QUAL_MASTER table accordingly. Additionally, the corresponding field values in the CUS_AUDIT_DEFAULT table will also be updated accordingly.
17. Add additional demographics, if necessary:
a. Click Additional Demographics.
The Additional Demographics screen displays, as shown below.
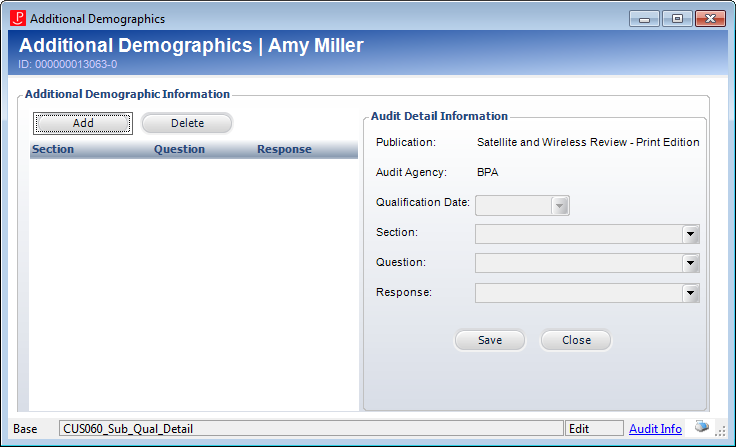
b. Click Add.
c. Select the Section from the drop-down.
d. Select the Question from the drop-down.
e. Select the Response from the drop-down.
f. Click Save.