If desired, customers can purchase miscellaneous products online through
the e-Business website. In order to make your MISC product available for
purchase via your e-Business site, the Product Status on the General
Setup screen must be “Active”, the "Web Enabled Rate" checkbox
on the Rates
and Pricing screen must be checked for at least one rate code, and
you need to set up an associated “Active” e-Business
Control.
The e-Business Links section of the task bar includes the following
screens for configuring miscellaneous products for purchase from your
e-Business site:
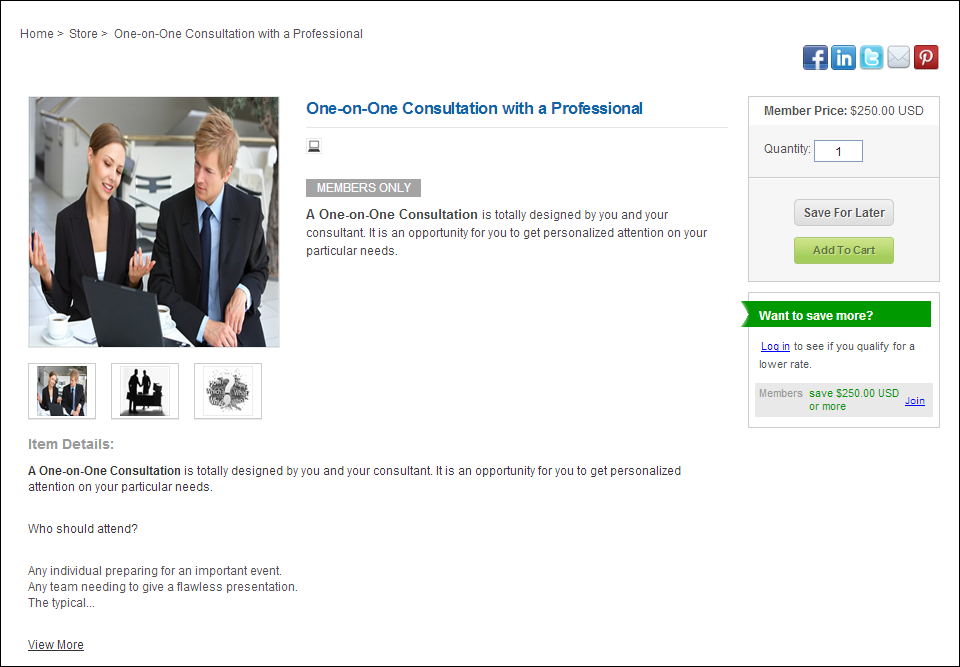
After setting up a MISC product to display on the web, your web users
will see the product detail page similar to the one displayed below.
| Screen Element |
Description |
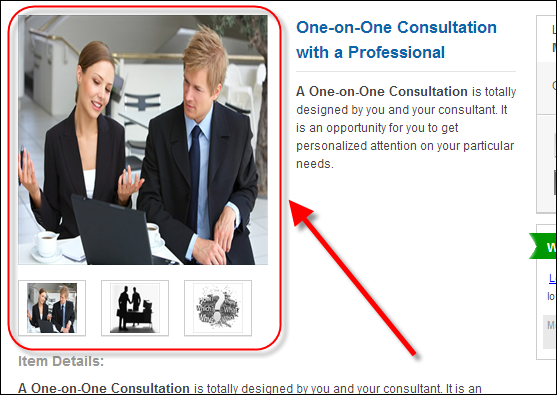
| Images |
If images have been defined for the product on the Online Store
Listing Images screen, the product images will display on the
MISC product
detail page, as shown below. For more information, please
see Defining
Miscellaneous Product Online Store Listing Images.
 |
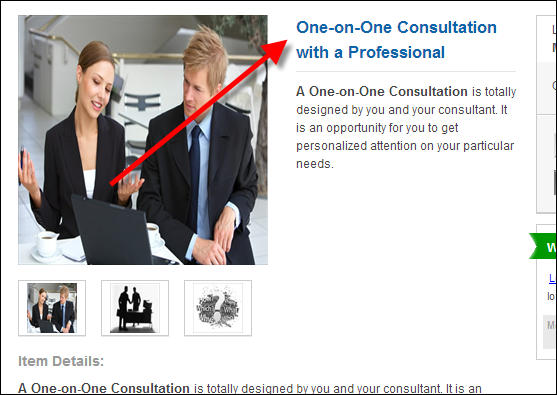
| MISC Product Title |
The product Invoice Description defined on the General
Setup screen displays as the product title on the MISC product detail
page, as shown below.
|
| Categorical Icons |
A MISC product may qualify for a number of categorical icons.
Categorical icon images are defined at the product class and product
category level in System Types and Codes. A product can only have
one product class, defined on the General
Setup screen in Product Maintenance. A product can have many
product categories, defined on the Search
Categories screen in Product Maintenance. For more information,
please see Configuring
Categorical Iconography.
 The appropriate categorical icon
defined for the product will also display on the product
listing in e-Business. The appropriate categorical icon
defined for the product will also display on the product
listing in e-Business.
|
| Product Alerts |
If the MISC product qualifies for one or more of the following,
the appropriate product alert(s) will display on the product
listing and product
detail pages:
|
| CE Credits |
As of 7.5.0, if a continuing education credit is added to
the product and the product has been defined
to display on the web, the CE ribbon will display on the top,
right of the product image in the product
listing and product
detail pages on the web, as shown below.
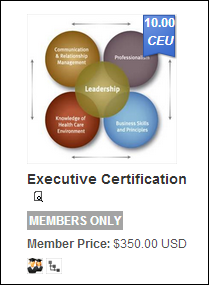
Please note that only one
CE credit type ribbon and amount will be displayed on the top,
right of the product image. The CE credit type to be displayed
will be selected based on the lowest Display
Order of the codes defined for the non-fixed TRN "CE_CREDIT_TYPE"
system type. For example, if the "CEU" code defined
for the "CE_CREDIT_TYPE" system type has a display order
of "0" and the "CLE" code has a display order
of "1", and both credits have been defined for the product,
the CEU credit will display on the top, right of the product image
on the web.
If more than one CE credit type exists with the lowest display
order (e.g., "CEU" and "CLE" both have a display
order of "0"), then the CE credit type will be selected
based on alphabetic sort in ascending order. The following code
is used to select the CE credit:
Select Top 1 App_Code.CODE + “ “ + Product_Education.CE_CREDITS
From App_Code,
Product_Education
Where App_Code.TYPE = ‘CE_CREDIT_TYPE’
And App_Code.SUBSYSTEM = ‘TRN’
And App_Code.ACTIVE_FLAG = ‘Y’
And App_Code.AVAILABLE_TO_WEB_FLAG = ‘Y’
And App_Code.CODE = Product_Education_CE.CE_CREDIT_TYPE_CODE
Order by App_Code.DISPLAY_ORDER, App_Code.CODE
As of 7.5.1, additional CE credits defined for the product will
display in the Credits section, as highlighted below.
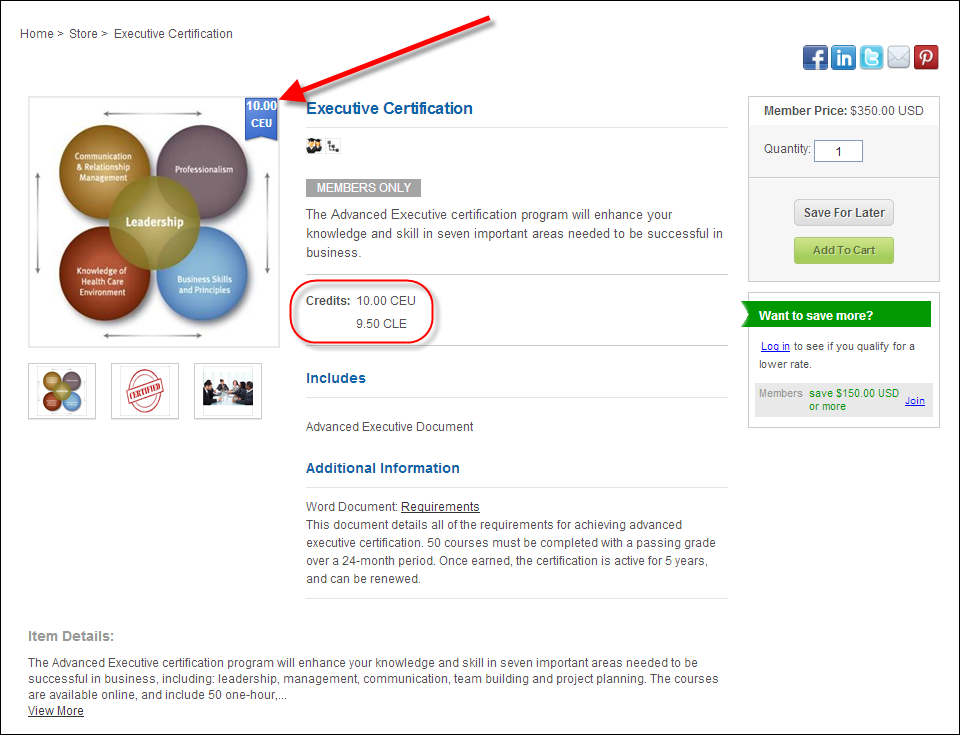
 Only codes defined for the "CE_CREDIT_TYPE"
system type with the Available
to Web checkbox will display in this section. Only codes defined for the "CE_CREDIT_TYPE"
system type with the Available
to Web checkbox will display in this section.
For more information, please see Defining
Miscellaneous Product Education Information. |
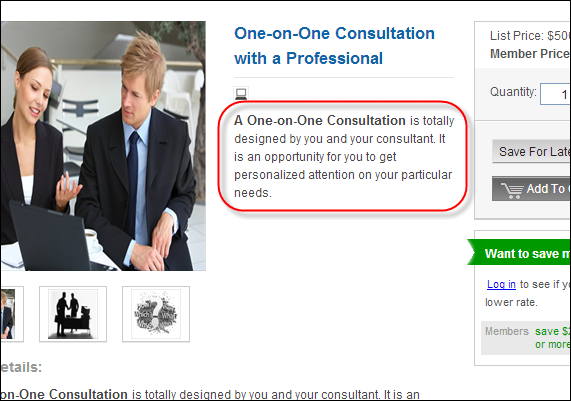
| Description |
If a brief description has been defined for the product on
the Brief Description screen, the description will display below
the product name on the MISC product
detail page, as shown below. For more information, please
see Adding
a Miscellaneous Product Brief Description.
 |
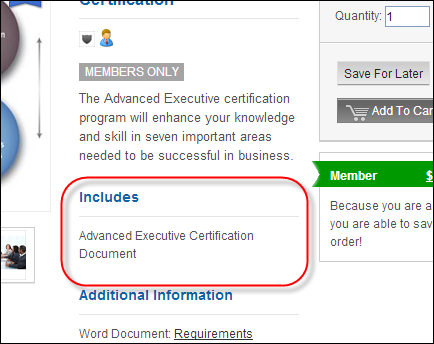
| Includes |
If any components have been defined for the product on the
Components screen, the list of components will display on the
MISC product
detail page. For more information, please see Defining
Miscellaneous Product Components.
 |
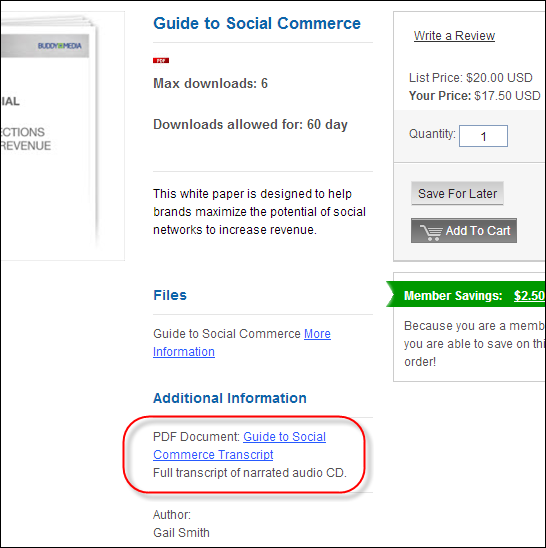
| Additional Information |
If any related files have been defined for the product on the
Related Files screen, the list of attachments will display in
the Additional Information section on the MISC product
detail page, as highlighted below. For example, if a product
has a extensive description PDF, a link to the PDF will display
in the Additional Information section. The label for this item
in the Additional Information section will be based on the "File
Type" selected for the related file, the name of file will
be based on the "Display Name", and the "Description"
of the file also displays. For more information, please see Defining
Miscellaneous Product Related Files.
 |
If any related customers have been defined for the product
on the Related Customers screen, the linked customers will display
on the MISC product
detail page. For example, if a consultant is added for a consultation
product fee, the consultant's name will display in the Additional
Information section. The label for this item in the Additional
Information section will be based on the "Relationship Type"
selected for the related customer. For more information, please
see Defining
Miscellaneous Product Related Customers.
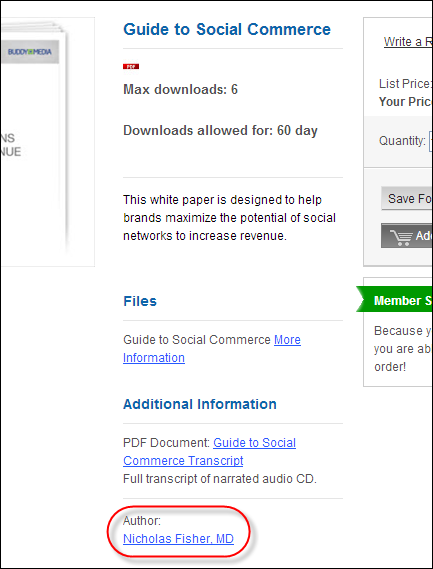
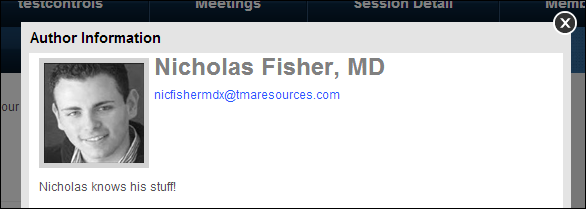
If the related customer has been defined to "Include
Profile in Web/Mobile Directory" on the Name
Details screen in CRM360®,
the customer's name will display as a hyperlink. Web users can
click the hyperlink to open a pop-up window to display more detail
about the customer, including name, contact information, and biography,
as shown below. Please note that the customer's contact information
must be marked as "Include in Web/Mobile Directory"
on the Contact
Information screen in CRM360. The title of the pop-up window
is based on the "Relationship Type" selected for the
related customer on the Related
Customers screen.
 |
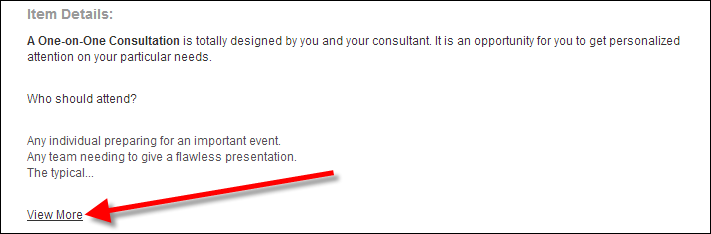
| Details |
If a long description has been defined for the product on the
Long Description screen, the description will display below the
product name on the MISC product
detail page. The control will display 300 character of the
long description and a link to "View More" if necessary,
as shown below. For more information, please see Adding
a Miscellaneous Product Long Description.
 |
Right Navigation |
| Share |
If the following options are selected when configuring the
Product Detail control, the appropriate "share" icons
will display on the MISC product detail page, as shown below.
For more information, please see Configuring
the Web Settings for the Product Detail Control.
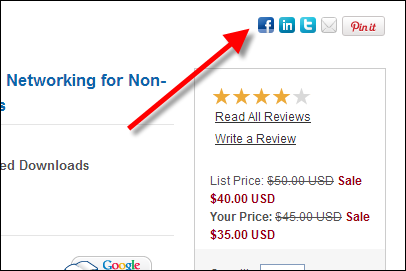 |
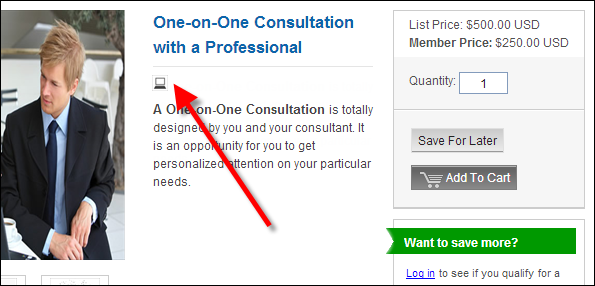
| List Price |
If a rate structure of "list" has been defined for
the product, the "List Price" will display on the MISC
product detail
page, as shown below. If the "Show as Web Sale Price?"
checkbox is checked and a value is entered in the "Strikethrough
Price" field on the Rates and Pricing screen, that price
will display as a strikethrough and the list rate will display
as a red sale price, as shown below. For more information, please
see Defining
Miscellaneous Product Rates and Pricing.

The list price defined for the
product will also display on the product
listing in e-Business. |
| Member Price |
If a rate structure of "member" has been defined
for the product, the "Member Price" will display on
the MISC product
detail page. If the web user is logged into the site and is
a member, the price will display as "Your Price", as
shown below. If the "Show as Web Sale Price?" checkbox
is checked and a value is entered in the "Strikethrough Price"
field on the Rates and Pricing screen, that price will display
as a strikethrough and the member/your rate will display as a
red sale price, as shown below. For more information, please see
Defining
Miscellaneous Product Rates and Pricing.
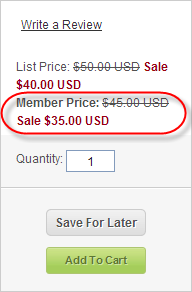
The member price defined for
the product will also display on the product
listing in e-Business. |
| Quantity |
The quantity field allows web users to enter the number of
products they want to receive, as shown below. This update edits
the Order_Detail.ORDER_QTY.
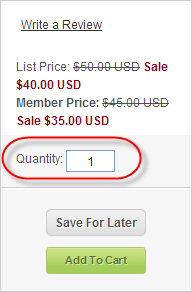
**Add info on quantity discounts |
| Add to Cart |
If the "Allow Purchase from the Web" checkbox is
checked on the eBusiness
Control screen, the "Add to Cart" button will display
on the MISC product
detail page, as shown below.
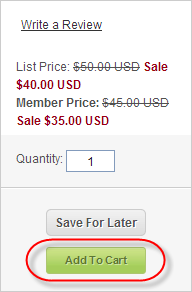 |
| Save for Later |
The "Save for Later" button on the product
detail page allows the web user to add a product to their
shopping cart in the Saved for Later section, as shown below.
 |
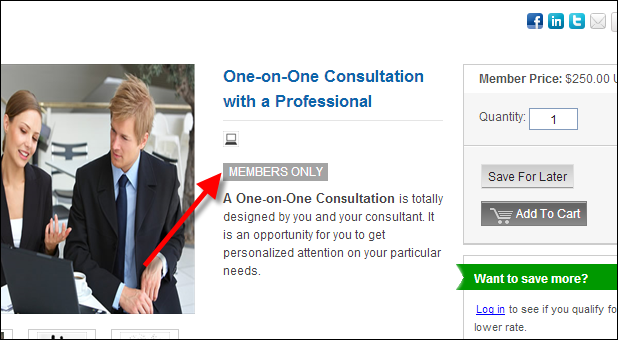
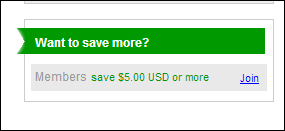
| Member savings message |
For a web user who is logged into your website but is NOT
member of your organization, the control displays how much money
he/she could save by becoming a member, as shown below. Additionally,
a link displays that redirects web users to the membership join
page. From there, the web user can proceed through the membership
join process in order to become a member of your organization.
For a web user who is NOT logged into your website, the control
displays how much money he/she could save by becoming a member
AND offers the web user the option of logging into your website
to see if he/she qualifies for a lower rate. If not, he/she is
able to click the "Join" link and proceed through the
membership join process.
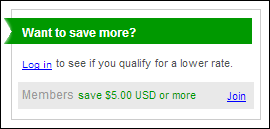
For more information, please see the Configuring
the Shopping Cart Savings Control. |