 Committee
and Employment are the only system-level types.
Committee
and Employment are the only system-level types.Using this screen, you can add, delete, or modify system relationship types and codes. Relationship types and codes are set up separately from the system types and codes. The types and codes entered display as drop-down values for Relationship fields in the Customer, Committee, and Subgroup Demographics screens.
This screen provides the functionality for a single relationship to be associated with multiple entities. For example, an individual can have an employment relationship and a personal relationship with another customer.
Committee
and Employment are the only system-level types.
To define the system relationship types and codes:
1. From the
Personify360 main toolbar, select System Admin > System
Codes > Customer Relationship Setup.
The Relationships Maintenance screen displays, as shown below.
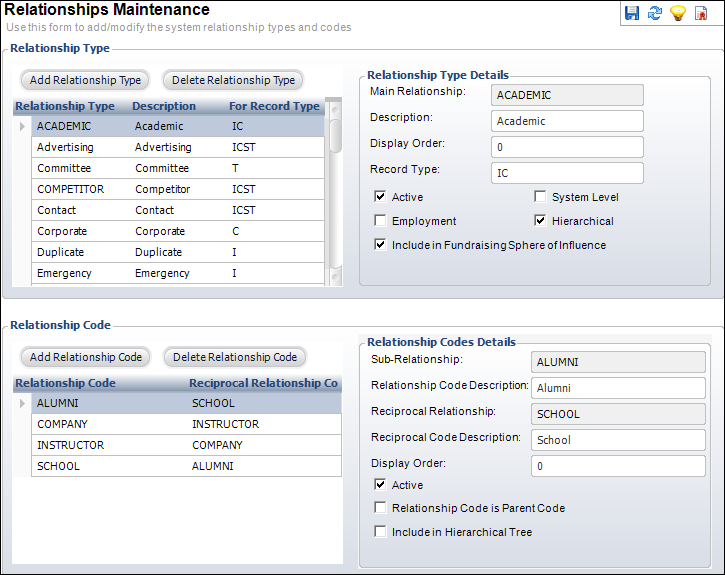
2. To add a relationship type, perform the following:
a. Click Add Relationship Type.
b. Enter the Main Relationship type.
c. Enter the Description.
d. Enter the Display Order of the relationship type.
e. Enter the Record Type this relationship type is for.
f. Select the appropriate checkboxes.
3. To add a relationship code, perform the following:
a. Highlight the appropriate relationship type and click Add Relationship Code.
b. Enter the Sub-Relationship.
c. Enter the Reciprocal Relationship.
d. Enter the Display Order of the relationship code.
e. Select the appropriate checkboxes.
f. Create an inverse relationship code for the code you just created.
For each
Relationship Code you create, you must also create an inverse of that
code in order to ensure the relationship functionality connects the records.
For example, if you create a "PARENT" Relationship Code
with "CHILD" as its Reciprocal Relationship Code, you must also
create a new "CHILD" Relationship Code with "PARENT"
as its Reciprocal Relationship Code.
4. To modify a relationship, highlight the appropriate relationship type or code and modify the information.
5. Click Save.
Screen Element |
Description |
|---|---|
Relationship Type |
|
Add Relationship Type |
Button. When clicked, a relationship type is added to the table and to Personify360. |
Delete Relationship Type |
Button. When clicked, the highlighted relationship type is deleted. |
Main Relationship |
Text box. The name of the relationship type. If there is a relationship code associated with the type, this would be the parent relationship. For example, Chapter, Contact, Emergency, or Employment. |
Description |
Text box. The description of the relationship type. |
Display Order |
Text box. The order in which the relationship type displays in the Relationship drop-down on the Demographics screen. |
Record Type |
Text box. The types of records for which this relationship type will display. For example, I (Individual), C (Company), S (Subgroup), or T (Committee). Enter I, C, S, and/or T in this field only. Do not separate by commas or spaces. The system recognizes the code and only displays the relationship type for the corresponding Demographics screen. |
Active |
Checkbox. When checked, indicates the relationship type is active. If the relationship type is active, it will display as an option for the Record Type entered. |
Employment |
Checkbox. When checked, indicates membership benefits exist from the parent organization (employer) to individuals (employees) using the supporting Rate Structure setup. This checkbox is automatically selected for relationship types of “Employment.” |
System Level |
Checkbox. When checked, indicates the relationship type was included with base and was not created by the customer. |
Hierarchical |
Checkbox. When checked, the records with both Parent and Subsidiary relationships will display Relationship drop-downs. This allows the relationships set up with hierarchies to display appropriately.
|
Include in Fundraising Sphere of Influence |
Checkbox. When checked, this relationship will be included in the constituent's sphere of influence. |
Relationship Code |
|
Add Relationship Code |
Button. When clicked, a relationship code is added to the table and to Personify360. |
Delete Relationship Code |
Button. When clicked, the highlighted relationship code is deleted. |
Sub-Relationship |
Text box. The name of the relationship code within the relationship type. |
Reciprocal Relationship |
Text box. This is the child relationship to the relationship type. The value entered here will display in the Reciprocal drop-down on the Demographics screen. |
Display Order |
Text box. The order in which the relationship code displays in the Relationship drop-down on the Demographics screen. |
Active |
Checkbox. When checked, indicates the relationship code is active. |
Relationship Code is Parent Code |
Checkbox. When checked, the relationship code is considered the parent code within a set of relationship/reciprocal codes that are used to generate a hierarchical relationship tree. This value will be copied to the relationship records from the CUS_Relationship_Code setup records.
|
Include in Hierarchical Tree |
Checkbox. When checked, indicates the relationship type will be displayed in the hierarchical relationship tree screen. |