 This functionality should only be used by the Finance department. Personify recommends you set up security for this screen. For more information on creating an advanced adjustment, please see Creating an Advanced Adjustment.
On the Advanced Adjustments screen, you can define advanced criteria for an order line item price adjustment, such as selecting to adjust a specific revenue or receivable account. A Journal Entry (Type J) transaction is created for adjustments to the revenue account. A Write-Off (Type 5) transaction is created for adjustments to the receivable account.
This functionality should only be used by the Finance department. Personify recommends you set up security for this screen. For more information on creating an advanced adjustment, please see Creating an Advanced Adjustment.
The advanced adjustments functionality is used if you accidentally charge to the wrong revenue account or to refund a cancellation fee. To refund a cancellation fee, debit the cancellation account and reverse the debit/credit memo (adjust receivable account). If revenue recognition is “On Invoice,” you can change the revenue account.
If revenue can still be recognized (the order is active and not cancelled), then you cannot perform a revenue adjustment.
Advanced adjustments are only needed on cancelled orders because if the order is active, you have more options without using this screen (such as writing off a balance or adjusting a price). Only perform an advanced adjustment when the order has a $0 balance for Accounts Receivable (AR).
To create an advanced adjustment:
1. Select the appropriate line item
2. On the Price Adjustments screen, click the Advanced Adjustment button.
The Advanced Adjustments screen displays, as shown below.
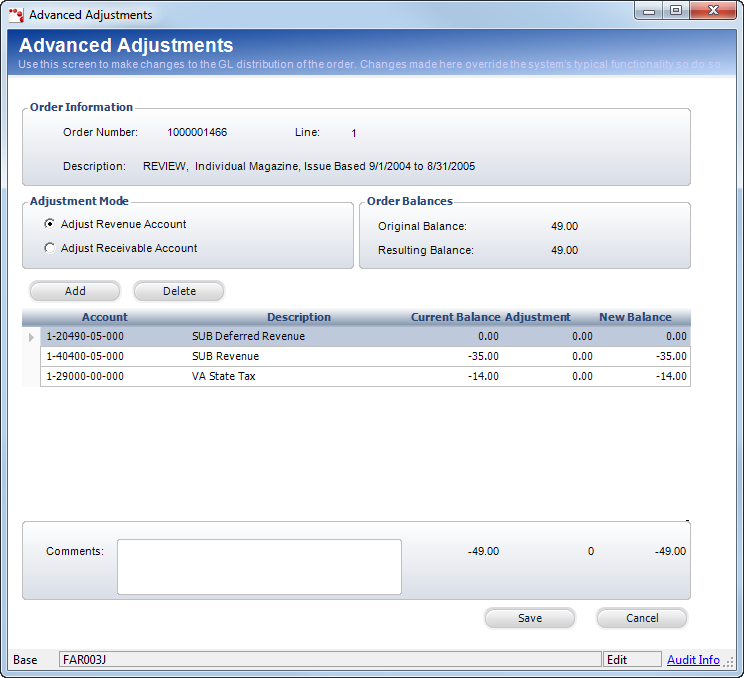
3. Select the appropriate Adjustment Mode radio button:
· Adjust Revenue Account – If an adjustment is made to this account, Journal Entries for transaction type and registration revenue are created. The credit amount must equal the debit amount for a revenue account adjustment.
· Adjust Receivable Account – If an adjustment is made to this account, a write-off transaction type and a Journal Entry for the registration revenue are created.
4. Click Add.
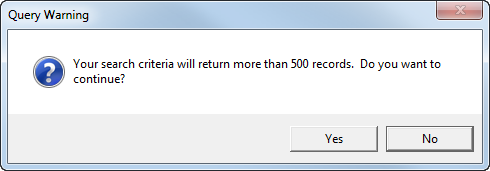
The GL Account Chooser displays. Please note that if the system contains more than 500 accounts, the following message will display. Click Yes to continue.
5. Search for and select the appropriate account.
6. Click inside the Adjustment table cell and enter the adjustment amount.
The New Balance calculates automatically.
7. Enter Comments related to the adjustment.
Comments are required for this screen.
8. Click Save.