 For this example the screen being created will call upon the APP140 screen.
1. Question: Why can I not see the taskbar?
Answer: The taskbar that is visible when the application runs is screen specific and must be configured for each screen.
· If you want to see the taskbar for the Form, highlight the form and click on the Taskbar property.
· If you want to see the taskbar for the Search page, highlight the Search page (not the tab, but the Search page itself) and click on the Taskbar property.
· If you want to see the taskbar for the Detail page(s), highlight the specific Detail page (not the tab, but the Detail page itself) for which you want to see the taskbar and click on the Taskbar property.
· There is also now a tool within the Designer that shows you which control a given taskbar is attached to.
2. Question: How do I call a specific page from the taskbar?
Answer: Within the taskbar control, add a task and set the command property to the name of the page in the page group.
For example, if the page is called “AdvertisingParameters,” the command would be:
cmd://Form/ShowControl?Name=AdvertisingParameters
3. Question: How do I show a data field in the title bar?
The title bar is usually set at the form level to show the name of the form. If you want to display something at the detail page level:
· Highlight the Detail page and select the Titlebar property.
· In the text for the Titlebar property, enter “{}” to surround the property name.
For example:
Type Detail for {Description}
When run, this will return (for Type = CUS_CLASS): Type Detail for Customer Class in the title bar.
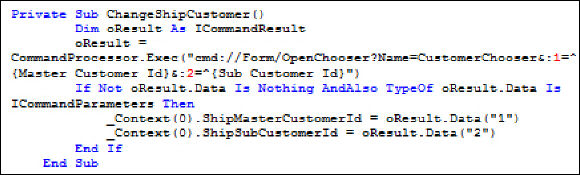
4. Question: How do I create a command for a hyperlink to call the AccountChooser and then return an account to a text box?
Answer: This command line will call the Account Chooser dialog, which looks at the FGL_Account_Master table. It also returns the Account back into the text property of the “TextText1” control:
cmd://Form/OpenChooser?Name=AccountChooser&:TextBox3=^{Account}
To limit the accounts in the chooser to only show Revenue and Liability accounts:
cmd://Form/OpenChooser?Name=AccountChooser&!AccountClassCode=R,L&:TextBox3=^{Account}
To receive a different list of accounts, add one more parameter. For example:
cmd://Form/OpenChooser?Name=AccountChooser&!Account=Revenue&:TextBox1=^{ReceivableAccount}
This pulls the AR Revenue account pairs into the chooser and will bring back the Receivable Account into the txtText1.
There are various other fields that can also be returned (Deferred Account = {DeferredAccount}, Revenue Account = {RevenueAccount}, etc.)
5. Question: How do I chain commands?
Answer: To create a screen that will call another screen automatically upon save:
For this example the screen being created will call upon the APP140 screen.
a. Create a form in the designer.
b. Reference the Customer collection in the search control.
· Search by LastName, City, etc.
c. Create fields on the detail page.
d. Add a button to the detail page.
· In the properties for the button, click on command and select “app” and “chaincommand.”
· Add a “?” to the end, making it a command.
cmd://App/ChainCommand?1 = cmd://Form/Save&2=cmd://MainOpenDialog?Name=APP140
The command builder currently only builds a single command, but you can manually create the rest using the same format.
6. Question: How do I pass parameters from one screen to another?
Answer: To save a form and pass a parameter from ORD001 to APP140:
cmd://App/ChainComand?1=cmd://Form/Save&2=cmd://Main/OpenDialog?Name=APP140^&To={ShipToCustomer.PrimaryEmailAddress}^&Subject=Order{OrderNumber}Shipped!
7. Question: How do I pass a key field from one form to another?
Answer: To pass the order number to a screen where the order number is a parameter:
cmd://Main/OpenView?Name=Far004&Key={OrderNumber}
To return a value from a chooser:
cmd://Form/OpenChooser?Name=ListCodeCooser&:txtOMListCode=^{ListCode}
Where: “ ^{ListCode}” is the name of the property to be returned from the chooser and “txtOMListCode” is the control on the form from which the chooser is launched and to which the property from the chooser is returned.
To return a value from a chooser through code-behind:
8. Question: How can I show data without putting it into a text box?
Answer: In Personify360, text boxes are used when input is possible. To only show the data and not allow input, use the Label control and bind it to the data field you want to show. The CaptionLabel describes the data field and is not the data field itself.
9. Question: How do I call the Customer Speed form to create a subgroup?
Answer: The Customer Speed form is called with a parameter. The command to open the form to create a subgroup is:
cmd://Main/OpenDialog?Name=CUS001SF&RecordType=S
10. Question: How do I change the length of time the “Save” message appears?
Answer: There is now a parameter called DisplayTimeout, which can be specified in seconds, Personify recommends leaving this at its default value.
You should not use this parameter in code behind/commands unless there is a specific scenario that requires this.
11. Question: How do I open a browser with parameters that are data elements?
Answer: This example opens Google and searches for the particular customer’s label name. You would specify this command in the command parameter of a button or link:
http://www.google.com/search?hl=en&q=[{LabelName}]
12. Question: How do I refresh data from a screen?
Answer: To add this functionality to a screen, you need to call the ResetCollection Command:
<LinkCommand=”cmd://Form/ResetCollection”Text=”Refresh”ImageKey=””></Link>
You can also call it programmatically by invoking the ResetCollection method on BOC.
13. Question: How do I configure the Product Chooser?
Answer: There is an XML file in your “.../Config/” folder called ProductChooserSetup.xml. This is where you set up the different subsystems based on a specified filter. You can also change what is displayed in the Chooser. For example, if the Chooser only displays the ShortName, but you want to display another column in the product table you can.
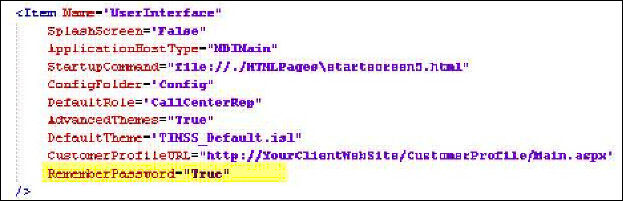
14. Question: How do I remove the “Remember Me” on Login?
Answer: Some organizations like the “Remember Me” function, while others see it as a security risk. This is how you can change it for your implementation:
15. Question: How do I control where the Quick Create appears in the taskbar?
Answer: On the detail page level you can’t control where the Quick Create falls on the taskbar. The solution is to define the first Quick Create at the Search Page level rather than the form level and then redefine it at the Detail Page level, but give it a different name (e.g., QuickCreate2). You can then put it wherever you want on the list.
16. Question: How do I add scroll bars to grids on either search screens or detail pages?
Answer:
a. Open the form in the designer and highlight the grid (e.g. Grid1).
b. Change the AutoFit property to “None”.
c. Save the form and reopen it.
If the columns do not all fit in the space of the grid, a horizontal scroll bar will appear.
17. Question: When many columns are available in a Generic Chooser, how do I give more room for the result set?
a. Open the Generic Chooser or GenericChooserSQL in the designer.
b. Click and drag the side of the screen to make it wider.
c. Set focus to the underlying Group Boxes and set Anchor to “Left, Right, Top”.
d. Set focus to the grid and make it wider.
e. Set Anchor to “Left, Right, Top”.
f. Optionally, set the AutoFit property to “None” if you want scroll bars to appear.
g. Save the form.
18. Question: Can I replace the Personify360 logo with my organization’s logo?
Answer: Yes, you can replace the standard banner logo’s with your organization’s logo.
To replace the Personify360 logo with your organization’s logo, you simply need to put JPG files (with the exact specifications listed below) in the same folder as the executable application.
To replace Personify360’s Application Servers Selection screen graphic:
a. Create a 288 x 87 (recommended) JPG file of your organization’s logo.
b. Save the file as “choose_applicationserver_logo.jpg” in the same folder as the executable application.
To replace Personify360’s Automatic Updates window graphic:
a. Create a 584 x 89 (recommended) JPG file of your organization’s logo.
b. Save the file as “automaticupdates_logo_top.jpg” in the same folder as the executable application.
To replace the Personify360 Splash Screen graphic:
a. Create a 450 x 250 (recommended) JPG file of your organization’s logo.
b. Save the file as “personify_splashscreen.jpg” in the same folder as the executable application.
It is important that you name the JPG files exactly as described below. The application looks for the exact file name when replacing the graphics.
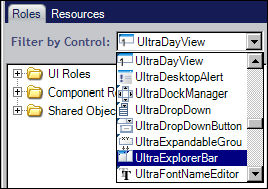
19. Question: How do I replace the Personify360 logo on the taskbar with my organization’s logo?
Answer: You can replace your organization’s logo in the Personify360 taskbar by using the Visual Style Designer.
To replace the Personify360 logo on the taskbar:
a. Make a copy of the file “TIMSS.Default.isl”.
b. In the Personify360 application, select Tools > Visual Style Designer from the menu bar.
c. Click Load.
d. Select the file you copied in Step 1 (TIMSS.Default.isl).
e. Select “Ultra Explorer Bar” from the Filter By Control drop-down.
f. Expand UI Roles.

g. Expand Base.

h. Expand ControlArea.
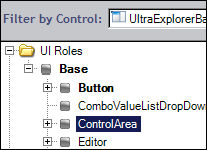
i. Select ExplorerBarControlArea.

The “Settings for ‘ExplorerBarControlArea’” window displays.
j. From the “Settings for ‘ExplorerBarControlArea’” window, click the Image drop-down and select File.

k. Navigate to the background image you want to use for the taskbar.
l. Save your changes and close the Visual Style Designer.
20. Question: How do I add my new user-defined columns on a screen using the Application Designer?
Answer: To use a user-defined column on a screen:
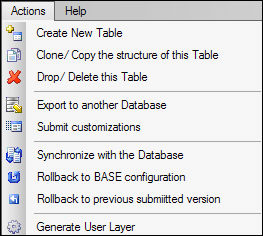
a. After creating your user-defined column, select Submit customizations from either the Actions menu, the toolbar, or by right-clicking the desired table from Table Views.
b. Once submission is complete, an informational window appears with details concerning the temporary location of your customization compilation.
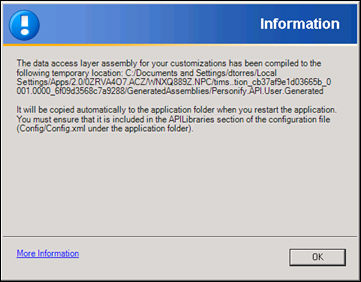
The DLL name is put in a temporary folder, as it cannot be added to Personify360 since the application is already running. However, it is automatically added to the Personify folder on your computer the next time you restart Personify360. The Config.xml file mentioned in the information box shown above cannot contain the DLL file.
If you open the Config.xml file, there is a change that must be made manually. By default, the Config.xml states:
<Section Name="APILibraries">
<Item Name="TIMSS.API.Base" Layer="Base" Type="Custom" RootNamespace="TIMSS.API.Base" FileName="TIMSS.API.Base.dll" />
<Item Name="TIMSS.API.Generated" Layer="Base" Type="Generated" RootNamespace="TIMSS.API.Generated" FileName="TIMSS.API.Generated.dll" />
<Item Name="TIMSS.API.Core" Layer="Core" Type="Custom" RootNamespace="TIMSS.API.Core" FileName="TIMSS.API.Core.dll" />
</Section>
You must add a new line so that the Config.xml reads as follows:
<Section Name="APILibraries">
<Item Name="TIMSS.API.User.Generated" Layer="User" Type="Generated" RootNamespace="TIMSS.API.User" FileName="Personify.API.User.Generated.dll" />
<Item Name="TIMSS.API.Base" Layer="Base" Type="Custom" RootNamespace="TIMSS.API.Base" FileName="TIMSS.API.Base.dll" />
<Item Name="TIMSS.API.Generated" Layer="Base" Type="Generated" RootNamespace="TIMSS.API.Generated" FileName="TIMSS.API.Generated.dll" />
<Item Name="TIMSS.API.Core" Layer="Core" Type="Custom" RootNamespace="TIMSS.API.Core" FileName="TIMSS.API.Core.dll" />
</Section>
This only needs to be done for the first database customization. After that, the system adds new tables and fields to the same DLL. If you have other user-layer DLLs created for logic customizations, they should occur higher in the list than the generated user-layer.
c. Within the Application Designer, open the page to which you want to add your user-defined column.
The page must be bound to a collection containing the table you modified.
d. Drop the control to which you want to bind your user-defined column.
e. In the properties toolbar, click the “Bind To” ellipsis.
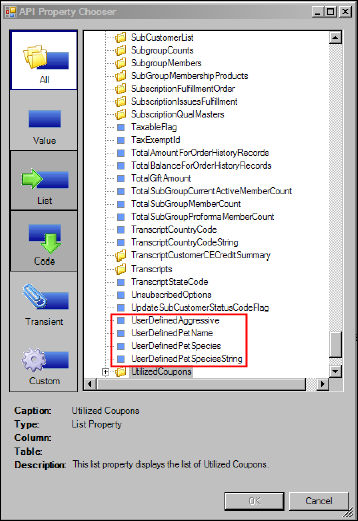
The API Properties window displays.
f. The property you created in the Database Designer will have the naming convention “UserDefined (your field’s name)”.
21. Question: How can I consume the Personify360 API and Commands inside HTML file?
Answer: Using the Application Designer, open the screen that contains the HTML you want to customize. In the Misc section, as highlighted below, you will find the following properties:

· Source
This is the URL which will be loaded in the control.
· Template
This stores the physical HTML file name to be loaded.
· TemplateAsync
This is same as "Template", but it will be loaded asynchronously for better performance.
· TemplateCommands
These are the keywords you can define and then use inside your HTML template page. You can define different functionality using code behind commands in each page based on your requirement.
Header Control XML
The HTML page is internally bound to the context of this form and can be identified by “TargetCollection”. The CommandName “EditContactInfoCommand” should be present in the HTML template file. The CommandText “cmd://Form/EditContactPhone” should be present in the code behind section of this screen. For example, the following XML is used in the CRM360® header:
<Form Name="CRM360" Size="987, 620" SearchControl="SearchPage" DetailControl="DetailPage" Text="CRM360" TargetCollection="CustomerInfo.Customers" RecordHistory="True" RecordHistoryItemTitleTemplate="{LabelName} - {UniqueKey}" HelpTopicID="3094" ContainerTabCaption="{LastFirstName} ({ScreenName})">
<Panel Name="HeaderPanel" Text="Panel1" Location="0, -10" Size="944, 133" TabIndex="18" Anchor="Top, Left, Right">
<Controls>
<WebBrowser Name="wbHeaderControl" Template="CRM360_Header" TemplateAsync="CRM360_Header_Async" Text="" BindTo="" Location="-2, -2" Size="948, 134" TabIndex="0" Dock="None" Anchor="Top, Left, Right" PropertyName="">
<TemplateCommands>
<TemplateCommand CommandName="EditContactInfoCommand" CommandText="cmd://Form/EditContactPhone">
</TemplateCommand>
</TemplateCommands>
</WebBrowser>
</Controls>
</Panel>
API Properties in the HTML
Template file will be any HTML file with an .HTML extension (e.g., CRM360_Header.HTML). If you want to use style sheet, you can create a .CSS file and include the style sheet name in HTML file. As a best practice you should keep the .CSS file with the same name as template name (e.g., CRM360_Header.CSS: <link rel="stylesheet" type="text/css" href="C:\Projects\Personify\Current\Product\CommonBin\HTMLPages\CRM360_Header.css" />).
Evaluating any API property of the context object at runtime is similar to current way you access a property in XML form or TASK file. (i.e., inside curly braces – like {LabelName}). At runtime, the web browser parser will treat any value inside curly braces {} as an API property and will try to evaluate its value using current form context. If successful, the property name is replaced with the value in HTML. If unsuccessful, it will return blank.
Personify360 Commands in the HTML
You can execute code behind commands through the HTML template. For example, to execute a command method EditAddress in code behind, you can use following syntax in HTML file:
<div class="edit"><a href="cmd://Form/EditAddress">Edit Address</a></div>
The code above will display an “Edit Address” link in the web browser and when the user clicks the link, the system will execute the EditAddress command function written inside XML form (code behind).
Additionally, any conditional text can be written in square brackets []:
<span>[( Nick Name - {CustomerInfo.Nickname})]</span>
In code above, if the {Nickname} API property returns nothing then all the text in brackets will be truncated. If some value is returned by the property, it will display the text.
Deploying Customizations
After customizing and testing the HTML files, the administrator should copy these files manually in to the “HTMLPages” folder of the Appserver (e.g., …\BackOffice\Test\HTMLPages). When the user opens the Personify360 launcher, these HTML and CSS files will be downloaded to the “HTMLPages” folder of the client machine (e.g., …\AppData\Roaming\TMA Resources Inc\Personify\DefaultEnvironment\7.5.2\HTMLPages).
22. Question: I modified some code using the Application Designer to change the color of some text, but I cannot see my changes.
Answer: Personify Enterprise uses App Styling that does not allow overriding certain control attributes programmatically. In order to override a default attribute, one must turn off the App Styling for that control, as shown below:
txtDescription.UseAppStyling = False
txtDescription.BackColor = Color.Red
txtDescription.ForeColor = Color.White