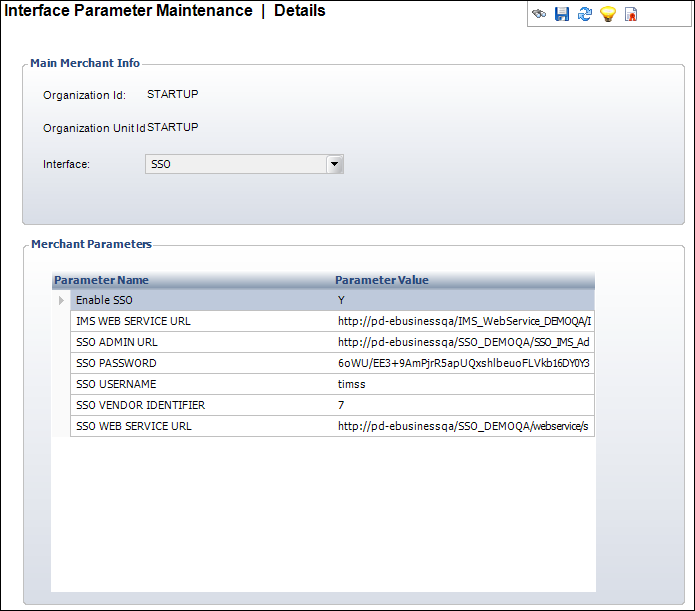
The Interface Parameter Maintenance screen displays, as shown below.
The Content Management System (CMS) you are using will determine how you set up the SSO and IMS Admin module. Refer to the following for a:
· Non-DNN Content Management System
· DNN Content Management System
This section explains the steps to set up the SSO/IMS admin portal outside DNN. These steps are mandatory if the association is not using DotNetNuke 4.0 framework.
To install the SSO/IMS Administration Web Application:
1. Open the Web.Config of the SSO site.
2. Add the following under
the Configuration section:
<connectionStrings>
<add name="SSO.ConnectionString" connectionString="Server=DNB-2004\sql2008;Database=PersonifySSO;user
id=sa;password=sql2008r2" providerName="System.Data.SqlClient"
/>
</connectionStrings>
3. Add the following entries
in the AppSettings section defining the data service location:
<add key="svcUri" value="http://localhost/PersonifyDataServicesBase/PersonifyData.svc/"/>
<add key="EnableBasicAuthentication" value="true"/>
<add key="TIMSSSearchCount" value="100" />
4. Save the web.config file.
5. Open the Personify application.
6. From the Personify
main toolbar, select System Admin >
Configure and Verify Interfaces.
The Configure and Verify Interfaces search screen displays.
7. From the SSO Interface
section, click Setup SSO Interface Parameter.
The Interface Parameter Maintenance screen displays, as shown below.
8. From the Merchant Parameters section, in the SSO Admin URL row, click inside the Parameter Value field and enter the appropriate URL.
9. Click Save.
10. From the Personify
main toolbar, select Security > User
and Group Setup > Access Point Security.
The Access Point Maintenance search screen displays.
11. In the Access-point
Code field, enter "HAS_SSO_ADMIN_RIGHTS" and click Search.
The Access Point Maintenance details search displays for the selected access
point, as shown below.
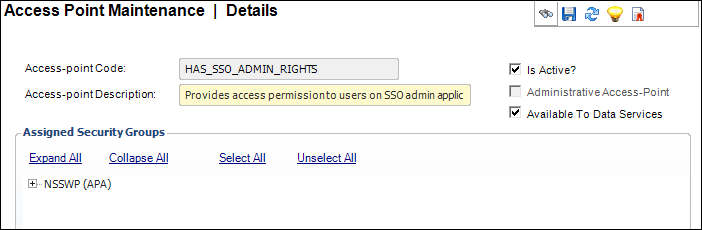
12. From the Assigned Security Groups section, select the group security group that contains the users who should be able access the SSO/IMS Admin module.
13. Click Save.
After completing the steps above, you will see the new SSO IMS Admin button on the Configure and Verify Interfaces screen. This button will launch the login page for this module. Please note that the ability to search for a customer from Personify is removed from this version as the SSO database will have all the customer records created inside it. For more information on the using SSO and IMS with the Admin module, please see Using Identity Management with Single Sign-On.
This section explains the steps to set up the SSO/IMS admin portal using the web module supplied by TMA Resources. These steps are required if the association is already working with DotNetNuke 4.0 framework or higher.
 To
perform the site setup, the user should log in as “host.” Also, the user
should have a working knowledge of DNN.
To
perform the site setup, the user should log in as “host.” Also, the user
should have a working knowledge of DNN.
If
the SSO and IMS Admin Modules for Personify 7.2.3 or below already exist
on your site, you must first delete all pages associated with it before
proceeding.
For more information on the using SSO and IMS with the Admin module, please see Using Identity Management with Single Sign-On.
To install the SSO/IMS Administration web application:
1. Copy the zip files to your computer.
If you are
currently running on DNN 5.2.3 or higher, simply copy the zip files to
your Personify e-Business root folder > Install > Module directory,
then open your Personify e-Business site, and go to www.[YourDomain]]/
[DNNWebSiteuRL]/install/install.aspx?mode=installresources. After
doing so, proceed to Step 4.
2. Go to
the Personify Admin page and browse to the zip files.
The admin page displays, as shown below.
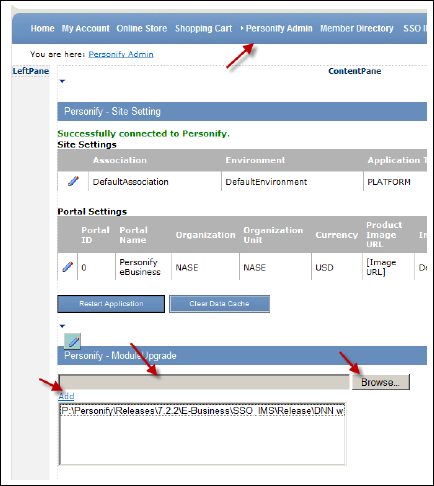
3. After selecting the zip file, click Upgrade Web Part.
4. From the Page Functions section, add a page for SSO by clicking Add.
5. Configure the Page Settings as desired and click Update.
6. Make sure you are on the new SSO page and add the Personify – SSO IMS Setup module to that page by selecting the following fields from the menu bar at the top.
a. Add New Module: selected
b. Module: Personify – SSO IMS Setup
c. Pane:
ContentPane
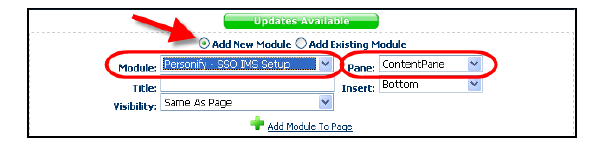
7. Click
Add Module to Page.
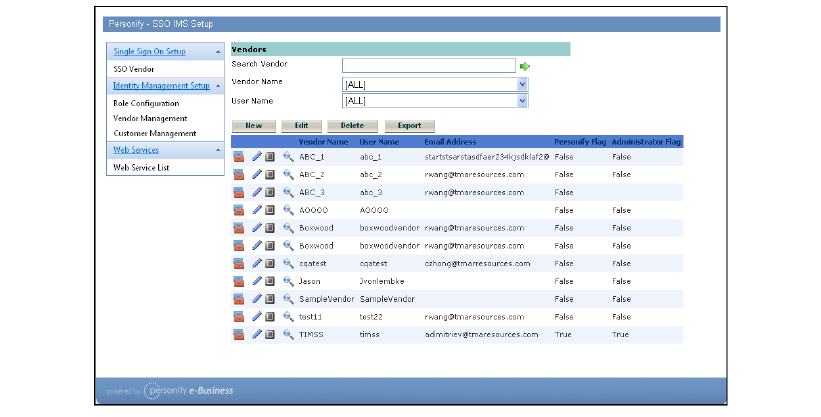
The SSO Admin page appears as below.
8. Modify the web.config file for this application.
9. Set up the connect string for the DNN database and SSO/IMS database in the <Connectionstrings> section:
<connectionStrings>
<!-- Connection String for SQL Server 2005 Express -->
<add
name="SiteSqlServer" connectionString="Server=<<Server
name>>;Database=<<DNN
Database name>>;uid=<<User
ID>>;pwd=<<Password>>;"
providerName="System.Data.SqlClient" />
<add
name="IMSConnectionString"
connectionString="Server=<<SSO/IMS
database
server>>;Database=<<SSO_IMS
Database name>>;uid=<<User
id for
SSO_IMS Db>>;pwd=<<Password>>;"
providerName="System.Data.SqlClient" />
</connectionStrings>
10. Set up the IMS configuration for your Personify version.
<IMSConfigurationSection
AssemblyName="<<TIMSS
version
specific adaptor name>>" TIMSSVersion="<<TIMSS version
number code>>"
ProviderType="TMAR.IdentityManagement.<<Version
specific adaptor>>.DataAdaptor" />
11. Set up the <appsettings> section as follows.
a. Set the email server.
<add key="EmailServer" value="pobox.tmaresources.com" />
b. Set the Personify version number. The database value is “SQL” for SQL Server. Set the query search count. This count is used if the query selects more than the set number. The records for this count will be shown first.
<add key="TIMSSVersion" value="5"/>
<add key="TIMSSDatabase" value="SQL"/>
<add key="TIMSSSearchCount" value="100"/>
12. Modify
the web.config XML file to include the condition your association wants
to filter SSO account activations done online by.
The condition must be a part of the Customer API and contain no transient
properties; make sure the condition is not overly generic to ensure it
accurately filters.