Saving an Existing Email, Meeting, or Task to Personify360 as a Contact
Tracking Record
In addition to saving an outgoing email,
meeting request, or task
to Personify360, you also have the option of creating a contact tracking
record for an incoming or existing email, meeting request, or task.
 If
the email message is deleted from Outlook after a contact tracking record
has been created, it can still be opened using the View Email link on Contact Tracking
or CRM360, as the email message is stored in the CUS_ACTIVITY_OUTLOOK_MSG.MESSAGE_FILE
column in the database. It is stored in the same manner that images are
stored in the APP_IMAGE table. Upon click the View
Email link, Personify360 will 'build' the email message from
this value along with the CUS_ACTIVITY_OUTLOOK_MSG.MESSAGE_FILE_NAME as
the name of the .msg file in the C:\Users\[USER]\AppData\Local\Temp\ folder
and will then open in the default email client installed on the computer.
If
the email message is deleted from Outlook after a contact tracking record
has been created, it can still be opened using the View Email link on Contact Tracking
or CRM360, as the email message is stored in the CUS_ACTIVITY_OUTLOOK_MSG.MESSAGE_FILE
column in the database. It is stored in the same manner that images are
stored in the APP_IMAGE table. Upon click the View
Email link, Personify360 will 'build' the email message from
this value along with the CUS_ACTIVITY_OUTLOOK_MSG.MESSAGE_FILE_NAME as
the name of the .msg file in the C:\Users\[USER]\AppData\Local\Temp\ folder
and will then open in the default email client installed on the computer.
To save an existing email, meeting, or task to Personify360:
1. Double-click an incoming/existing
email, meeting request, or task.
2. The following fields
in the Personify Actions section will default based on the settings defined
on the Personify Account
Settings screen. You can manually change any of these settings as
necessary.
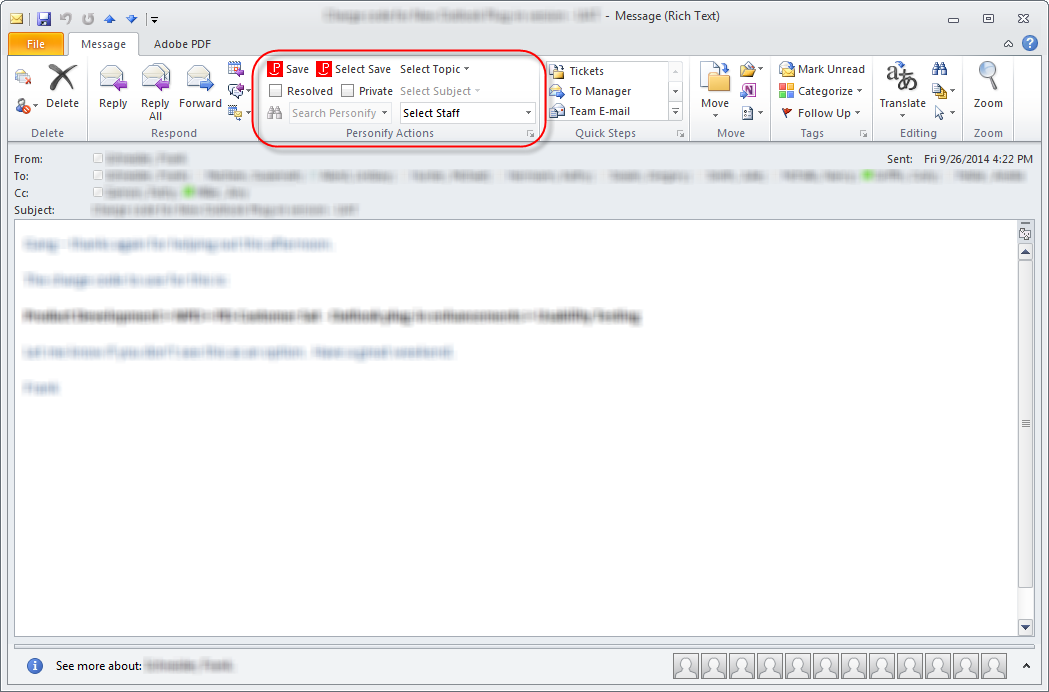
· Select
Topic
· Select
Subject
· Select
Staff
· Resolved
· Private
See table below for more information on these
options.
Because you
are viewing an existing email, meeting, or task, the Search
Personify field is disabled.
3. Click
the Save button to save the email,
meeting, or task as a contact tracking record in Personify360 based on
the settings defined on the Personify Account Settings screen.
4. Alternatively,
you can click the Select Save
button to manually select the email addresses in the email, meeting, or
task for which you want to create a contact tracking record.
This allows you to select who is assigned a contact tracking record from
the list of recipients and it reduces the risk of duplicate records being
created. This is different than the Save option, which uses the default
configurations to determine how many records get created automatically.
The Select Contacts screen displays similar to what is shown below. This
screen lists the email address in the distribution list broken out by
To, CC, BCC, and Other. The CC and/or BCC sections will not display if
the email did not contain email addresses in those respective fields.
The Other field allows you to
manually enter an additional email address (comma separated) you would
like to create a contact tracking record for, such as the originator of
an email, who may no longer be in the email’s address fields at the time
the message is saved. Depending on your settings on the General
Tab, the system will automatically check which emails will be saved
by default.
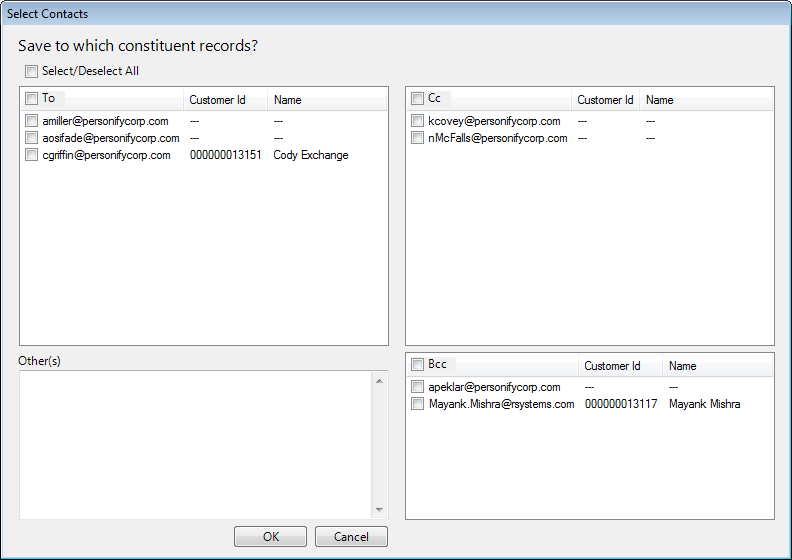
If the email
address is not found in the system, an anonymous activity record can be
created. This occurs if a selected email does not match in Personify360
but is saved anyway. The unmatched email address is inputted into the
Person Contacted field on the new activity, for reference. This applies
regardless of which field the email is on: To, CC, BCC, From, or Other.
For more information on saving contact records in Personify 360, refer
to Viewing Contact Tracking
Records and Viewing
Anonymous Contact Tracking Records.
Screen Element |
Description |
Select Topic |
Drop-down. Select the topic of the email,
meeting, or task from a predefined list of topics, which are based on the
non-fixed codes defined for the MRM "CALL_TOPIC" system type.
For more information,
please see Customers System
Types and Codes. |
Select Subject |
Drop-down. Based on the topic selected,
select the subject of the email, meeting, or task from a predefined
list of subjects, which are based
on the non-fixed subcodes defined for the MRM "CALL_TOPIC" system type.
For more information,
please see Customers System
Types and Codes. |
Select Staff |
Drop-down. Select the Personify360 staff
user to be assigned to the contact tracking record. This drop-down
lists only active staff
members in alphabetical order, making it easier and more intuitive
to assign a contact tracking record to a staff member. You can
type directly into this field or select the drop-down to see a
full list of available users. If you enter a digit into the field,
the list jumps to the first record that starts with that digit,
and as the user continues to type, the cursor moves further down
the list until the desired record is selected.
 When you try typing in the Select Staff field for
the first time, the type-ahead functionality does not work. You
must first select the drop- down and then attempt to use the type-ahead
functionality. When you try typing in the Select Staff field for
the first time, the type-ahead functionality does not work. You
must first select the drop- down and then attempt to use the type-ahead
functionality.
Only active users for the particular
Org Unit will display in the Select
Staff field. |
Resolved |
Checkbox. When checked, it indicates that
the email, meeting, or task does NOT require any attention after
it has been sent. |
Private |
Checkbox. Checking this checkbox will
mark the email, meeting, or task as “Private” in the Personify360
Actions section. If the email is saved to Personify360, checking
this checkbox will mark the contact tracking record as “Private”
in Personify360 and only you and system administrators can see
the contact tracking record in the back office. |