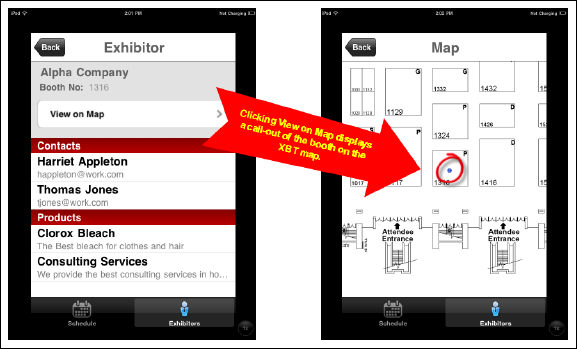
Personify360 allows your organization to link a floor map image with a specific conference that designates the booth locations for each of the exhibitors signed up for that exhibition. This means that while viewing exhibitor information either on the web or on the mobile device, your users are given the option to view the exact booth location for that exhibitor on an uploaded conference floor map, as shown below.
Linking the location of an exhibitor booth to a floor map is done through a separate file and requires an image of the floor map as a PNG file.
Please note the following general maximum specifications recommended for map images:
· 1200 x 1200 (pixels)
· Grayscale
· 0.5 MB
If the image exceeds these specifications, it is possible that it will work acceptably on most devices, but it is also possible that display and performance issues can occur.
To link exhibitor booth locations to a floor map:
1. Open your floor map PNG image file in an image editor with ruler functionality.
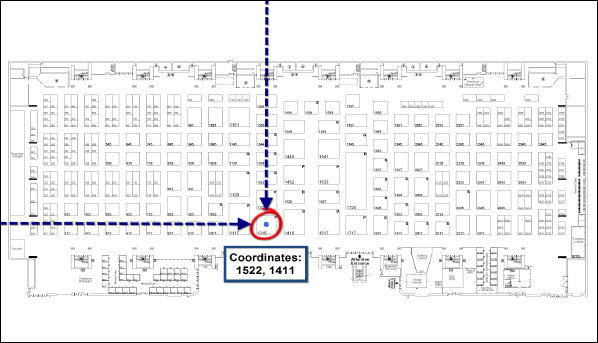
2. Determine the pixel location of the specific exhibitor booth as measured from the top-left corner of the image.
For example, the coordinates for Booth 1316 (shown above) are “1522,1411” with 1522 as the X axis location and 1411 as the Y axis location.
3. Create a file based on the template below indicating the booth number, floor map image name, and booth coordinates of each booth you want mapped.
{
"Booth 1316": {
"image": "exhibit hall.png",
"coords": [
"1522",
"1411"
]
},
"Booth 1416": {
"image": " exhibit hall.png",
"coords": [
"1677",
"1393"
]
},
"Booth 1324": {
"image": " exhibit hall.png",
"coords": [
"1522",
"1265"
]
}
}
 The booth name (highlighted in green in the example code) must match up with the booth name entered in your Personify360 back office.
4. Within the same file, repeat step 3 for all exhibitor locations you want linked to a floor map.
You can enter coordinates for more than one floor map image/conference in a single file.
5. Save and close the file.
6. Host the Booth Mapping file you just created to your web server.
Make sure to review the exhibitor floor maps extensively to ensure the correct coordinates are entered.