
The Types and Codes Maintenance screen displays.
Product facets, powered by system types and codes (highlighted below), drive what is displayed in the sort order. In order for the facet code to display on the web, you first need to web-enable it. Next, you assign the facet code to a web-enabled product class. Below describes the steps needed to modify the system types and codes.
To configure product type facets:
1. In the back office,
from the Personify360 main toolbar, select System Admin>
System Codes> System Types and Codes, as highlighted below.
The Types and Codes Maintenance screen displays.
2. From the Subsystem
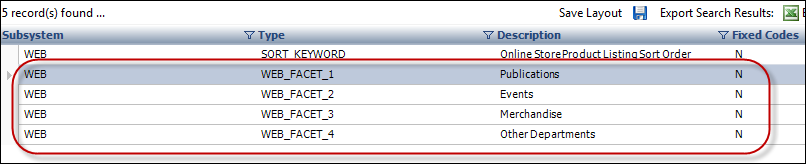
drop-down, select Web and click Search,
as highlighted below.

The following four facet records display: Publication, Events Merchandise,
and Other Departments, as highlighted below.
 When renaming
the facets, keep in mind that only SUB, INV, and DCD product classes can
be associated to WEB_FACET_1, only MTG and CRT product classes can be
associated with WEB_FACET_2, only INV product classes can be associated
with WEB_FACET_3, and only MBR, FND, CRT, MISC, and DCD product classes
can be associated with WEB_FACET_4.
When renaming
the facets, keep in mind that only SUB, INV, and DCD product classes can
be associated to WEB_FACET_1, only MTG and CRT product classes can be
associated with WEB_FACET_2, only INV product classes can be associated
with WEB_FACET_3, and only MBR, FND, CRT, MISC, and DCD product classes
can be associated with WEB_FACET_4.
3. Perform the following for each facet type:
a. Select
the facet type and click Select Type.
The Types and Codes Maintenance screen displays, as shown below.

b. In the Description field, change the name of the facet, if necessary.
When renaming
the facets, keep in mind that only SUB, INV, and DCD product classes can
be associated to WEB_FACET_1, only MTG and CRT product classes can be
associated with WEB_FACET_2, only INV product classes can be associated
with WEB_FACET_3, and only MBR, FND, CRT, MISC, and DCD product classes
can be associated with WEB_FACET_4.
c. In
the Existing Defined Codes section, select a code type (e.g., Books) and
click Edit Codes for this Type, as highlighted
below.

The Types and Codes Maintenance screen displays, as shown below.

d. Check
the Available to Web checkbox.
In order for this to display on the web, this checkbox must be enabled.
e. Check the Active checkbox.
f. Click Save.
 Each code
listed for each facet needs to be marked web enabled and active in order
to display properly on the web. If you do not want a code to display on
the web do not check the web enabled or active checkbox.
Each code
listed for each facet needs to be marked web enabled and active in order
to display properly on the web. If you do not want a code to display on
the web do not check the web enabled or active checkbox.
4. Repeat the steps above
for each facet that you want to display on the web.
Next, product class code(s) must be linked to a facet in order for the
product to display on the web.
5. Navigate to the Product Maintenance screen for the product that you want to link to a facet.
6. From the Product
Class drop-down, select a product class for the product.
For example, for the Set of Financial book set, the product class is "Book",
as highlighted below.

7. Navigate to the Types and Codes Maintenance screen.
8. Search for the appropriate
"PRODUCT_CLASS" system type and click Select
Type.
The Types and Codes Maintenance screen displays. Here is where you will
define each Product Class with a facet.
You can
add as many "Product Classes" to each web facet code as desired.
9. From the Existing Defined
Codes section, select a code and click Edit Codes for
this Type.
For example, the product class defined for the Set of Financial book set
was "Book".
10. From the Code Detail
section, enter the web facet code in the Option 2
field.
For example, for the product class "Book", you might enter the
web facet code "BOOKS" in the Option 2 field, as highlighted
below.
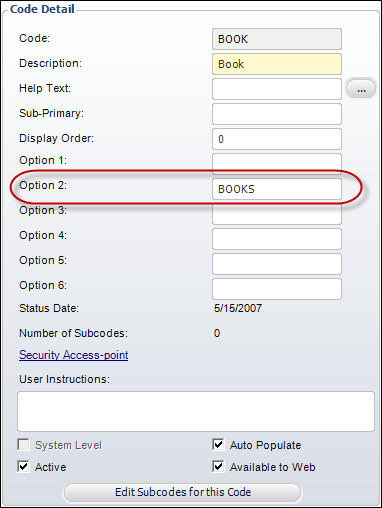
In this example, any INV products with a Product Class of "Book"
will display if the web user clicks the "Books" level under
"Publications" in the navigation menu, as shown below.

11. Click Save.
12. Repeat the above steps for each product class that you want to define with a facet.