Defining Tables to be Merged
Before you can begin the batch
merge process, you must define the tables to be merged. You must perform
this step for both the general merge process and the online merge process.
From the Duplicate Customer Related Tables (CUS101A) screen, you can
define which tables should be affected when duplicate customers are merged.
All of the customer-related tables are provided by default, but you can
add your own tables if necessary. When the merge process runs, the customer
number of child records pointing to the record to be merged changes to
point to the customer you want to retain.
 The
MERGE_FAIL_ACTION_CODE should be set to DELETE if the primary key is MASTER_CUSTOMER_ID,
SUB_CUSTOMER_ID. If the table has a surrogate key and no uniqueness
constraints, it should be set to MERGE. If the table has a
surrogate key but also has a uniqueness constraint, it should be set to
DELETE. Setting the MERGE_FAIL_ACTION_CODE to DELETE will cause duplicate
data to be deleted ONLY if it results in a primary key violation.
The
MERGE_FAIL_ACTION_CODE should be set to DELETE if the primary key is MASTER_CUSTOMER_ID,
SUB_CUSTOMER_ID. If the table has a surrogate key and no uniqueness
constraints, it should be set to MERGE. If the table has a
surrogate key but also has a uniqueness constraint, it should be set to
DELETE. Setting the MERGE_FAIL_ACTION_CODE to DELETE will cause duplicate
data to be deleted ONLY if it results in a primary key violation.
If
you have a custom table with a Surrogate Key and Unique Key on the Candidate
Key and columns to be merged are the part of Unique Key, then in order
to merge the two records using the customer merge functionality, a customization
is required on the code for CustomerDuplicateMergeTables.vb and then the
CUS595_UpdateDupCustomer_SP must be regenerated. For more information,
please contact your account specialist.
 In
order to merge user-defined tables, uncheck the Active
checkbox to force the CUS595_UpdateDupCustomer_SP stored procedure to
rebuild itself.
In
order to merge user-defined tables, uncheck the Active
checkbox to force the CUS595_UpdateDupCustomer_SP stored procedure to
rebuild itself.
To define the tables to be merged:
1. From the
toolbar, select Customers and Committees > Duplicate
Customers > Duplicate Customer Setup.
The Duplicate Customer Maintenance search screen displays.
2. Click
Tables to be Merged.
The Duplicate Customer - Related Tables search screen displays.
3. Click
Create New.
The Duplicate Customer - Related Tables screen displays, as shown below.
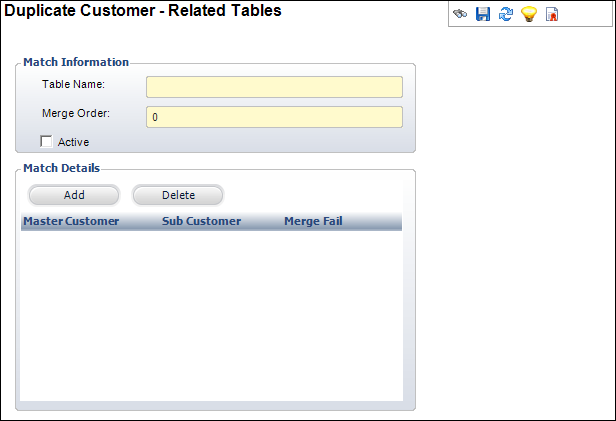
4. Enter
the Table Name and Merge
Order number.
5. Check
the Active checkbox, if applicable.
6. Click
Add to add tables for the match details.
These are the tables that the report looks at to match possible duplicates.
7. Select
the Master Customer from the cell drop-down
relating to the column in the table that has the Master Customer ID that
would be changed to the retained customer.
8. Select
the Sub Customer from the cell drop-down
relating to the column in the table that has the Sub Customer ID that
would be changed to the retained customer.
9. Select
the Merge Fail value from the cell drop-down.
10. Click
Save.
Screen Element |
Description |
Table Name |
Text box. For new records or editing,
validation should be performed against table names. |
Merge Order |
Text box. Order of the tables that are
merged. |
Active |
Checkbox. When checked, indicates the
match detail table is active and sets the X-REF field to “Y.” |
Add |
Button. When clicked, a row is added to
the table to add a match details table. |
Delete |
Button. When clicked, the highlighted
row from the table is deleted. |
Master Customer |
Cell drop-down. Displays the Master Customer
ID column. The Master Customer ID field populates based on the
columns of the Table Name. This is the column in the table that
has the Master Customer ID will be changed to the retained customer. |
Sub Customer |
Cell drop-down. Displays the Sub Customer
ID column. The Sub Customer ID field populates based on the columns
of the Table Name. This is the column in the table that has the
Sub Customer ID will be changed to the retained customer. |
Merge Fail |
Cell drop-down. Select whether to merge
or delete the record. |