Creating a New IMS Role
 As
of 7.4.1, system administrators and super users can access this screen
via the Personify back office. From the Personify main toolbar, select
System Admin > System Setup > Basic Constituent
IMS Setup. Please note that the DNN page is outside of Personify
and may take more than a few seconds to load.
As
of 7.4.1, system administrators and super users can access this screen
via the Personify back office. From the Personify main toolbar, select
System Admin > System Setup > Basic Constituent
IMS Setup. Please note that the DNN page is outside of Personify
and may take more than a few seconds to load.
To create new roles:
1. While
on the SSO IMS Setup page, under the Identity Management Setup heading
on the left, click Role Configuration.
The Role Search screen displays, as shown below.
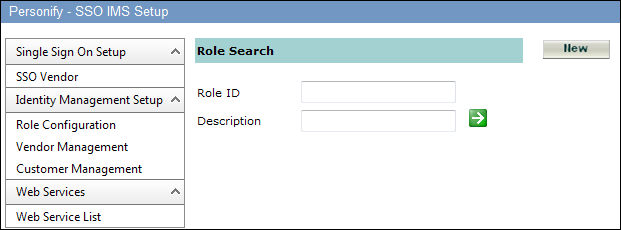
2. Click
New.
The IMS Role Configuration page displays, as shown below.
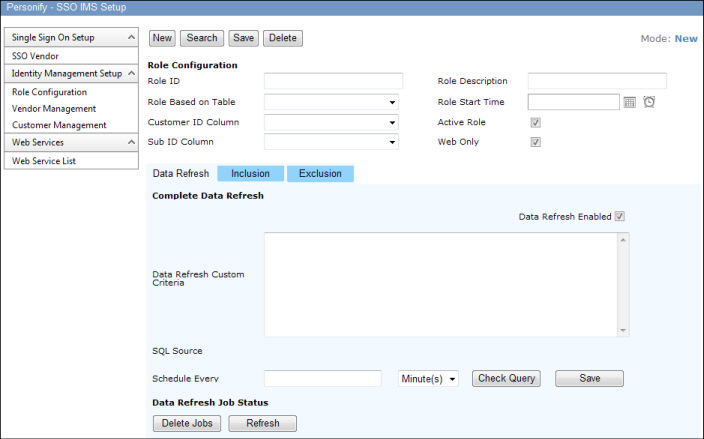
3. Enter
a Role ID.
The Role ID should be unique and can be up to 50 alphanumeric characters.
4. Enter
a Role Description of the role.
5. From the
Role Based on Table drop-down, select the table
or view used to construct the SQL script for the role. This drop-down
of the table or view is generated automatically from the Personify database.
6. The Customer ID Column drop-down populates based on
the table selected in the previous step. Select customer ID column used
to assign the Role ID.
7. The Sub ID Column drop-down populates based on the
table selected in the step 4. Select sub ID column used to assign the
Role ID.
8. Select
the Role Start Time. The date and time can be
current, in the past, or for the future. If the date is set for the future,
role execution starts from the date and time specified. For current or
past dates, there is no impact and the information is not used.
9. The Activate Role checkbox is selected by default.
The roles that are active will be executed by the Windows services.
10. Check
the Web Only checkbox if you do not want this
role to display in the back office. For more information, please see Additional IMS Back Office
Setup.
11. From the
Data Refresh tab (shown below), perform the following:
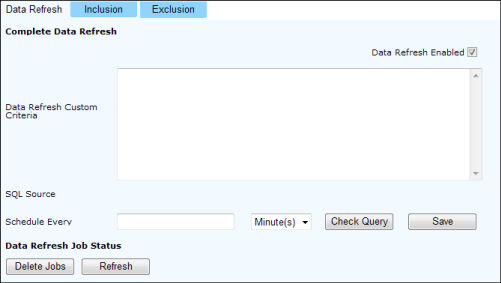
a. Select
Data Refresh Enabled checkbox to use the SQL
script in role execution.
b. Enter
any custom information for this role in the Data Refresh
Custom Criteria text box by way of a SQL query.
The SQL Source information displays as you enter the SQL Query.
c. Before
saving the role, click Check Query.
This validates the script that is generated by the application by concentrating
the “where” clause entered by administrator. The correct SQL script will
be displayed on the right-hand side of the window.
d. Set the
frequency for the role to execute in the Schedule Every field.
This frequency can be in days, hours, or minutes. The frequency time should
be greater than the “sleep” time established for the Windows service.
e. Click
Save.
The list of jobs executed appears in the Data Refresh Job Status section.
You can refresh this list at any time for a more accurate list. You can
also delete all the jobs by clicking Delete Jobs.
12. The Inclusion
criteria can be set up in the Inclusion tab. The criteria should be set
to look for the records that were added in the Personify database from
the last submission of the role. The Level for role assignment can be
set up in same way as described above.
From the Inclusion tab (shown below), perform the following:
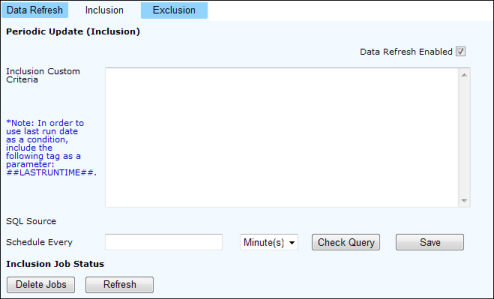
a. Select
Data Refresh Enabled checkbox to use the SQL
script in role execution.
b. Enter
any custom information for this role in the Inclusion
Custom Criteria text box by way of a SQL query.
The SQL Source information displays as you enter the SQL Query.
c. Before
saving the role, click Check Query.
This validates the script that is generated by the application by concentrating
the “where” clause entered by administrator. The correct SQL script will
be displayed on the right-hand side of the window.
d. Set the
frequency for the role to execute in the Schedule Every field.
This frequency can be in days, hours, or minutes. The frequency time should
be greater than the “sleep” time established for the Windows service.
e. Click
Save.
The list of jobs executed appears in the Inclusion Job Status section.
You can refresh this list at any time for a more accurate list. You can
also delete all the jobs by clicking Delete Jobs.
13. The Exclusion
criteria can be set up to revoke the role assignment for the customer.
For example, the role for customers should be revoked if the membership
is expired.
From the Exclusion tab (shown below), perform the following:
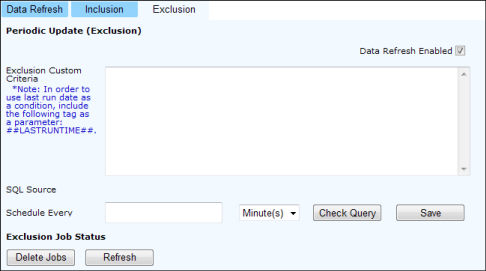
a. Select
Data Refresh Enabled checkbox to use the SQL
script in role execution.
b. Enter
any custom information for this role in the Exclusion
Custom Criteria text box by way of a SQL query.
The SQL Source information displays as you enter the SQL Query.
c. Before
saving the role, click Check Query.
This validates the script that is generated by the application by concentrating
the “where” clause entered by administrator. The correct SQL script will
be displayed on the right-hand side of the window.
d. Set the
frequency for the role to execute in the Schedule Every field.
This frequency can be in days, hours, or minutes. The frequency time should
be greater than the “sleep” time established for the Windows service.
e. Click
Save.
The list of jobs executed appears in the Inclusion Job Status section.
You can refresh this list at any time for a more accurate list. You can
also delete all the jobs by clicking Delete Jobs.
Inclusion
and Exclusion role criteria can be setup using the ##LASTRUNTIME## tag.
If used in the criteria, the records added after the last execution of
the role are selected and the role for those customers will be assigned.