The Email section displays, as highlighted below.
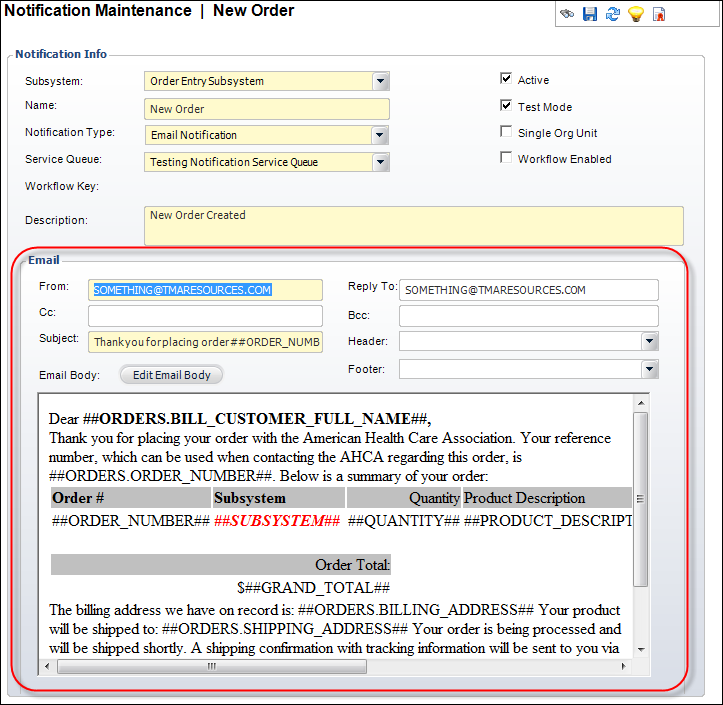
The Email screen allows you to set up the outgoing email defaults for this notification event.
To edit the email notification template:
1. On the
Notification Maintenance screen, from the General Setup task category,
click Edit Email Notification Template.
The Email section displays, as highlighted below.
2. Enter the email address this notification is From.
3. The Reply To address defaults to the address entered in the From text box. Change this, if necessary.
4. If necessary, enter the email address(es) you want a Cc or a Bcc to be sent to.
 If you would
like to send a Cc or Bcc to recipients dynamically based on data conditions
(as compared to a static list of email addresses), follow the instructions
in Creating
Notification Cc/Bcc Recipients Based on Data Conditions.
If you would
like to send a Cc or Bcc to recipients dynamically based on data conditions
(as compared to a static list of email addresses), follow the instructions
in Creating
Notification Cc/Bcc Recipients Based on Data Conditions.
5. Enter
a Subject for the email.
You can choose to add information from specific tables and columns into
the Subject by entering the data element in the following format: ##Table
Name.Column Name##.
For example, “Confirmation of Order ##ORDER_NUMBER##” generates a subject
line similar to “Confirmation of Order 10045.”
6. Select a Header from the drop-down.
7. Select a Footer from the drop-down.
8. Click
Edit Email Body.
The HTML Editor Dialog window displays. The size limit for the notification
email body is 2GB.
 The HTML Editor does NOT
support the use of the IFRAME tag.
The HTML Editor does NOT
support the use of the IFRAME tag.
9. Enter the email body information (text, graphics, etc.) as you want it to display on your outgoing notification email.
Optionally,
if you are comfortable with HTML code you can click the Code Window radio
button. This opens a text field where you can enter an HTML code string.
Personify does not recommend using any Java script when creating HTML
templates. Many email addresses will either not recognize this or quarantine
the email message as a potential virus.
You can also choose to add information from specific tables and columns
into the HTML message.
For example, if you want to display the a product code in the email.
To add a table name and column to your message:
1. Place your cursor where you want the table name and column to display.
2. From the HTML Editor
Dialog window, click Available Columns.
The Generic Chooser displays.
3. Highlight the table
name whose information you want to display in your message and click Select.
The name displays in your message.
4. Click OK.
The email displays in the Email Body section with the table name and
column name in the form of “##(Table Name.Column Name)##.
5. Click Save.
Screen Element |
Description |
|---|---|
From |
Text box. The “From” address used for this outgoing message. |
Reply To |
Text box. An address for your customers to reply to. Defaults to the “From” address. Please note that this is NOT optional. |
Cc |
Text box. An optional address that a carbon (or courtesy) copy of the email is sent to.
|
Bcc |
Text box. An optional address that a blind carbon (or courtesy) copy of the email is sent to.
|
Subject |
Text box. This is the subject of the outgoing email notification.
|
Header |
Drop-down. Displays the different headers stored in the system. Selecting one of these options adds a header to your email. |
Footer |
Drop-down. Displays the different footers stored in the system. Selecting one of these options adds a footer to your email. |
Edit Email Body |
Button. Opens the HTML Editor Dialog window where you can create your email using HTML code. The size limit for the notification email body is 2GB. |
 When adding multiple recipients
to the Cc line of a notification, do NOT add any spaces after
the semicolon, in between email addresses (e.g., email1@address.com;email2@address.com).
If there is a space after the semicolon, in between email addresses,
the notification will fail (e.g., email1@address.com; email2@address.com).
When adding multiple recipients
to the Cc line of a notification, do NOT add any spaces after
the semicolon, in between email addresses (e.g., email1@address.com;email2@address.com).
If there is a space after the semicolon, in between email addresses,
the notification will fail (e.g., email1@address.com; email2@address.com).